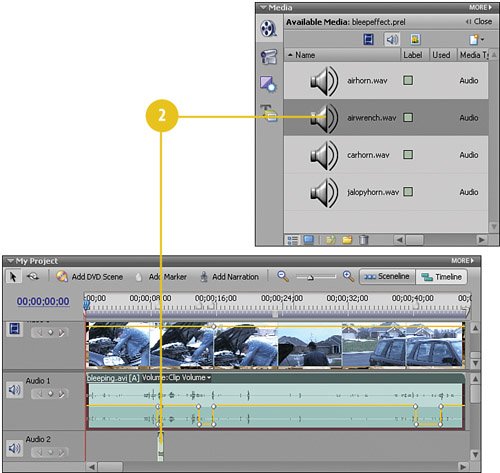
Adding Sound Effects to the Audio 2 Track


It's now a matter of adding our "blooper" sounds at each of the "silent sections" that we created using the keyframes. Fortunately, these will be easy to spot and overlay with our sound effects, thanks to the obvious "dips" we created in an earlier task in the volume yellow rubberband in the audio track.

Add a Sound Effect at Each Marker

Return to the start of the tracks in the My Project panel by pressing the Home key on your keyboard.

Drag airwrench.wav from the Media panel to the Audio 2 track and position it directly below the first "silent spot," that is, the first dip in the yellow rubberband, which starts at 00;00;08;25.

Drag jalopyhorn.wav from the Media panel to the Audio 2 track and position it directly below the second "silent spot." Notice that it doesn't quite fill the space, which would allow the "expletive deleted" to be heard (if the volume here wasn't already turned down, that is). There's a simple fix:

Drag airhorn.wav from the Media panel to the Audio 2 track and position it to the right of jalopyhorn.wav. We now have sufficient sound effect coverage for the outburst.

Drag carhorn.wav from the Media panel to the Audio 2 track below the third "silent spot."

You may have noticed that this sound effect is a bit longer than the silence we created. To adjust this, select the "tail" end of the carhorn.wav clip on Audio 2 track and trim the clip back by one second. (The length of the clip will show in the Monitor panel as 00;00;03;04).

Timesaver

Zoom in as needed for better control over the trim process. And, watch the pale yellow box that appears just to the right and below the clip as you begin to trimyou may need to pause slightly before trimming for this box to appear. It's showing you by how much you are trimming the clip. When you have reached one second and ten frames, or 00;00;01;10, you've trimmed enough. Release the mouse at this point.

Did You Know?

You can use the CTI to control the focus of the zoom. When you zoom in on the Timeline, Premiere Elements will zoom in on the currently visible area only to a point. Once you loose your focus you'll find yourself having to scroll left and right to find where you were. An easy way to avoid this is to first move the CTI to where you want to work and then zoom in. In this case, press CTRL-right arrow until the CTI is at the final "silent space." Then, use either the shortcut key (the equals sign, =, on the keyboard) or the Zoom In button (the magnifying glass with the plus sign) to zoom in. Premiere Elements will continue to focus in on just that area by the CTI. A much better zooming experience when you're in control, isn't it? Note that you may need to tweak your view of the Timeline a bit using the left and right arrows to get it exactly the way you want it.


Hollywood Special Effects with Adobe Premiere Elements 3
ISBN: 0789736128
EAN: 2147483647
Year: 2006
Pages: 274
Authors: Carl Plumer

flylib.com © 2008-2017.
If you may any questions please contact us: flylib@qtcs.net