Removing the Audio at Each "Offensive Moment" In this task, we use keyframes and the yellow volume rubberband on the audio track in the Timeline to lower the volume where the "bad language" occurs. This is to ensure that, after we have applied the sound effects, none of the "offensive" words can accidentally be heard behind (or in video editing terms, under) the chosen sound effect. We have already placed markers at each of the four points in the clip where "bad words" can be found. We will now add a keyframe at the beginning and end of each word or phrase. Lower the Sound for Each of the "Offensive Moments"  Each marker you placed already identifies the beginning of the audio we want to remove, so jump to the first marker by first pressing the Home key on your keyboard to return the CTI to the front (also known as the "head") of the clip. Each marker you placed already identifies the beginning of the audio we want to remove, so jump to the first marker by first pressing the Home key on your keyboard to return the CTI to the front (also known as the "head") of the clip.
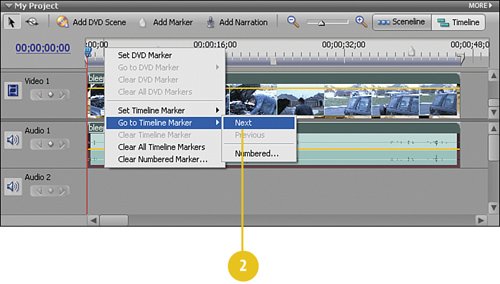
 Right-click in the timeruler and from the contextual menu, select Go To Timeline Marker, Next. Right-click in the timeruler and from the contextual menu, select Go To Timeline Marker, Next.
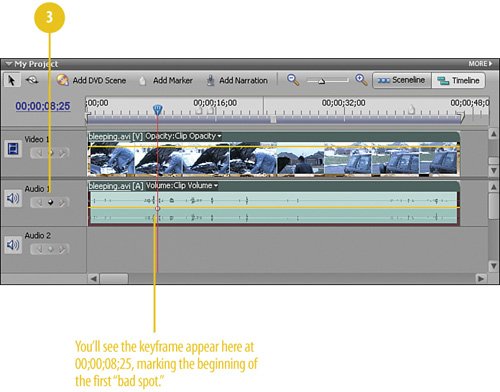
  At the marker (at 00;00;08;25), you can add a keyframe by clicking the Add/Remove Keyframe button. At the marker (at 00;00;08;25), you can add a keyframe by clicking the Add/Remove Keyframe button.
 Tip The clip must be selected or the Add/Remove Keyframe button won't work. This makes sense because without a clip selected, the keyframe won't know which clip on a track you want to mark.  Repeat the keyframe procedure again at the end of this "bleepable" phrase, by first moving the CTI to the end of the phrase (use your right-arrow key). The phrase ends at about 00;00;09;05. Repeat the keyframe procedure again at the end of this "bleepable" phrase, by first moving the CTI to the end of the phrase (use your right-arrow key). The phrase ends at about 00;00;09;05.
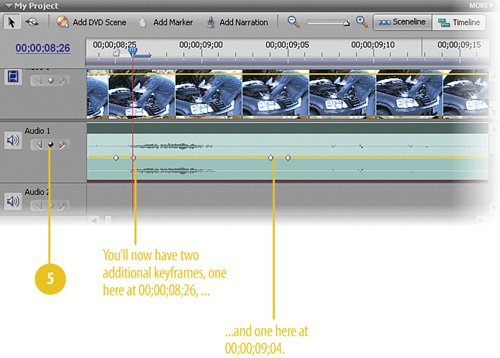
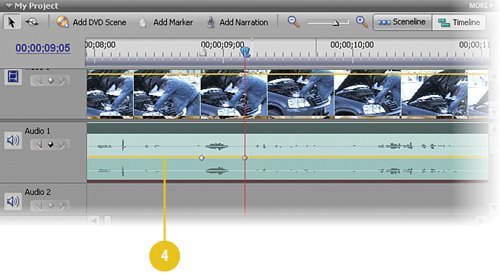  We don't want to remove the audio for the whole clip, just the single second between these two keyframes. To do this, we will need to add two more keyframes, one right next to the start keyframe and one right next to the end keyframe. Add these keyframes now. We don't want to remove the audio for the whole clip, just the single second between these two keyframes. To do this, we will need to add two more keyframes, one right next to the start keyframe and one right next to the end keyframe. Add these keyframes now.
 Timesaver Zoom in sufficiently to see what you're doing, otherwise you'll be looking at just a clump of keyframes on the screen.  Drag the two keyframes you just added, one at a time, so that they are each down below the audio waveform at the bottom of the audio clip on the Audio 1 track, as shown in the illustration. This will silence this portion of the clip. Drag the two keyframes you just added, one at a time, so that they are each down below the audio waveform at the bottom of the audio clip on the Audio 1 track, as shown in the illustration. This will silence this portion of the clip.
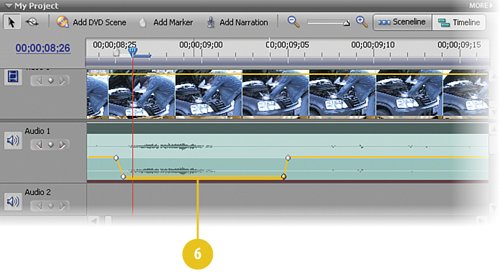  Move to the next marker by pressing CTRL-right arrow on your keyboard. Move to the next marker by pressing CTRL-right arrow on your keyboard.
Timesaver You may want to zoom out while you navigate along the Timeline, then zoom back in while you add the keyframes.  When you're at the marker (at 00;00;13;25) add a keyframe by clicking the Add/Remove Keyframe button. When you're at the marker (at 00;00;13;25) add a keyframe by clicking the Add/Remove Keyframe button.
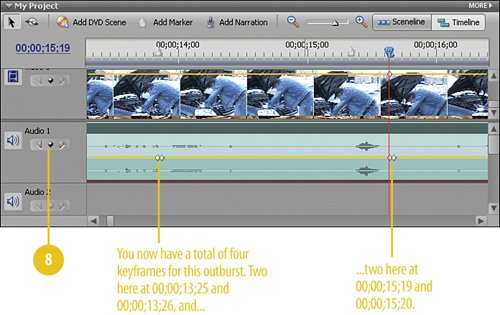  The next outbreak is close (00;00;15;10), so we'll encompass that one at the same time. Move to the third marker and then use the right arrow on your keyboard to move to the end of the "outrage" at 00;00;15;20. The next outbreak is close (00;00;15;10), so we'll encompass that one at the same time. Move to the third marker and then use the right arrow on your keyboard to move to the end of the "outrage" at 00;00;15;20.
 As before, so that we can mute these two outbursts as well, we need to add two more markers, one next to the start keyframe and one next to the end keyframe. As before, so that we can mute these two outbursts as well, we need to add two more markers, one next to the start keyframe and one next to the end keyframe.
 As you did for the first audio outrage, drag the two markers you just added, one at a time, to create that tell-tale dip in the yellow rubber band, as shown in the illustration. Doing so silences this part of the clip. As you did for the first audio outrage, drag the two markers you just added, one at a time, to create that tell-tale dip in the yellow rubber band, as shown in the illustration. Doing so silences this part of the clip.
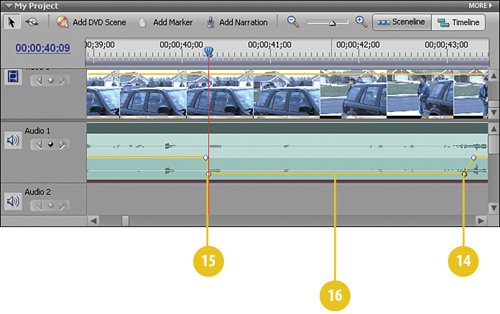
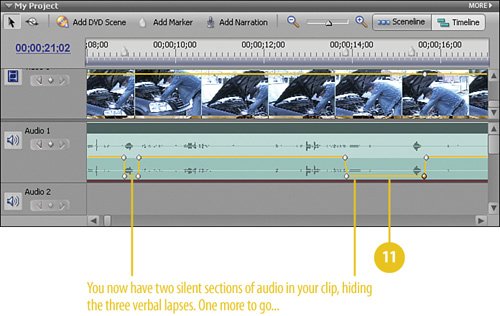  Continue to the final keyframe (CTRL-right arrow) and add a keyframe there. Scrub to the end of this outrageous language at 00;00;40;08). Continue to the final keyframe (CTRL-right arrow) and add a keyframe there. Scrub to the end of this outrageous language at 00;00;40;08).
Timesaver Remember to zoom back out while you navigate along the Timeline.  Move to the end of this final outbreak of swearing, at 00;00;43;09. Move to the end of this final outbreak of swearing, at 00;00;43;09.
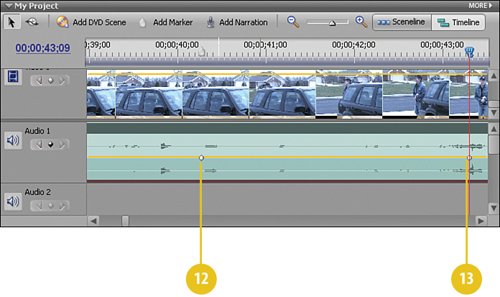  Click the Add/Remove Keyframe button at 00;00;43;08 to add another keyframe. Click the Add/Remove Keyframe button at 00;00;43;08 to add another keyframe.
 Click the Add/Remove Keyframe button at 00;00;40;09 to add the final keyframe. Click the Add/Remove Keyframe button at 00;00;40;09 to add the final keyframe.
Timesaver Again, zoom in as needed when working with keyframes.  Finally, as you did for the previous two audio sections, drag the two keyframes you added, one at a time, to silence this part of the clip. Finally, as you did for the previous two audio sections, drag the two keyframes you added, one at a time, to silence this part of the clip.
Did You Know? Arrows are a quick way to jump to a marker. The easiest way to move from marker to marker along the Timeline is to use the arrow keys again (remember how useful they were when originally placing the markers?). This time, however, you use them in conjunction with the CTRL ("control") key on your keyboard. To move to the next marker in the Timeline, press CTRL-right arrow. To move to the previous marker, press CTRL-left arrow.
|
Did You Know? You can Zoom in and out using your keyboard. You no doubt already know how to zoom in and out on the Timeline using the zoom buttons and the slider (shown below). However, you might like to know that there's even an easier way to this. Simply press the "equal sign" key on your keyboard (=) to zoom in, or the "minus sign/dash" key (-) next to it to zoom back out. (The minus sign key on the numeric keypad won't work.) 
|
|