Building a Simple Application in Visual Basic .NET
| < Day Day Up > |
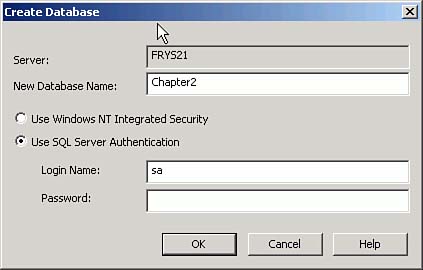
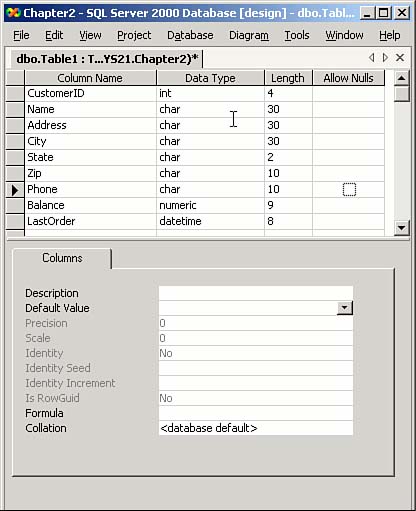
| The simplest Visual Basic .NET application is a single form managing a single table. It doesn't matter whether it's a "local" table stored in a FoxPro DBF or an Access MDB file or a table in an MSDE or a SQL Server database. The coding is exactly the same. Creating a Customers TableThere is a command window in Visual Basic .NET, but it has very limited use. To create a new table, we'll first need to add a new database. Use Ctrl+S to open the Server Explorer, and expand the tree until SQL Server is visible. Expand its tree, right-click on Databases, and select New Database. Supply the name Chapter2, and use sa and blank for the userid and password respectively (see Figure 2.3). Figure 2.3. Adding the Chapter2 database. Click on the Database to select it, and expand the tree to reveal the Tables branch. Right-click and select New Table. The Table Designer shown in Figure 2.4 will appear. Enter the fields and data descriptors used to create the FoxPro Customers.DBF earlier. You'll be asked for a name for the table when you close the designer; enter Customers , just as before. Figure 2.4. Specifying the Customers schema. The structure is the same. The only peculiarity is that the database offered to store NULL values for any column entries not specified in an INSERT statement. We absolutely don't want that. I've wasted a significant portion of my professional life dealing with null fields, provided on the off chance that I might want to know whether those fields were specified or not. Blank is blank, and that's always been good enough in my line of work. So don't forget to uncheck the nulls. At the bottom of the Table Designer, there is a toolbar with five choices:
These are largely features that are supported either by the FoxPro Data Environment, or by the database container. Select the CustomerID field and click on Set Primary Key to create an index. Without this, Visual Basic .NET has no clue how to locate a specific record for updating or deleting because there is no RECNO() in SQL Server. The other features won't enter into our simple example in this chapter, but you can be sure they come in handy at some point in a real-world application. Again, reflecting the limited usefulness of Visual Basic .NET's command window, you can't type in an INSERT statement interactively. Data is entered graphically. To enter a record into the table, right-click on the table name in the Solution Explorer and select Retrieve Data from Table. The resulting grid allows us to enter one row at a time. Type in the same values entered for CUSTOMERS.DBF , as shown in Figure 2.5. Figure 2.5. Entering a Customer record.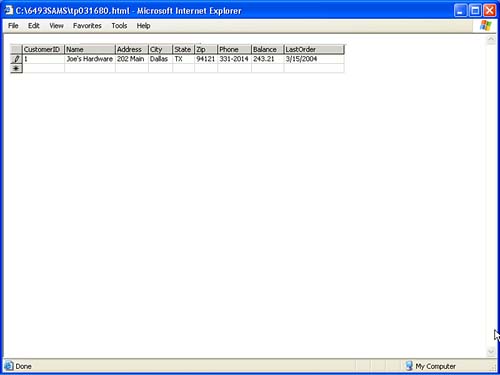 Designing the FormStart by creating a Visual Basic Windows Application project called CustomersProject, as shown in Figure 2.6. It's created with one form named Form1. Figure 2.6. Creating the CustomersProject project.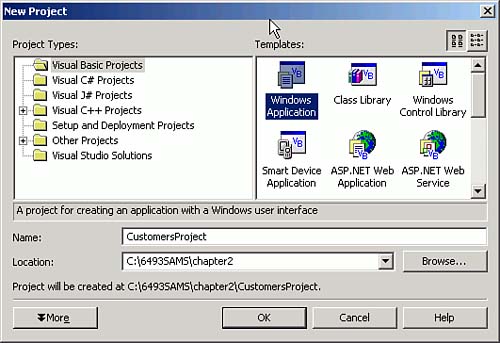 Now for a little surprise: Open the Server Explorer with Ctrl+Alt+S, select the Customers table in the Chapter2 database, and drag it onto Form1. You get ”a DataAdapter . What's a DataAdapter ? A DataAdapter is a middle- tier component that contains SELECT , INSERT , UPDATE , and DELETE statements that are automatically generated by Visual Basic .NET. In this case, dragging the table to the design surface meant SELECT * FROM CUSTOMERS . From there, Visual Basic .NET was able to infer the other three commands because it knows the key field ( CustomerID ). In our Visual FoxPro example, the simple act of issuing the command USE CUSTOMERS , or USE (THISFORM.TableName) in the form class, in effect opened the data source and returned the entire table. There's a command in Visual Basic .NET that does the same thing. It's actually not a command; it's the FILL method of the DataAdapter . It takes two parameters; the first is the name of a dataset, and the second is a name to give the first table in the dataset. Creating a DatasetTo create a dataset, select Generate Dataset from the Data pad of the IDE menu, using dsCustomers as the dataset name. You'll notice that a file named dsCustomers.xsd has been added to the project. There's more to it than that, but I'll tell you later. An instance named dsCustomers1 has been added to the form, much as a TextBox class added to your form in Visual FoxPro will be named TextBox1 . Double-click on the form to open its Load event and type the following line: SQLDataAdapter1.Fill(dsCustomers1,"Customers") Building the FormTo build the form, drag nine labels, eight text boxes, and an UpDownNumeric control to the form. Assign the appropriate text to the labels' Text properties (in FoxPro we use Captions ). Data binding is what we expected to achieve when we dragged the table onto the form. But at least for now, it's a manual process in Visual Basic .NET. Open the Properties sheet, click on the first control, open the DataBindings property by clicking on the plus sign to the left of it, and add the CustomerID field of the Customer table of the dsCustomers1 dataset to the data bindings. You have to expand the tree each time for each control, so it's tedious . Later we'll see a routine that can use the control names to do this automatically. Form MethodsWe'll need the same two methods used in the FoxPro application. They're almost identical, except that in Visual Basic .NET you can't refer to a variable until it's been declared with Dim or some other modifier: Public Sub Inputs(ByVal OnOff) Dim Ctrl As Control For Each Ctrl In Controls If Not Ctrl.Name.StartsWith("cmd") Then Ctrl.Enabled = OnOff Next Buttons(Not OnOff) End Sub Public Sub Buttons(ByVal OnOff As Boolean) Dim Ctrl As Control For Each Ctrl In Controls If Ctrl.Name.StartsWith("cmd") Then Ctrl.Enabled = OnOff Next cmdSave.Enabled = Not OnOff cmdCancel.Enabled = Not OnOff End Sub Because the command buttons begin with "cmd", I can direct the code to manipulate only command buttons or only controls other than command buttons. Adding the Command ButtonsDrag and drop nine instances of the CommandButton control to the bottom of the form. Change their names, captions, and their enabled property as shown in Table 2.3. Table 2.3. Properties for the CommandButton Controls
I've resized the form and changed both the form's Name and its Text property to Customers , its StartPosition to CenterScreen , and its ControlBox property to False . The properties and settings are either almost identical to those of FoxPro or easily recognizable. The Add Button CodeThe equivalent of APPEND BLANK is done by the AddNew() method of the BindingContext , which is automatically added to every Visual Basic form. The dataset and the table name are required parameters of the BindingContext because it manages all datasets and all tables contained within datasets: Private Sub cmdAdd_Click( _ ByVal sender As System.Object, ByVal e As System.EventArgs) _ Handles cmdAdd.Click Adding = True BindingContext(DsCustomers1, "Customers").AddNew() Inputs(True) End Sub A Visual Basic .NET routine to add a unique key would be nice. However, if you define the CustomerID as an IDENTITY field in SQL Server, the next available key value is automatically returned. FoxPro 8 also has this capability. You can also write your own, as we did earlier, and this can be useful for systems that can go offline and then synchronize the tables upon reconnection. The Edit Button CodeThe Edit button code is extremely simple because datasets keep track of their changes automatically; the only kind of Buffering mode in Visual Basic .NET datasets is mode 5: Private Sub cmdEdit_Click( _ ByVal sender As System.Object, ByVal e As System.EventArgs) _ Handles cmdEdit.Click Inputs(True) End Sub The Save Button CodeTo save any changes made by the user , we call the Update() method of the corresponding DataAdapter , and then disable input fields: Private Sub cmdSave_Click( _ ByVal sender As System.Object, ByVal e As System.EventArgs) _ Handles cmdSave.Click Inputs(False) Try With BindingContext(DsCustomers1, "Customers") .EndCurrentEdit() End With SqlDataAdapter1.Update(DsCustomers1, "Customers") DsCustomers1.AcceptChanges() BindingContext(DsCustomers1, "Customers").Position = 0 Catch oEx As Exception MsgBox(oEx.Message, MsgBoxStyle.Critical, "Unable to save record") End Try End Sub The Cancel Button CodeTo cancel an Add or any changes made by the user, we just disable the input fields: Private Sub cmdCancel_Click( _ ByVal sender As System.Object, ByVal e As System.EventArgs) _ Handles cmdCancel.Click Inputs(False) Try With BindingContext(DsCustomers1, "Customers") .CancelCurrentEdit() End With Catch oEx As Exception MsgBox(oEx.Message, MsgBoxStyle.Critical, "Problem canceling edit") End Try End Sub The Delete Button CodeDeleting a record is straightforward: Private Sub btnDelete_Click( _ ByVal sender As System.Object, ByVal e As System.EventArgs) _ Handles btnDelete.Click Try BindingContext(dsCustomers1, "Customers").RemoveAt(0) dsCustomers1.Tables("Customers").AcceptChanges() MsgBox("Record deleted", MsgBoxStyle.Information, "My app") Catch oEx As Exception MsgBox("Error: " + oEx.Message) End Try End Sub The Previous and Next ButtonsThe Previous and Next buttons are one-line commands in Visual Basic .NET, because there's no need to check for BOF() or EOF() before moving the BindingContext 's position, the Visual Basic read-write equivalent of RECNO() : Private Sub cmdPrevious_Click( _ ByVal sender As System.Object, ByVal e As System.EventArgs) _ Handles cmdPrevious.Click BindingContext(DsCustomers1, "Customers").Position -= 1 End Sub Private Sub cmdNext_Click( _ ByVal sender As System.Object, ByVal e As System.EventArgs) _ Handles cmdNext.Click BindingContext(DsCustomers1, "Customers").Position += 1 End Sub The Browse Button CodeBecause there's no BROWSE command in Visual Basic .NET, I decided to add the Visual Basic equivalent. I put a grid to the right of the screen, and then used the Browse button's Click event to widen the form to expose and enable the grid. I also changed the button's caption to Hide, to indicate that the grid can be hidden by clicking on it. The form with the grid showing appears in Figure 2.7. Private Sub cmdBrowse_Click( _ ByVal sender As System.Object, ByVal e As System.EventArgs) _ Handles cmdBrowse.Click If cmdBrowse.Text = "Hide" Then Width = 445 cmdBrowse.Text = "Browse" Else Width = 660 cmdBrowse.Text = "Hide" End If End Sub Figure 2.7. Simulating the FoxPro BROWSE command with a hidden grid. The grid's AfterCellChange event moves the BindingContext position pointer: Private Sub DataGrid1_CurrentCellChanged( _ ByVal sender As Object, ByVal e As System.EventArgs) _ Handles DataGrid1.CurrentCellChanged BindingContext(DsCustomers1, "Customers").Position = _ DataGrid1.CurrentRowIndex End Sub Finally, to close the form, the form's Close() method is the Visual Basic .NET equivalent of THISFORM.Release : Close() I'll leave the exercise of creating an inherited form for Chapter 3, "Building a Visual Basic .NET Application for SQL Server." |
| < Day Day Up > |
EAN: 2147483647
Pages: 130