Building a Simple Application in Visual FoxPro
| < Day Day Up > |
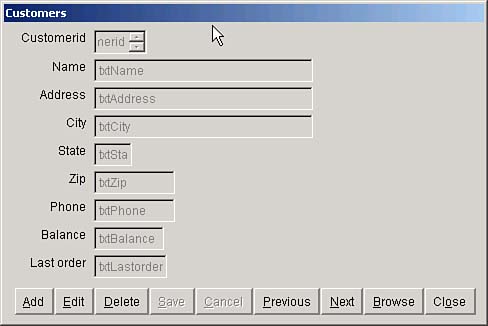
| The simplest Visual FoxPro application is a single user app with one or more screens. In this chapter we'll build a simple application consisting of a single screen to find, add, edit, and delete records in a Customers table. For this purpose, create a table called Customers by entering the following: CREATE TABLE Customers ( ; CustomerID Integer, ; Name Char(30), ; Address Char(30), ; City Char(30), ; State Char( 2), ; Zip Char(10), ; Phone Char(10), ; Balance Numeric(9,2),; LastOrder Date(8) ) There are a few FoxPro defaults that exist at the environment level that have to be changed. First, before you can insert a date into a table, you have to make sure that you've set the STRICTDATE setting to zero. I don't know why this setting defaults to the SQL Server syntax in a default installation, but it does. Also TALK defaults to ON , and displays all variable assignments in the _Screen background. Finally, MULTILOCKS must be set to ON in order to enable buffering. So issue these three commands either in the command window, or in the form's LOAD event before anything else happens: SET STRICTDATE TO 0 SET TALK OFF SET MULTILOCKS ON After you've changed these settings, the following command will put one record into the new table: INSERT INTO Customers VALUES ( ; 1, "Joe's Hardware", "202 Main", "Dallas", "TX", ; "94121", "212-331-2014", 243.21, {03/15/2004} ) Based on this table structure and this record, a typical customer screen might look like the one shown in Figure 2.1. Figure 2.1. A simple application screen. Creating a Simple Form Controls Class LibraryTo build our new application, we first need to create a class library with subclasses of the FoxPro base control classes. Type the following in the command window, using Ctrl+W to close the resulting designer window after each command: CREATE CLASS mytext OF pinter as textbox CREATE CLASS mycheck OF pinter as checkbox CREATE CLASS myedit OF pinter as editbox CREATE CLASS mycombo OF pinter as combobox CREATE CLASS myspin OF pinter as spinner CREATE CLASS myradio OF pinter as optiongroup CREATE CLASS mylabel OF pinter as label CREATE CLASS mycmd OF pinter as commandbutton TIP Use Alt+W, P to open the Properties sheet, and make sure that Dockable is not checked before you do this. I do this because it's the simplest way to begin to take advantage of object-oriented programming. If you now open the class library and change the properties for selected commands as shown in Table 2.1, you'll see what I mean; these changes will now take effect on every single form you create that uses these classes. Change the font or color of the MyText class, and it changes in all instances on all of your forms. Table 2.1. My Subclassed Controls with Important Property Settings
Field MappingSelect Tools, Options, Field Mapping and match the controls shown in Table 2.1 with the data types used in your Customers table. If you cut and paste the class name Pinter.vcx into the Class Location field and use Alt+A to save each field mapping after you fill in the three fields in the Field Mapping dialog, the entire process of creating the classes and setting the mappings should take two minutes or less. Creating the Form Using Your Subclassed ControlsAfter you've created your subclassed controls, type CREATE SCREEN CUSTOMERS DEFAULT to use the base FoxPro form class, open the Data Environment, and add the Customers table. Drag and drop the word Table from the top of the Customer table graphic onto the upper-left corner of the form, and you'll have the screen shown in Figure 2.1, minus the command buttons . Form MethodsI know that I'll want to enable and disable controls and command buttons, so I might as well write methods to do this before I go any further. In Visual FoxPro, you can traverse all controls in the form's Controls collection and set values based on the names of the form classes. I added a form property called InputClasses and populated it with the names of the input control classes in pinter.vcx : InputClasses: MyText,MyEdit,MyCheck,MyCombo,MySpin The code to enable or disable controls based on these classes, and to turn all of the form's command buttons on or off as needed, is this: Form method Input PARAMETERS OnOff WITH THISFORM FOR EACH Ctrl IN.Controls IF UPPER(Ctrl.Class) $.InputClasses Ctrl.Enabled = OnOff ENDIF ENDFOR .Buttons(OnOff) ENDWITH Form method Buttons PARAMETERS OnOff WITH THISFORM .SetAll ( "Enabled", NOT OnOff, "MyCommand" ) .cmdSave.Enabled = OnOff .cmdCancel.Enabled = OnOff ENDWITH Because the only controls that are enabled or disabled are the ones in the list, this approach permits us to put other controls (for example, list boxes) on the form without enabling or disabling them when inputs are enabled or disabled. Adding the Command ButtonsOpen the form, select View, Toolbars, and click on the Form Controls toolbar. Click on the three little books and select pinter.vcx . This changes the available controls to include only those contained in our class library. Drag and drop nine instances of the MyCommand control to the bottom of the form. Change their names, captions, and their Enabled property as shown in Table 2.2. Table 2.2. Properties for the Command Buttons
I've resized the form and changed both the form's Name and its Caption to Customers, its AutoCenter property to .T. , and its ControlBox property to .F. . It's beginning to look pretty good. Now it's time to code the buttons. The Add Button CodeGiven that this is a single-user application, you'd think that all I have to do is change the table's Buffering property to 3 (optimistic record), append a blank, and refresh the screen. However, APPEND BLANK moves the record pointer to the phantom record. If the user cancels, I want to redisplay the same record that was visible before the user clicked on Add. So I need to add a BeforeAdd property to the form by selecting Form, Add Property Menu. When that's done, the code for the Add button is this: WITH THISFORM SELECT ( [CUSTOMERS] ) .BeforeAdd = RECNO() CursorSetProp ( [Buffering], 3 ) APPEND BLANK .Refresh .Inputs(.T.) ENDWITH This adds a blank record to the Customers table after turning Buffering on, which means that TableUpdate() can be used to cancel the operation and simply throw away the blank record. We save the RECNO() value in order to redisplay the record that was on the screen before adding the blank. Finally, we refresh the screen controls to display their blank values and enable all input fields. Note that I didn't do anything about inserting a key value that is guaranteed to be unique. Generally, I call a function that takes a single parameter, a table name, and returns an integer. Here's the code: FUNCTION NextKey PARAMETERS pTableName pTableName = UPPER(pTableName) SaveAlias = ALIAS() IF NOT USED ( [Keys] ) USE KEYS IN 0 ENDIF SELECT KEYS LOCATE FOR UPPER(TableName) = pTableName IF NOT FOUND APPEND BLANK REPLACE TableName WITH pTableName ENDIF REPLACE LastKey WITH LastKey + 1 SELECT ( SaveAlias ) RETURN LastKey If you can be guaranteed that every table will have a unique integer key, you can include a call to this function in your code, using this: NewKeyValue = NextKey ( THISFORM.TableName ) REPLACE ( THISFORM.KeyField ) WITH New I KeyValue The Edit Button CodeThe code for the Edit button is almost identical to the code for the Add button, except that the APPEND BLANK is not needed. Strictly speaking, saving the RECNO() value in BeforeAdd isn't necessary either, but it makes the Cancel button code easier to write because we don't need to know whether we're canceling an Add or an Edit: WITH THISFORM SELECT ( [CUSTOMERS] ) .BeforeAdd = RECNO() CursorSetProp ( [Buffering], 3 ) .Refresh .Inputs(.T.) ENDWITH The Save Button CodeTo save any changes made by the user, we call the TableUpdate() function and then disable input fields: WITH THISFORM SELECT ( [CUSTOMERS] ) TableUpdate(.T.) CursorSetProp ( [Buffering], 1 ) .Inputs(.F.) ENDWITH The Cancel Button CodeTo cancel an Add or any changes made by the user, we call the TableRevert() function, turn buffering off, disable the input fields, return to the record number showing before the Add or Edit began, and then refresh the controls to reflect the data before the Add or Edit began : WITH THISFORM SELECT ( [CUSTOMERS] ) TableRevert(.T.) CursorSetProp ( [Buffering], 1 ) .Inputs(.F.) IF BETWEEN ( .BeforeAdd, 1, RECCOUNT() ) GO .BeforeAdd ) ENDIF .Refresh ENDWITH The Delete Button CodeDeleting a record is straightforward. We only have to decide which record to display after deleting a record. WITH THISFORM SELECT ( [CUSTOMERS] ) DELETE IF NOT EOF() SKIP ELSE GO BOTTOM ENDIF .Refresh ENDWITH The Previous and Next ButtonsIt's traditional to include Previous and Next buttons on FoxPro forms. Sometimes I think that we only offer these buttons because they're a single command ( SKIP +/-n ), and that users don't care and would prefer a good SEARCH command. But they'll serve to illustrate a point, as you'll see later in this chapter. Note that trying to go past BOF() or EOF() is an error in FoxPro: cmdPrevious::Click SELECT ( [CUSTOMERS] ) IF NOT BOF() SKIP -1 IF BOF() GO TOP ENDIF ENDIF THISFORM.Refresh cmdNext::Click SELECT ( [CUSTOMERS] ) IF NOT EOF() SKIP IF EOF() GO BOTTOM ENDIF ENDIF THISFORM.Refresh The Browse Button CodeBrowsing is a simple navigation technology. We could simply include a ReadOnly grid on the screen because the record pointer is automatically bound to the grid. But that uses space on the form, and if space is scarce , the BROWSE command is a good alternative. I only have to provide for the possibility that the user presses Esc to cancel the BROWSE . FoxPro doesn't have automatic handling for this, but it's easy to provide. I also map the right mouse button and the Enter key to Ctrl+W to select the highlighted record and close the Browse window: SELECT ( [CUSTOMERS] ) WhereWasI = RECNO() ON KEY LABEL ENTER KEYBOARD CHR(23) ON KEY LABEL RIGHTMOUSE KEYBOARD CHR(23) BROWSE TITLE [Rightclick or press ENTER to select a record; ESC to cancel] ON KEY LABEL ENTER ON KEY LABEL RIGHTMOUSE IF LASTKEY() = 27 && Esc GO ( WhereWasI ) ENDIF THISFORM.Refresh Finally, to close the form, the form's Release method is all we need: THISFORM.Release Enter this code and run the form. It ought to work. Now, change the font for the MyText class in pinter.vcx , and notice that it changes every text box on the screen. That's a simple demonstration of the power of objects. But wait, there's more. Creating a Form TemplateSince we used the power of objects for our control classes, why not do the same thing with the form? Use MODIFY FORM Customers to open the form. Highlight all of the labels and controls except for the command buttons and cut them (don't copy, but cut them to keep them in the clipboard for later), and then choose Save As Class. Pick Pinter.vcx as the class library, use the name FlatFileForm for the class, and save it (see Figure 2.2). This also saves the form's properties and methods. Figure 2.2. Saving the form and buttons as a class. Now we're ready for some magic. In the command window, type ERASE CUSTOMERS.SC? to erase the SCX and SCT files containing the Customers form. Then, select Tools, Options, Forms from the IDE menu, click on Form Template, and select FlatFileForm from the Pinter.VCX Class Library. Click OK to close the dialog. Now, type MODIFY FORM Customers You'll see a form with only the buttons across the bottom. (You'll also see the name Customers, but we'll deal with that shortly.) Presuming you haven't trashed the paste buffer, press Ctrl+V, and all of your labels and data controls will appear. They're all selected already, so use the up-arrow and left-arrow keys to move them all up and left eight pixels each, which is the amount of the automatic offset for cutting and pasting screen objects. Changing Form Code into Class CodeThe original code that we wrote for the form class is still there; however, it's specific to a single table. To make it generic, add a TableName and an IndexTag property to the FlatFileForm class. Then, change all instances of [Customers] in the class code to ( THISFORM.TableName ). You can also change the FlatFileForm class Caption property to "Please supply a title". TIP If you've used WITH THISFORM in all of your methods, you only need ( .TableName) . In the LOAD event of the FlatFileForm class, put this: WITH THISFORM SELECT 0 USE ( .TableName ) IF NOT EMPTY ( .IndexTag ) SET ORDER TO ( .IndexTag ) ENDIF ENDWITH And in the class's UNLOAD event, put this: USE IN ( THISFORM.TableName ) Finally, open the Customers form with MODIFY FORM CUSTOMERS and add Customers as the TableName property and the form Caption . If you've added an index for CustomerID , you can enter the name of the tag in the IndexTag property. CosmeticsBefore you run the form, there are a few things you can do to tidy up your creation. For one thing, the tab order is probably not right. Choose Tools, Options, Forms to open the Forms dialog, and change the Tab Ordering to By List. Now, open the form and click on View, Tab Order. Click on the By Row button. Now, find the cmdAdd button and drag it to the top of the list. Drag the cmdEdit button to the second position in the list, and click OK. Next, open the Properties sheet, select the form, and change the BorderStyle property to something other than 3 . We don't really do resizing of this kind of form, so if users try to do so it will look funny . We'll just nip it in the bud. Running the FormNow, run the form. Again, it should work. Open the form in the Form Designer and look at the code. There isn't any! That's the right way to build forms in Visual FoxPro. This simple example used DBFs, the simplest way to deal with data in FoxPro. The CursorAdapter in Visual FoxPro 8 makes it about as easy to build a SQL Server or Web Service application as it is in Visual Basic .NET. I purposely didn't use the CursorAdapter in this example. We'll deal with the CursorAdapter in Chapter 6, "Data Access" and Chapter 7, "XML." There are lots of enhancements that can be made to this template. It doesn't handle multiuser scenarios, where someone else might have changed the data. It doesn't handle classes of parent-child forms, although it could. TIP I once wrote a system to manage sales quotations, sales orders, invoices, shipping memos, purchase quotes, purchase orders, and receiving memos using a single template and was able to build the entire system in 10 working days, including a pretty serious inventory control subsystem. Nothing says you can't design your entire project around a couple of special-purpose form classes. In fact, that's the idea. Consider this FlatFileForm as the simplest possible case. Next, we'll do the same thing we did in this example again in Visual Basic .NET. It's a little different, but the concepts are the same. |

| < Day Day Up > |
EAN: 2147483647
Pages: 130