Outfitting a Groove Workspace with Tools
A team’s manager, as well as each of its participants, needs to keep track of and resolve issues, coordinate tasks, report on their progress, and exchange and evaluate ideas-all while creating and updating documents and related information. Although tools such as e-mail, file shares on servers and shared computers, Web sites, and even specialized collaboration applications support particular tasks and processes, they don’t always support consistent data access or provide context and information about the daily activities that a distributed workforce needs. That’s where Groove workspace tools come into play. A standard workspace can include tools that support project planning, file sharing, discussions, and meetings. When you set up a standard workspace, you can add the tools you know you’ll need (depending on the type of work you’ll do in the workspace) and then add others as the activities and information in the workspace develops.
Workspace tools are organized on tabs at the bottom of the Workspace Explorer window. Clicking a tool’s tab makes the tool active. The number that appears beside a tool’s tab tells you how many workspace members are working with that tool. You can also drag tool tabs to change their position in the workspace.
There are several ways you can add one or more tools to a workspace. You can use the New command on the File menu, click the icon that appears on the right side of the tool tab area, or click Add Tools in the Common Tasks area. One way or the other, you’ll select a specific tool (such as the Calendar or the Meetings tool) or arrive at the More
Tools dialog box, shown in Figure 6–11, in which you can select the tool or tools you want to add.
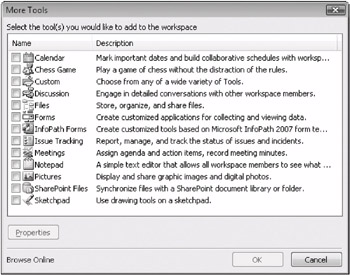
Figure 6–11: The More Tools dialog box gives you access to additional workspace tools.
In the following sections, you’ll learn about the basic features and operations of the various tools you can use in a Groove workspace.
For more information about the Groove Forms tool, see Chapter 7.
Keeping a Calendar
The Calendar tool lets you keep track of appointments and meetings, mark due dates for tasks or project milestones, and annotate any of the items you define with details such as a meeting’s purpose or what information needs to be refreshed in this week’s status report. Figure 6–12 shows the Calendar tool (in monthly view).
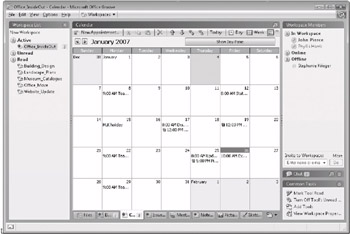
Figure 6–12: The Calendar tool enables you to track important dates and appointments. You can link to appointments from other tools in a workspace.
Simply click New Appointment (or double-click a date) to add an item to the calendar. In the Add Appointment dialog box, shown in Figure 6–13, you’re required to enter a topic in the Subject field and specify the start and end of the appointment or event. In the Details area, you can type a description of the appointment, reminding yourself and informing others what the particular appointment concerns.
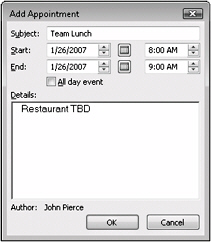
Figure 6–13: Use the Add Appointment dialog box to enter the specifics of a new appointment or event.
| Note | To delete an appointment, right-click the entry for the appointment in the calendar, and then click Delete. |
Using the Calendar tool’s toolbar, you can adjust how the calendar is displayed, move from appointment to appointment, and perform operations such as exporting, importing, or printing the details of appointments. Here are some of the ways you can work with the Calendar tool:
-
You can view appointments for a month, for a specific day, or for a week. You can also show what Groove refers to as the Day Pane (click Show Day Pane), which lists each day’s appointments on the right side of the calendar and offers a detailed view beside a week’s or month’s worth of appointments.
-
Move from appointment to appointment by clicking the arrow buttons on the toolbar or by clicking Next Appointment or Previous Appointment on the View menu.
-
Create links to specific appointments. To copy a link to an appointment, right-click the appointment and then click Copy Appointment as Link. Open the tool where you want to place the link (for example, in the Details area of a meeting you define in the Meetings tool) and then paste the link there.
| Note | You can open a tool in its own window by right-clicking the tool’s tab and then clicking Open In New Window. |
Topics Under Discussion
You can use the Discussion tool to start or follow an online conversation. It lets you and other workspace members propose and respond to ideas-critiquing, building on, and debating the questions and ideas that affect your work together. The information and opinions recorded in the tool can be archived with a workspace and examined in depth later to extract important details and apply one team’s experience to the work of others.
For more information about archiving a workspace, see Chapter 7.
The Discussion tool has two types of entries: topics and responses. In the Discussion tool window, shown in Figure 6–14, you can see a list of subjects (with responses indented) and the content of a posting in a pane below the list. Workspace members add to a conversation by responding to a topic posting. Members can respond to topic postings and to other responses.
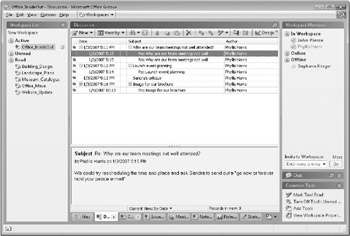
Figure 6–14: Use the Discussion tool to brainstorm, raise issues, and exchange ideas.
When you start a discussion about a topic, you specify a subject. You can also specify a category so that as the number of discussion items increases, items can be organized and grouped. Responses to a specific posting are stored under that category as well, indented under the initial item. A project manager or group leader might want to set up some standard categories at the start of a project to foster discussion on particular areas-schedule, change requests, budget, and the like.
Here are the steps you follow to begin a topic of conversation in the Discussion tool:
-
On the Discussion tool’s toolbar, click New, and then click Topic.
-
Enter a subject for the topic. If you want to assign the topic to a category, select an item from the Category list, or click the plus (+) sign to set up a new category.
-
Type your thoughts on the topic in the text box below the subject line, and then click Save.
The topic will be displayed in the workspace. Other users can double-click the discussion record to compose a response. Each time you go online, Groove 2007 synchronizes discussion threads so that all workspace members can see the postings and responses other members have contributed.
The Discussion tool’s toolbar provides controls for viewing, searching, and navigating through the items. The default views are By Date and By Category. To search for an item in the Discussion tool, click the Search button on the toolbar, and then follow these steps:
-
In the list at the top of the Form Search dialog box, select Topic or Response.
-
In the Subject field, type the subject you’re looking for.
-
In the Category list, select a category to search for all the discussion items in a specific category.
-
In the By field, you can enter a workspace member’s name. In the On field, enter a date, or choose one from the pop-up calendar.
-
Click Search.
| Note | The Discussion tool also provides an advanced search feature that you can use to cull through a long list of discussion items or when you need to apply complex criteria (including logical AND and OR combinations) to your search. |
Making Meetings More Effective
It’s hard sometimes to get work accomplished at meetings. There’s a real art to running and participating in meetings that are effective. Groove’s Meetings tool is designed to help members of a workspace prepare for and document meetings and the outcomes of meetings-what decisions were made and who will take what actions. You can use the Meetings tool as a single, centralized location in which to post agendas before the meeting, define guidelines and ground rules for the topics under discussion, and then record meeting minutes. The Meetings tool is shown in Figure 6–15.
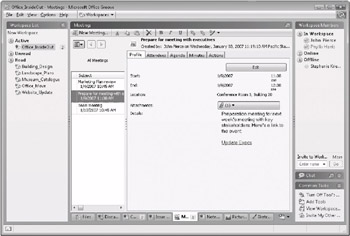
Figure 6–15: The Meetings tool is more than a calendar. Use it to define an agenda, track action iterns, and record meeting minutes.
To set up a meeting, click New Meeting on the Meetings toolbar. This command starts the Meeting Wizard, shown in Figure 6–16, which you use to enter a profile for the meeting, including the subject of the meeting, the meeting time and location, and other details.
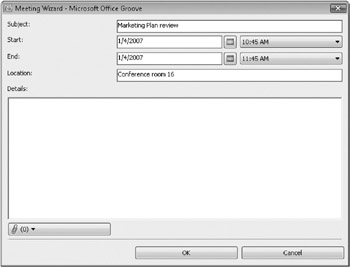
Figure 6–16: Meeting details are entered in the Meeting Wizard.
When you click OK in the wizard, the details you’ve entered appear on the Profile tab in the Meetings tool, which is shown earlier in Figure 6–15. You can then step through each of the other tabs-Attendees, Agenda, Minutes, and Actions-to round out the information about the meeting you’ve defined. As the names of the tabs indicate, the Meetings tool isn’t designed only for setting up meetings. It is designed to capture information at the meeting (you can use the tool to take minutes while the meeting occurs) and to set up a framework for following up on discussions at the meeting-in the form of action items that you assign to meeting attendees and then track their status and rank in priority.
| Inside Out-Linking an Item from One Tool to Another | Let’s say you define an action item in the Meetings tool. Now you want to continue discussing this item with other members of the team and also add an appointment to the Calendar tool to mark the date by which the item needs to be resolved. You can link an item, such as a meeting detail or an appointment, from one tool to another. To establish the link, select the item you want to link. Then, on the Edit menu, click Copy As Link. (In some tools, you may be offered a submenu of choices. For example, you can link an entire meeting or just a single action item.) Now switch to the tool you want to link the item to. Create a new appointment, for example, or a new topic in the Discussion tool, and then paste the linked item into the new item. The linked item appears as a hyperlink in blue type and underlined. You can then click the link to see the details of the action item, discussion thread, appointment, or other item. By linking items, you strengthen the network of information that a Groove workspace helps you organize and capitalize on the capabilities of each workspace tool. |
Storing, Organizing, and Sharing Files
The Files tool, shown in Figure 6–17, is designed so that workspace members can share and collaborate on many different file types, including files from other Microsoft Office system applications. Any member of a workspace can open any of the files that are available in the Files tool.
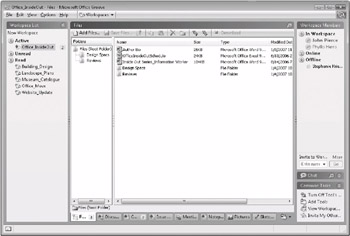
Figure 6–17: The Files tool is a collection of workspace files and folders.
When a member of a workspace edits or updates a file and saves the changes in Groove 2007, the file is automatically updated for all other workspace members. When several members work on a file at the same time, the first person to save changes will update the original file. If another member saves changes to the original version, a second copy of the file will be created with the editor’s name in the title.
You need to follow just two steps to add a file to the Files tool:
-
On the Files toolbar, click Add Files.
-
In the Add Files dialog box, find and select the file(s) you want to add, and then click Open.
You can also save a file that’s listed in the Files tool to a folder in Windows. To save a file to a folder in Windows, select the file or files in the Files list, and then click Save Files on the toolbar.
To work with a file from the Files tool, right-click the file, and then use the shortcut menu. The shortcut menu lets you perform operations such as opening and editing a file, printing a file, or sending a file to someone as an attachment in an e-mail message. You can also create new files directly in the Files tool. On the File menu, click New, and then choose the type of file you want to create. The list of file types will be based on the applications that you have installed on your computer.
| Note | Groove’s SharePoint Files tool builds on the capabilities of the Files tool by linking a Groove workspace to a document library in a Windows SharePoint Services site. The SharePoint site must be built on Windows SharePoint Services (version 3). |
Tracking Issues
In collaborative work, when issues are raised, questions often arise as well about who will handle the issue and what kind of progress is being made. Even projects of modest scope can involve a large number of issues, and the effort required to document and track these issues is an area that many groups find to be time-consuming and tedious.
The Issue Tracking tool in Groove consists of two basic forms, plus a group of standard and user-defined views that let you group and organize recorded issues for ease of reference and review. The first form, called the Issue Tracking form, is shown in Figure 6–18. This form includes two tabs-Original Report and Current Status. It is used to identify an issue and includes details such as who entered the issue, which category an issue is assigned to, which workspace member the issue has been assigned to, and the issue’s status. The Issue Tracking form also contains a text box you can use to describe the issue and an attachments area so that supporting documents and other files related to the issue can be made part of the record. The issue ID is provided by Groove and identifies the issue and who created the issue record.
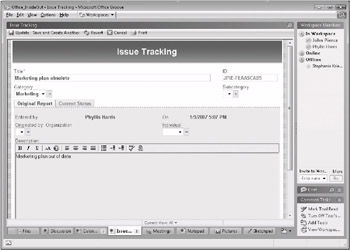
Figure 6–18: The Issue Tracking tool lets you assign issues to workspace members for follow-up and resolution.
The Response form, shown in Figure 6–19, displays the details entered in the Issue Tracking form and provides an area for a member to enter comments in response.
The Issue Tracking tool is designed using the Groove Forms tool. To learn more about the Groove Forms tool, see Chapter 7.
Any workspace member can create an issue record (or respond to an issue). In addition, workspace members who have the necessary permissions can create special keyword records that become part of the lists for fields such as Originated By, Status, Assigned To, and Priority. Permissions are defined as part of the form’s design and can be based on member role or given to specific workspace members.
You can create new keywords (assuming that you have the necessary privileges) by choosing one of the keyword record options from the New menu. You might, for example, create new keywords for issue categories and subcategories, or enter the keywords you want to use to classify issues by status and priority. When you or another workspace member records a new issue, these keywords are included in the lists for these fields.
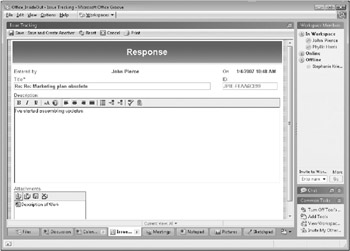
Figure 6–19: The Response form can be used to update workspace members about an issue.
The purpose of defining keywords, of course, is to use them to sort and group the items in a large list of issues. The View By menu on the Issue Tracking toolbar lets you group issues by assignment, priority, and the other fields for which you define keywords. You can also use the Search button in the Issue Tracking tool to locate an issue you’re looking for. You can search by title, category, originator, or other fields defined for an issue.
Taking Notes
The Notepad tool is a text editor that workspace members can use to create and save simple documents-meeting agendas or minutes, for example, or lists of specifications, summaries of team decisions, suggestions for process changes, and status reports about project tasks. These possibilities comprise just a few of the possible uses of the Groove Notepad tool, which is shown in Figure 6–20.
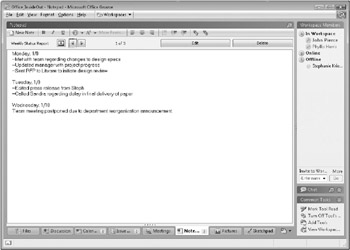
Figure 6–20: The Notepad tool is a text editor, complete with formatting options, that you can use to record information about the activities in a workspace.
The notes you take aren’t limited to plain text. The Notepad tool provides formatting features such as bold, italic, and underline, and choices of fonts, font color, and font size. You can also print or export a note, search for text in a note page, and check your spelling. There are quite a few of the familiar word-processing features in this simple notepad. The following list provides more details on several of them:
-
Adding pages to a notepad You can add pages to a notepad and name each page for reference. For example, think of the context a workspace can provide by keeping the status reports for each week of your project easily accessible in the notepad.
To add a new note page, click New Note, and then add a name for the note in the Title box. Enter content for the note in the editing area. You can right-click to see formatting options, or use the formatting icons on the toolbar. To view note pages, click the Previous or Next buttons to move sequentially among note pages, or select a note in the Note list.
-
Editing notes To edit a note page in the Notepad tool, go to the page you need to edit, and then click Edit. If another workspace member is already editing the selected note page, Groove prompts you to choose whether you want to edit the note anyway or wait until the other member is finished editing the page. The Edit button in the Notepad tool displays a number if one or more other members are currently editing the selected page. You can point at the Edit button to display a status window that tells you which member is currently editing the page. If you choose to continue and edit the page, Groove saves your changes in a new “conflict” copy of the note page. A conflict page also includes a link back to the original page. Likewise, if you are editing a page and another member begins to edit the same page, Groove briefly displays a message to inform you that another member has started to edit the page. If this occurs, your changes are saved to the original document and the other member’s changes are saved in a conflict copy.
-
Exporting notes You can export a selected note page in a Rich Text Format (RTF) file. You can then open the RTF file in other programs that support this format, such as Microsoft Office Word or WordPad in Windows. To export a note, display the page you want to export, and then click Export on the File menu. By default, the notepad uses the title of the note for the file name.
-
Searching for text in a note page You can search the text in a note page when the note is open for reading or editing. If a note is open for editing, you must click in the text-editing area before you start a search. To search text in a note, on the Edit menu, click the Find command. As you can with similar text-searching features, you can choose options such as case-sensitivity to refine the search.
-
Creating links to note pages As with other workspace tools, you can create a link that references a specific note page. Open the note page you want to link to. Then, on the Edit menu, click Copy Note As Link. Switch to the tool in which you want to place the link, and then paste the link in the appropriate item-a new appointment or a discussion topic, for example.
-
Printing a note page To print a note page, on the File menu, click Print.
| Note | You can use familiar keyboard shortcuts when working with the Notepad tool, including Ctrl+C to copy, Ctrl+X to cut, and Ctrl+V to paste. |
Adding Pictures to a Workspace
Not every workspace needs to use the Pictures tool, but images are often important to work in architecture, publishing, marketing, and similar business pursuits. The Groove Pictures tool, shown in Figure 6–21, lets you use a workspace to display and share image files in JPEG (.jpg) or bitmap (.bmp) format. Click the Show Picture Details button in the center of the window to see a list of the picture files that have been added to the workspace, as well as information such as file size, type, modified date, and the last person who edited the file.
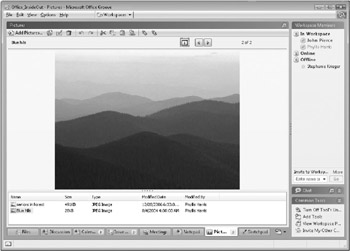
Figure 6–21: The Groove Pictures tool lets you store images related to the topic of a workspace.
You add a picture by clicking Add Pictures on the toolbar and then using the Open Picture File dialog box to select the file you want. You can also open a folder on your computer that contains image files, and then drag a file to the Pictures tool and drop it in the picture viewing area or into the list. The Pictures tool automatically scales all pictures you add to the tool to fit the current size of the picture viewer window.
You can edit pictures in the Pictures tool if your computer has a picture-editing program that supports the selected file type. If you open a JPEG file for editing but don’t have a program that supports editing this type of file, it will open for display in your Web browser or in a picture viewer. On most computers, bitmap (.bmp) files will open in Microsoft Paint. To open one or more picture files in a graphics-editing program, right-click them in the list, and click Edit. Depending on the graphics program and the operating system, a new window may open for each file. When you edit and save a picture and then return to Groove, you’re prompted to save the picture back to Groove. You can export any picture in the Pictures tool to a disk and also copy pictures to another instance of the Pictures tool (in another workspace, for example) or to an image-editing program.
Sketching Your Ideas
Sketches that help visualize a business process, a space plan, the relationship between tables in a database-these and many other types of drawings and diagrams-play an important role in business discussions and plans these days. The simple palette and set of tools that the Groove Sketchpad tool (shown in Figure 6–22) provides helps you and other team members brainstorm, draw in the context of a discussion, and just get your ideas down so that you can refine them later.
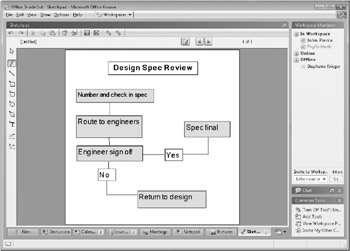
Figure 6–22: The Sketchpad tool lets you draw basic shapes and provides formatting options for fill colors and line colors.
If you are familiar with a drawing application (Paint, which comes with Windows, for example, or a more sophisticated program, such as Microsoft Office Visio), you’ll come up with a number of ways in which you can put the Sketchpad tool to work. Imagine, for example, sketching an organizational chart as you talk through the pros and cons of a small merger, sketching the main stages of a workflow process you want to introduce, or sketching ideas about a room in a house that’s under design.
You can add a page to a sketchpad by clicking New Sketch on the File menu or by clicking the button that adds a blank page. (This button sits to the left of the Previous button, just above the drawing page.) To name a sketch, click the label that reads Untitled, and then enter the name you want to use.
The drawing tools, organized along the left side of the page, include a pointer; a pencil tool for freehand drawings; tools for drawing basic shapes (such as lines, rectangles, and circles); a text box tool for labels; a line color tool; and a fill color tool. These basic drawing features are supplemented by the ability to undo and redo actions as you sketch, add a background image, and navigate from page to page in a sketchbook. You can, of course, add more than one sketchbook to a workspace, keeping one for work-flow processes, for example, and a second for organizational charts that you want the team to consider.
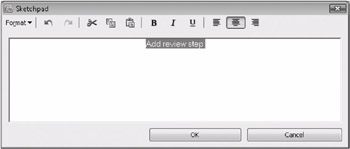
| Inside Out-More Than Plain Text | In the Sketchpad tool, you don’t have to use only plain text. When you add a text box to a sketch, you see the dialog box shown here. Enter the text and then apply the formatting you want, including a choice of fonts and alignment. To edit the text or change the formatting you’ve applied to a text, double-click the textbox to open this dialog box again. |
EAN: 2147483647
Pages: 299
