Groove Workspace Basics
Workspaces are at the center of the capabilities that Groove 2007 provides. Workspaces have members-a virtual team of people involved in a project or members of an organization’s finance or marketing department, for example-as well as tools that members use to work together. In this section, you’ll learn how to create a standard Groove workspace and how to invite and manage workspace members.
Creating a Workspace
When you need to create and start setting up a workspace in Groove, click the New Workspace link at the top of the Workspaces area on the Launchbar. You then enter a name and specify the type of workspace you’re creating. You might also select a workspace template.
For more information about workspace templates, see Chapter 7.
Here are the steps to follow to create a standard workspace in Groove 2007:
-
On the Launchbar, click New Workspace. (You can also use the New command on the File menu on the Launchbar.)
-
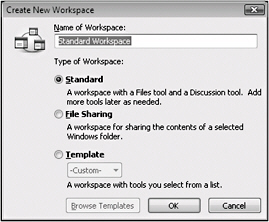
In the Create New Workspace dialog box, shown here, select the Standard option.
-
Type a name for the workspace, and then click OK.
| Note | The descriptions of the standard workspace and the file-sharing workspace provide a sense about the work you can do in Groove. You’ll learn more about file-sharing workspaces in Chapter 7. |
For a standard workspace, after you click OK in the Create New Workspace dialog box, you’ll see the Groove Workspace Explorer, shown in Figure 6–5. The Workspace Explorer provides access to workspace tools (the File tool and the Discussion tool are included by default), as well as to commands you can use to invite people to join the workspace, send messages to other workspace members, manage workspace properties, and change how you view the information that a workspace contains. After reviewing the Workspace Explorer for only a brief period of time, you can begin to see how it ties into and builds on the work that you perform using the Launchbar.
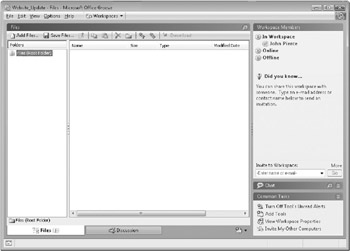
Figure 6–5: The Workspace Explorer for a standard workspace provides access to tools, shared files, and workspace members.
Inviting Workspace Members and Assigning Member Roles
Someone needs to create a workspace, of course, and then invite people (and possibly other computers that the creator of the workspace uses) to become members of that workspace. Each person who becomes a member of a Groove workspace is assigned a role. The individual who creates the workspace has the Manager role by default. Other members of a workspace can be designated workspace managers as well or be assigned the Participant or Guest role.
Each role has standard permissions that affect the type of work a member can do in a workspace. Managers, for example, can do the following:
-
Edit files
-
Delete files
-
Delete the entire workspace
-
Invite members
-
Remove members
-
Add or delete tools
-
Cancel outstanding invitations
Members assigned to the Participant role can, by default, add tools to a workspace and invite others to join. Individuals assigned to the Guest role cannot perform any of these functions by default. The Guest role should be assigned to members who need to review the workspace from time to time to check on progress but who are not actively engaged in the proceedings or projects the workspace supports.
Workspace managers can assign a member to a different role after the member has joined the workspace. Managers can also change the permissions associated with a specific role. For more information, see “Setting Roles and Changing Role Permissions” on page 146.
Here are the steps you follow to invite someone who is already a Groove user to join a workspace:
-
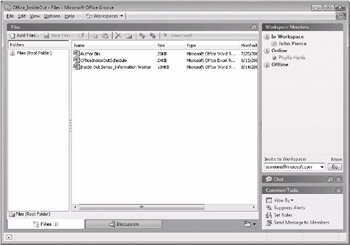
In the Workspace Members pane, under Invite To Workspace, enter the name or e-mail address of the person you want to invite to this workspace, as shown here, and then click Go.
-
To send an invitation to more than one person, click More.
-
In the Add Recipients dialog box, enter the name or e-mail address of the person you want to invite, and then click Add To List. You can repeat this step to include additional people in the invitation.
-
In the Add Recipients dialog box, click OK.
-
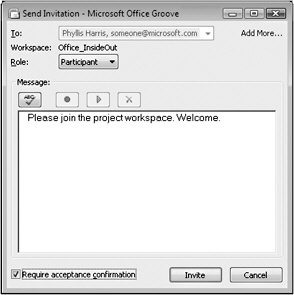
In the Send Invitation dialog box, shown next, select a role for the invitee, and type a message if you’d like.
-
If you want a confirmation that the person has accepted the invitation, select the Require Acceptance Confirmation check box.
-
Click Invite.
You can see whether the person accepts your invitation by monitoring Groove alerts.
Using Your Groove Account on a Second Computer
To use your Groove account on another computer (in other words, to invite the other computer to join the workspace), you need to place a copy of the file that contains your Groove account information on the other computer. After you install Groove on the other computer, all you need to do is double-click your account file, and Groove takes it from there. The information in the workspaces you belong to will be downloaded to the other computer, for example, and you’ll see your same list of contacts.
Figure 6–6 shows the dialog box you use to save your Groove account file. You can open this dialog box by clicking Invite My Other Computers on the Options menu on the Launchbar. The dialog box also provides clear instructions for the steps you need to take.
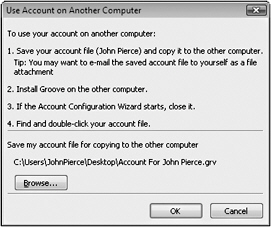
Figure 6–6: You can easily set up your account on another computer using this dialog box.
Knowing When Members Are Present and Accounted For
The Workspace Members pane in the Workspace Explorer lists the names of the members of a workspace and indicates the status of each member. (To show or hide the Workspace Members pane, on the View menu, point to Show/Hide, and then click Members.) The status of a workspace member can be one of the following:
-
In Workspace Indicates members who currently have the workspace open.
-
Navigating Together Indicates members who currently have the workspace open and have enabled the Navigate Together feature.
-
Online Indicates members who are currently online but don’t have this workspace open.
-
Idle Lists members who are currently online but have not performed activities at their computer for at least the past 15 minutes.
-
Offline Indicates members who are currently offline.
-
Suspended Indicates members whose workspace data is no longer being synchronized.
The Navigate Together option lets workspace members move in unison between workspace tools. When you select Navigate Together, all other members who have the option selected go to the tool that you select. Likewise, you go to the tool another member selects. Use the Navigate Together option on the Options menu to turn this option on or off.
Only members who have Navigate Together selected at the same time navigate together. If other members already have the option selected when you select it, you immediately navigate to their location in the workspace. Navigate Together remains turned on until you turn it off or close the Workspace Explorer.
Navigate Together works with the following actions in a workspace:
-
Opening or closing the Chat tool.
-
Navigating between tools by clicking tool tabs.
-
Navigating between pictures in the Pictures tool and sketches in the Sketchpad tool.
-
Navigating in the Calendar tool.
-
Opening folders in the Files tool.
-
Navigating from page to page in the Notepad tool.
To navigate on your own while Navigate Together is turned on, press Shift and click instead of only clicking. You can do this if you need to work with a different tool on your own.
You can point at a member’s name to display a status window with information about the member. In addition, member names appear in different colors, depending on their authentication status.
For more information about authentication status, see “Verifying Contact Identities” on page 192.
You can also organize your view of workspace members in several different ways. Right-click in the Workspace Members pane, and then select the view you want:
-
Alphabetical Lists all members alphabetically.
-
Status Categorizes members according to their current status.
-
Verification Status Categorizes members according to their contact authentication status.
-
Role Categorizes members according to their role in the workspace.
-
Organization Categorizes members by the organization listed in their contact properties. If members have no organization listed in contact properties, they are listed under “Unknown Organization.”
Regardless of a member’s status, you can initiate activities with your coworkers in a workspace. For example, you can right-click a member’s name, select Properties, and open the member’s Contact card to send a message to that member. You can also select several members, right-click, and select options to send a message or an invitation to a new workspace.
| Note | When you are working in the Workspace Members pane, you can click the expand and collapse buttons to open and close member categories, the Chat tool, or the Common Tasks area. If you hide the Workspace Members pane, you also hide the Chat tool and the Common Tasks area. |
Chatting with Workspace Members
Each Groove 2007 standard workspace includes a Chat tool. The Chat tool is located near the bottom of the Workspace Members pane.
Workspace members can contribute messages to a discussion in the Chat tool at any time by clicking in the blank box at the bottom of the tool and then clicking the arrow button to send the message. Messages posted in the Chat tool are saved, and the conversation continues for as long as the workspace exists. As with other Groove 2007 tools, the number of users currently involved in a chat is listed. Groove displays an alert to let workspace members know when a message has been posted in the Chat tool. Figure 6–7 shows an example of an active chat in a standard Groove workspace.
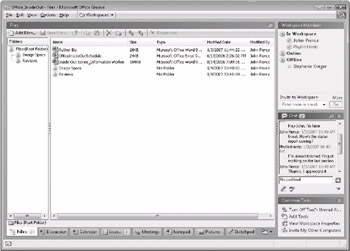
Figure 6–7: A Chat tool is one of the built-in features in a standard Groove workspace.
| Note | If you are using Groove 2007 on a Tablet PC, the Chat window may open by default in Ink mode. You will need to click Options, and then click Switch To Text Mode when you want to type in the Groove Chat window. |
Setting Roles and Changing Role Permissions
In some workspaces, you might have reason, even temporarily, to change the role of a member after he or she accepts the invitation to the workspace. You might also want to add or remove certain permissions for the Manager, Participant, or Guest roles. For example, you might want to restrict those in the Participant role from adding tools or let them delete tools in a workspace. Only individuals who are workspace managers can make these changes.
To set a workspace member’s role, open the workspace, and then follow these steps:
-
On the Options menu, click Set Roles.
-
In the Properties dialog box, select the member whose role you want to set, and then click Change Role.
-
In the Change Role dialog box, shown here, select the new role, and then click OK.
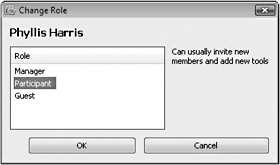
To change the permissions for a workspace role, open the workspace, and then follow these steps:
-
On the Options menu, click Set Roles.
-
In the Properties dialog box, click the Permissions tab, which is shown here.
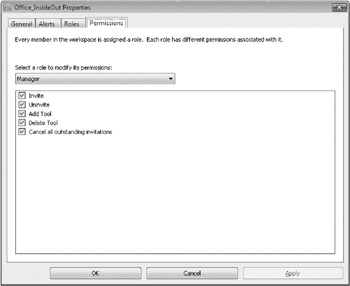
-
On the Permissions tab, select the role whose permissions you want to modify, and then select or clear the check boxes for the privileges you want to grant or deny.
Exploring a Groove Workspace
A standard Groove workspace includes a Files tool and a Discussion tool by default. In the Workspace Explorer, current workspace members are listed in the Workspace Members pane, the Chat tool is at the ready, and you’re provided with links to common tasks.
As the number of workspaces you belong to grows, you’ll need to switch from one workspace to another from time to time. The Workspace Explorer provides several ways by which you can do this. On the Workspace Explorer toolbar, for example, you can display the Workspaces Selector, shown in Figure 6–8, a drop-down menu that appears in the toolbar. (To hide or display the Workspaces Selector, on the View menu, point to Toolbars, and then click Explorer Toolbar.) You can reposition the Workspaces Selector by dragging it to a different location on the toolbar.
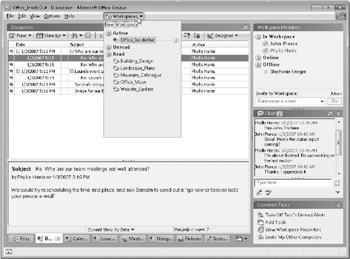
Figure 6–8: The Workspaces Selector lets you to switch between workspaces.
You can also display the Workspace List by clicking Show/Hide, and then Workspace List on the View menu. In the Workspace List, click a workspace’s title to open that workspace. By pointing at a workspace, you can display a status window that lists the last modified date and members who are currently in the workspace. The Workspace List is shown in Figure 6–9.
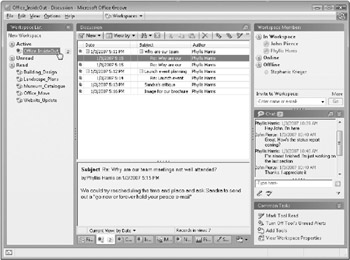
Figure 6–9: The Workspace List similar to the Workspaces Selector, shows all your available workspaces.
You should become familiar as well with the Workspace Manager, which is shown in Figure 6–10. You open the Workspace Manager by clicking the command of the same name on the Options menu in the Workspace Explorer. The Workspace Manager is another means of viewing your workspaces. You can see the name, status, type, and time when you last had unread information in the workspace. When you select a workspace name in the list, the Workspace Members pane shows which members are active in the workspace and which members are online or offline.
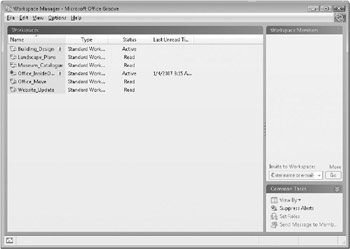
Figure 6–10: The Workspace Manager displays workspaces in a detailed list format
Groove lets you view workspaces in several different ways. The command you use to select the view you want is View Workspaces By, which is on the View menu. Here’s a quick rundown on how you can view a list of your workspaces:
-
Folders Sorts workspaces by folder.
-
Alphabetical Lists workspaces in alphabetical order.
-
Status Sorts workspaces by their status: Active, Unread, or Read.
-
Not On This Computer Workspaces you have on other computers. You can download the workspace data either from another computer that contains your account or from another workspace member.
-
Type Sorts workspaces by type, such as standard or file sharing.
-
Last Unread Time This view organizes workspaces by their relative activity. For example, you can see which of your workspaces were active and updated today, yesterday, within the last seven days, or within the last 30 days. Workspaces that have not received updates for more than 30 days are categorized under Older. Within each of these categories, workspaces are sorted in descending order of most recently read.
EAN: 2147483647
Pages: 299