Creating UserForms (Dialog Boxes)
When you want to create automation to interact with the user in ways that a message box or input box can’t do, create a dialog box (known in VBA as a UserForm). You can create a custom dialog box in VBA that looks very much like any built-in dialog box you see in Word, Excel, or PowerPoint.
If you’ve ever created form controls in a document or created and formatted AutoShapes on a PowerPoint slide, you already know most of what you need to know to create a custom dialog box. The following subsections walk you through steps to create and use a simple UserForm.
Designing a UserForm
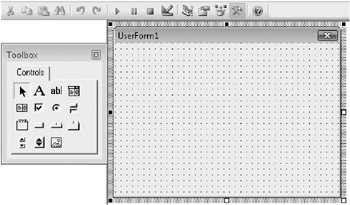
To begin creating your dialog box, select the project (in Project Explorer) to which you want to add your dialog box. Then, on the Insert menu, click UserForm (or select UserForm from the Insert button on the Standard toolbar). When you do, an empty dialog box is created at a default size, as you see here.

If the toolbox that you see in the preceding image doesn’t appear automatically when the form is created, click the Toolbox icon that you see highlighted on the Standard toolbar in this image. The toolbox contains all of the controls you’ll need for creating your form.
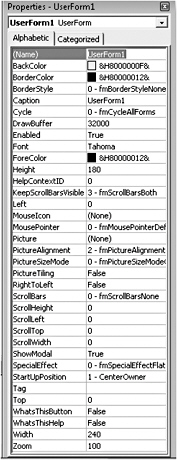
Before you start to add controls, take a look at the Properties window. You’ll see a long list of available settings here (as you see in the following image), some of which you might want to customize immediately.

Following are some basic settings in this window that can be particularly helpful.
-
Name-change the name of the dialog box, using VBA naming rules. This is the name that appears in the Project Explorer and that you’ll use to refer to the dialog box in macros. It’s common, though not required, to start UserForm names with the letters frm. For example, name this form frmSample.
-
Caption-the caption is the text that appears in the title bar of the form. This can be any text string and is limited only by the width of the dialog box as to how much text can appear in the title bar.
-
Height and Width-these settings control the size of the dialog box. You can also drag the handles on the form to resize it. However, using these options to set a precise size can come in handy for a few reasons, such as if you have a large dialog box that needs to fit within the user’s window at low resolution.
-
Left and Top-these settings control where the dialog box appears on the screen. If you set these measurements, remember to account for any users who might use a lower resolution setting for their screen.
Notice that you can also customize font, borders, and fill color for the form.
To add controls to the dialog box, in the Toolbox, click the control type you want and then either click or drag to create that control on the form, just as you would do with shapes on a PowerPoint slide. Point to each option in the Toolbox for a ScreenTip indicating the type of control.
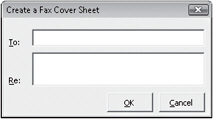
In the steps that follow, we’ll create the dialog box you see here.

To create this dialog box, we’ll add the following controls.
-
Two labels, containing the text To: and Re:.
-
Two text boxes, one allowing for a single line of text in the To field, and the other allowing for text to wrap in the Re field.
-
Two command buttons-one for OK and one for Cancel.
To create these controls, do the following.
-
Click the Label button in the Toolbox (the capital letter A), and then click the form, approximately where you want the label to appear. A label is similar to a text box in a document, so just click into it and replace the text with the text you want (To: for the first label).
Caution Unlike many programs where you can edit graphic objects, such as text boxes, don’t double-click on a UserForm to edit a control. If you do, you’re likely to accidentally open the Code window for that UserForm and automatically add the default event for the control you double-clicked. Meanwhile, If this happens, just delete the structure for the unwanted event and then double-click the UserForm name in the Project Explorer to return to the form. Control events are discussed later in this section.
-
Select the label and then, in the Properties window, change its name to something easy to access in a macro. I named this first label labTo. To specify the accelerator keystroke, as you see in the preceding image, type T in the Accelerator field in the Properties window. Remember to press Enter to apply a value after typing in any field in this window.
-
To size the label to fit the text, with the label selected, click Format and then click Size To Fit. This will help you align the controls when you have them all on the form.
-
Ctrl+drag to duplicate the label and then set up the other two labels you need, using the same actions in steps 1–3.
-
Click the TextBox button in the Toolbox and then click the form. Just as you would with any shape, drag to size it as needed.
-
In the Properties window, name this text box. For ease of reference, I usually give text boxes the same name as their labels, but with a different prefix. So, for example, if I have a label named labTo, I would name the accompanying text box txtTo.
-
Press Ctrl+drag to duplicate the text box, then rename and resize as needed.
For the second (Re:) text box, notice that you need it to accept multiple lines. By default, a TextBox control only accepts a single line. To allow text to wrap to multiple lines, in the Properties window, set the MultiLine field to True. If you want to allow the user to add hard returns (by pressing Enter) in that field to start a new line, also change the EnterKeyBehavior field value to True.
-
Use the same procedure to create and name the two CommandButton controls.
Note that the text that appears on the command buttons (OK or Cancel) is typed as you would on a text box. Just click in the default text, then delete and replace it with the text you need. Also notice that the text in a label or on a command button is the text in the Caption field in the Properties window, so you can replace the text in that window if you prefer.
-
Notice that, on the Format menu, you have Align tools as well as Horizontal Spacing and Vertical Spacing options. Select controls as you would shapes on a slide and use these formatting tools to align the controls, as you see in the preceding sample.
It’s worth noting that the Align options here work similarly to the way they work in Microsoft Visio and not as you may be familiar with from PowerPoint. That is, controls align to the first control you select. The dominant control has white handles when selected, so that you can easily identify the direction in which selected controls will align. (However, holding the Shift key while selecting constrains which controls you can select. If you hold the Ctrl key instead, you can select any controls on the form in any order, and the last object you select will be the dominant control.)
-
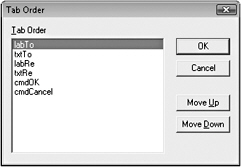
Right-click the form and then click Tab Order. In the Tab Order dialog box, move control names up or down as needed so that an applicable label appears immediately before its related text or combo box control, and so that the controls appear in the order in which you’d want to access them if you were tabbing through the dialog box. For the sample form, my completed Tab Order dialog box looks like the following.

Note that, if a label doesn’t precede its related field, using the accelerator key on the label won’t access that field.
Once your controls are named and positioned, you’re ready to add the automation you’ll need to use this form.
Automating a UserForm
There are two parts to automating a dialog box, as follows.
-
The code you add directly to the control, to manage its behavior in the dialog box.
-
The code you write in a module to display the form and use it to interact with the user.
Depending on the types of controls that your dialog box includes, the code in your UserForm might get rather complex. For our sample dialog box, however, all we need is code to manage what happens when a command button is clicked. To do this, start by double-clicking the OK button.
When you double-click a control, the code for that control appears with a procedure created for you, using that control’s default event Similar to document-level events (discussed earlier in this chapter), the name of the procedure connects it to a specific event. For command buttons, the default event is the one you’ll usually want. For others, however, you might want to change the default event (for example, the default event for a check box is click, but you might need an event to occur when the value changes rather than when the box is clicked). As with document-level events, the available events in the Procedure list are those available to the type of control you’re automating (the control selected in the Object list).
For the OK button, all you need to do is set it to hide the form. The macro that runs the form will continue to run after the form is hidden by the user. For the Cancel button, however, you’ll want to unload the form and then end code execution (in two separate procedures), so that the macro doesn’t continue to run.
You can refer to a UserForm as Me in code contained in that UserForm. Though you can also refer to the form by name, using Me is handy because you won’t need to change the references if you change the form name. The code for the OK and Cancel buttons would look like this:
Private Sub cmdOK_Click() Me.Hide End Sub Private Sub cmdCancel_Click() Unload Me End Sub
You can end code execution from the preceding event for the Cancel button. However, if you instead add a separate event-the Terminate event for the UserForm-you’ll also account for the user clicking the close button in the title bar of the UserForm instead of using your Cancel command button. This additional event looks like the following.
Private Sub UserForm_Terminate() End End Sub
To create this event, you can simply type it beneath the other events in the Code window for your UserForm. Or, select UserForm from the Objects list at the top of that Code window and then select Terminate from the Procedure list. Note that, when you select UserForm, its default event (Click) will be added to your code. You can simply delete that if you don’t need it.
| Note | To toggle between a UserForm and its code, right-click the form name in Project Explorer and then click View Code or View Object, as needed. |
To automate the form in a procedure that you’ll run from a module, set up anything you want to specify about how controls look when the dialog box is launched, then show the dialog box (using the Show method you see in the following sample) and then execute any commands you want for using the information the user adds in a dialog box. Take a look at one possible sample macro for automating the preceding dialog box.
Sub Fax() With frmSample .txtTo.Value = "" .txtRe.Value = "" .Show With ActiveDocument.Tables(1) .Cell(1, 2).Range.Text=frmSample.txtTo.Value .Cell(2, 2).Range.Text=frmSample.txtRe.Value End With End With End Sub
Let’s take a walk through this code.
-
First, I set up a With…End With structure using my UserForm, which I named frmSample, as the object.
-
Within that grouping structure, all controls that I added to the form are members of the frmSample object. So, when I start a new line inside that With…End With structure by typing a period, I get an Auto List that includes the control names I added to the form. In the preceding code, I set the values of the To and Re text boxes to nothing, so that the last value the user set wouldn’t be accidentally left behind.
-
The Show statement appears on a line by itself. This action displays the dialog box to the user.
I added another With…End With structure here because typing ActiveDocu-ment.Tables(1) is longer than typing frmSample, and I need to reference the first table in the document on each line where I’m placing the text the user adds to each text box in the dialog box into a specified table cell in the document. (Note that bookmarks, hidden bookmarks in particular, are another common method of identifying where in a document to place information collected in a dialog box.)
Because frmSample and ActiveDocument.Tables(1) are completely separate objects, when my insertion point is inside the ActiveDocument.Tables(1) With…End With structure, notice that I can’t use the frmSample With…End With structure that surrounds it. In a procedure this short, the second With…End With structure is used only to demonstrate placing one independent grouping structure within another-but where you have more dialog box controls, with more actions to take, doing this might save you some code.
To learn about adding and automating more complex controls on a dialog box (such as combo box or multipage controls) or to learn other options for automating your UserForms (including what types of procedures you can do directly from the UserForm’s code), see the additional resources recommended in the next section of this chapter.
| Note | Because the macros provided in the preceding section reference UserForms, this code is not included in the sample file |
EAN: 2147483647
Pages: 299