Building a Report in Layout View
In this chapter you’ve learned how to create a report from scratch in Design view, to quickly build a simple report using the Report command, to create a report using the Report Wizard to get a jump-start on your work, and to use Layout view to modify an existing report. You’ve been creating a Contact Events report in the preceding sections, so we’ll continue this example now using Layout view.
Starting with a Blank Report
If you want to follow along in this section, open the ![]() ContactsDataCopy.accdb database. Click the Blank Report button in the Reports group on the Create tab. Access 2007 opens a new blank report in Layout view with the field list displayed on the right, as shown in Figure 30–37.
ContactsDataCopy.accdb database. Click the Blank Report button in the Reports group on the Create tab. Access 2007 opens a new blank report in Layout view with the field list displayed on the right, as shown in Figure 30–37.
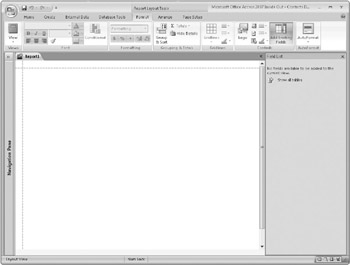
Figure 30–37: Access always opens in Layout view when you click the Blank Report button.
The report does not yet have a record source, so no fields are displayed in the field list. You can click Show All Tables in the field list to display a list of all tables in this database, but you want to use the saved qryRptContactEvents query that contains all the fields you need from several tables. Click the Property Sheet button in the Tools group on the Arrange tab, click the All tab, and select the qryRptContactEvents query for the Record Source property. Switch back to the field list by clicking the Add Existing Fields button in the Controls group on the Format tab, and then click Show Only Fields In The Current Record Source at the bottom of the field list to show only the eight fields in the query, as shown in Figure 30–38.
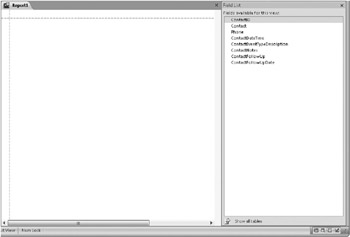
Figure 30–38: Assign the qryRptContactEvents query as the new report’s record source.
You should start this new report by entering a title, so click the Title button in the Controls group on the Format tab. Access places a label control in the upper-left corner of the report and enters the name of the report as Report1. Click inside this label, highlight the existing characters, and change the text to Contact Events. As you type the new characters, Access automatically resizes the label to accommodate the length of the new text. Press Enter to save the new title in the control.
Adding Grouping and Sorting
You need to set up the grouping and sorting options for the ContactID and ContactDateTime fields as you did earlier in the chapter. Click the Group & Sort button in the Grouping & Totals group on the Format tab to open the Group, Sort, And Total pane. Click the Add A Group button and set the following options for ContactID, as shown in Figure 30–39:
Group On ContactID From Smallest To Largest, By Entire Value, With No Totals, With Title Contact ID, With A Header Section, With A Footer Section, Do Not Keep Group Together On One Page
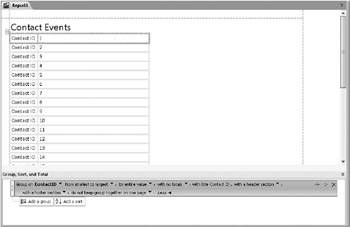
Figure 30–39: After you add ContactID as a group level, Access adds that field to the report grid.
As soon as you select ContactID in the Select Field box that opens when you click the arrow next to Group On, Access 2007 places a text box bound to ContactID and an associated label on the report. In Layout view, it’s hard to see where the different report sections begin and end. When you create the ContactID group level, Access creates a header and footer for this group, but because you see live data in Layout view, the actual design layout can sometimes be hard to visualize. Right now it almost looks like the ContactID field is in the report’s Detail section because you see all the records listed one right after another. Switch to Design view for a moment and take a quick look at what Access has created so far. In Figure 30–40, you can see that Access correctly placed the title label in the Report Header section instead of the Page Header section. The ContactID field and label are positioned in the new ContactID group level (as shown in the ContactID Header section). This is what you want, so switch back to Layout view to continue creating your report.
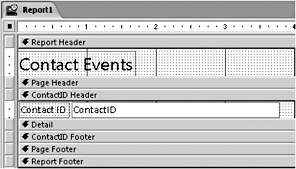
Figure 30–40: In Design view, you can see where Access has placed the various controls in the report sections.
You need to add a sort on the ContactDateTime field, so click the Add A Group button in the Group, Sort, And Total pane and set the following options for ContactDateTime:
Sort By ContactDateTime From Newest To Oldest, By Entire Value, With No Totals, With Title Date / Time, Without A Header Section, Without A Footer Section, Do Not Keep Group Together On One Page
| Inside Out-Save a Step by Choosing Add A Group Instead of Add A Sort | You could also click Add A Sort to define the sort on the ContactDateTime field, but Access 2007 won’t add the field to the report layout. When you click Add A Group, Access builds a group header section and adds the ContactDateTime field. When you change the grouping specification to Without A Header Section, Access moves the ContactDateTime field into the Detail section for you. This saves having to find the field in the field list and add it yourself. |
Just as before, Access places a new control and label on the report for you after you select the ContactDateTime field, as shown in Figure 30–41. In this case, Access places this field in the Detail section of the report when you select Without A Header Section. After you select Without A Header Section, you’ll notice that With Title changes from Date / Time to Click To Add. Access moves the label and text box from the new ContactDateTime Header section into the Detail section. The new label still shows Date / Time, but Access changes the specification to show Click To Add in the With Title column. You can now see the report beginning to take shape with two fields on the grid and the controls displaying live data. Close the Group, Sort, And Total pane now.
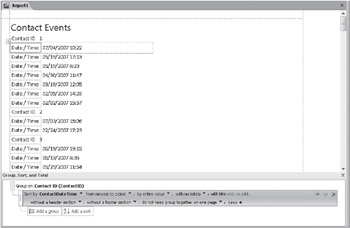
Figure 30–41: Access adds the ContactDateTime field to the Detail section below the ContactID field.
Now that you have all your grouping and sorting set up, you need to add the additional fields onto the report. If necessary, click the Add Existing Fields button in the Controls group on the Format tab to open the field list again. Click the Contact field in the field list, drag it onto the report, and drop it just below the Contact ID label and text box, as shown in Figure 30–42. When you have it correctly positioned, Access displays a horizontal I-bar below the Contact ID controls.
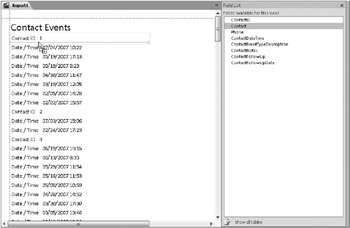
Figure 30–42: Drag the Contact field and drop it below the ContactID field.
Access places the Contact field right below the Contact ID label and text box controls and appears to push the Date / Time records down the page. Now that you have the Contact field in place, you really don’t need the ContactID field at all. Earlier in the chapter when you built this report in Design view, you didn’t include the ContactID field because the number itself is probably meaningless to whoever sees this report. The contact’s name is more important, so let’s delete the ContactID controls now. Click on either the ContactID label or text box and press Delete to remove these two controls from the grid. Alternatively, you can click the Delete button in the Records group on the Home tab. Your report should now look like Figure 30–43.
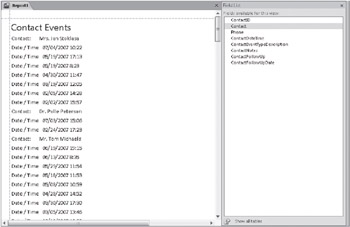
Figure 30–43: Access moves the other controls up after you delete the ContactID text box and label.
| Inside Out-Why Delete the ContactID Controls? | It’s true that you probably could have created the group header directly using the Contact field rather than ContactID to see a similar end result. However, for each contact, only the value in the ContactID field is guaranteed to be unique. (It’s the primary key of the tblContacts table.) Although it’s highly unlikely to find two contacts with the same name, it could happen, and you would end up with contact event data for multiple unique contact ID values grouped under one heading. Also, creating a group on a numeric value (ContactID) is slightly more efficient than creating a group on a text value (Contact). |
Now let’s add the Phone field to the report beneath the contact name. Click the Phone field in the field list, drag it onto the report, and drop it just below the label and text box controls for the first contact. As before, make sure the I-bar is right below the contact label and text box controls before releasing the mouse. Access places the Phone field in the ContactID Header section and lines up the control to match the Contact field. (You can switch to Design view if you’d like to see this.)
Working with Control Layouts
When you’re designing a report in Layout view, Access 2007 automatically places any controls that you add to the report inside a control layout. Control layouts help you to align and position controls on reports and forms. You can think of a control layout as being similar to a table in Microsoft Word or a spreadsheet in Microsoft Excel. When you widen or narrow one control in a column, you change the width of any other controls in that column that are part of that control layout. Likewise, when you increase or decrease the height of a control, you’re changing the height of all the controls on that row.
There are two kinds of control layouts in Access 2007-stacked and tabular. In a stacked control layout, Access “stacks” bound controls for different fields in a column and places all the labels down the left side. You can have multiple sets of stacked controls within a section. Any controls (including associated labels) in a stacked layout must all be in one section. In the report you’ve built thus far, Access has placed the contact and phone number controls in a stacked layout in the ContactID Header section. It has also placed the contact date/time controls in a stacked layout in the Detail section.
In a tabular control layout, Access places bound controls horizontally with labels along the top as column headings-much like rows on a spreadsheet. A tabular control layout can include controls in different sections of a report-for example, the labels can appear in a header section and the data controls in the Detail section. You’ll learn later in this section how to convert the stacked layout for fields in the Detail section into a tabular layout.
| Inside Out-Is Layout View a Useful Way to Build Reports? | The answer depends on your level of expertise. As experienced developers, we find Layout view somewhat frustrating. It’s not always obvious which section contains the controls for a field that we’ve just added to the report. Notice that we recommend you switch to Design view several times during the design process to verify where Access has placed controls. Also, Access automatically adds any field into a control layout, and you don’t have much control over how it does this. Although control layouts can help you align controls in a pleasing way, they severely restrict how you place your controls and how you size them within a layout group. If you’re an experienced developer, you might use Layout view to quickly place controls in a new report design, but then you’ll probably switch to Design view to selectively remove control layouts so that you can finish customizing your design. |
The text box controls for the Phone field and the Contact field are both too wide at this point. You can see this by clicking any of the controls for either field-Access draws a dotted line showing you the boundary of all the controls in the stacked layout group. Start by clicking the Phone field text box, move your mouse to the right edge until it becomes a double-sided arrow, and then click and drag the edge of the field to the left but make sure you don’t shorten the field too much. Give yourself more room than you think you might need on the right side because as you resize the Phone field you’ll notice that Access resizes the Contact field as well, and you need enough room in that field to display the names on one line. You can see this effect in Figure 30–44. (Note: The longest contact names are near the end of the list.) When you resize the Phone field, you resize the Contact field and vice versa, so if you shorten the Phone field too much, Access has to move some of the data in the Contact field down to a second line.
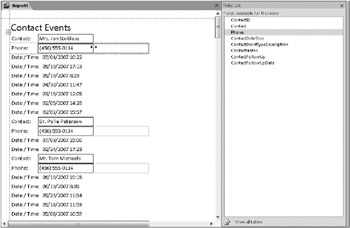
Figure 30–44: Access resizes the Contact and Phone fields together.
The only control in the Detail section of the report at the moment is the ContactDate-Time field. You’ll eventually need to convert this stacked control layout to a tabular control layout, and you’ll need some additional horizontal space. If you click the ContactDateTime text box, you’ll see that it is far wider than it needs to be. Grab the right edge of the control and drag it to the left so that the text box is just wide enough to display all the data.
To see how this affects placing additional controls in the section, click ContactEventTypeDescription in the field list and drag it to the right edge of ContactDateTime. Access lets you place the horizontal I-bar either above or below the ContactDateTime field controls, but not to the right of the field, which is what you want to do. Go ahead and drop it below the first ContactDateTime control, as shown in Figure 30–45.
After you release the mouse, Access places the ContactEventTypeDescription field directly below the ContactDateTime field and sizes it to match the width of the ContactDateTime field, as shown in Figure 30–46. Because the width you chose for the ContactDateTime field won’t allow the data in ContactEventTypeDescription to fit on one line for all records, Access expands the height on those records that have more characters.
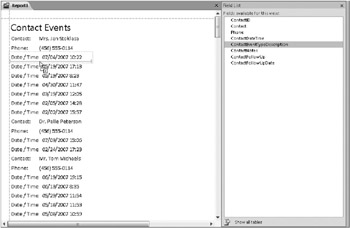
Figure 30–45: Drop the ContactEventTypeDescription field below the first ContactDateTime field.
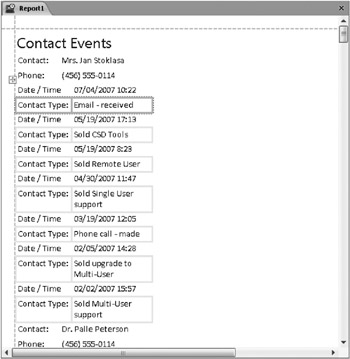
Figure 30–46: Access places the ContactEventTypeDescription field into the stacked control layout with the ContactDateTime field.
If you added the remaining three fields-ContactNotes, ContactFollowUp, and ContactFollowUpDate-to the report Detail section, Access would also stack these down the left edge on the report. You want to see these fields placed horizontally across the report, so you need to change the control layout in this section from stacked to tabular. Click the Date / Time label or text box, hold down the Shift key, and then click the Contact Type label or text box to select both controls. Click the Remove button in the Control Layout group on the Arrange tab to remove the control layout applied to this section, as shown in Figure 30–47.
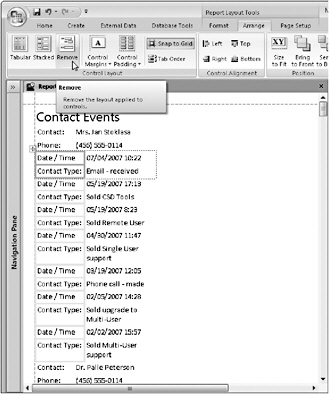
Figure 30–47: You can remove control layouts by clicking the Remove button on the Arrange tab.
Now that you have removed the control layout for the Detail section, these controls act independently-if you resize one control, the other will not resize. If you add new fields to the Detail section at this point, you might have some extra work in getting everything properly aligned. Because you want to see the other fields displayed horizontally, applying a tabular control layout to the Detail section will make placement and alignment of the new fields much simpler. Select the Date / Time and Contact Type labels or text boxes as you did previously, and then click the Tabular button in the Control Layout group on the Arrange tab, as shown in Figure 30–48.
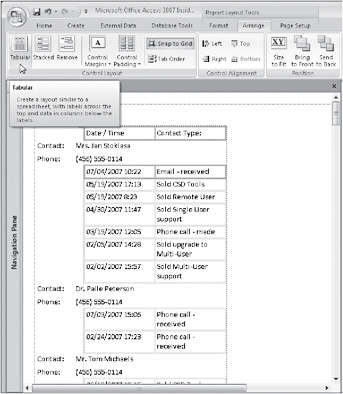
Figure 30–48: The tabular control layout arranges the controls with labels horizontally across the report.
| Inside Out-You Don’t Have to Remove a Layout Before Converting It | Although we told you to select both controls in the Detail section and then click Remove, you don’t actually have to do that. We added that step so that you could see the controls independent of the layout. When you want to convert a layout from stacked to tabular or vice versa, select the controls in the layout and then click the layout you want in order to directly convert it. |
Access now places the labels and text box controls for the ContactDateTime and ContactEventTypeDescription fields in a tabular format. The two labels are placed horizontally across the report just below the report title. Access also moves the ContactEventTypeDescription text box to the right of the ContactDateTime text box control. (Access has actually placed the labels in the Page Header section-you can verify this by switching briefly to Design view.) During the switch to tabular format, Access also moves the labels and controls about one inch from the left side of the report. This layout is now closer to the report you built from scratch in Design view earlier in this chapter.
Because these two field controls are now next to each other instead of stacked, you can change the width of one of them without affecting the other. Let’s move both the labels and text boxes back to the left margin of the report. Click the Date / Time label and increase the width by dragging its left edge to the print margin dotted line on the left side of the report. The Date / Time label is aligned with the left margin of the report, but now it’s too wide, so decrease the width by dragging its right edge toward the left. As you resize the label, Access also resizes the ContactDateTime field control. Release the mouse when you can still see all the data in the ContactDateTime field control. Access moves the Contact Type label and the ContactEventTypeDescription field to the left after you reduce the width of the date/time controls. Now click the Contact Type label and expand the width to the right to allow extra room for the characters in the longest ContactEventTypeDescription field control. After you have expanded the width, Access reduces the height of the ContactEventTypeDescription field control to one line, as shown in Figure 30–49.
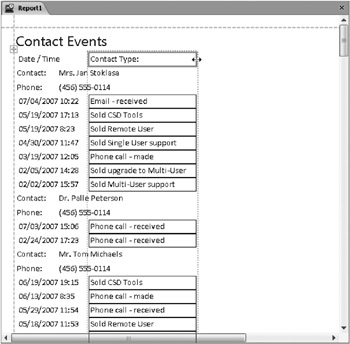
Figure 30–49: Expand the width of the ContactEventTypeDescription field so that the data fits on one line.
Now you’re ready to add the three remaining fields to the report. Click ContactNotes in the field list and drag it to the right edge of the Contact Type label until you see a long vertical I-bar, as shown in Figure 30–50. The vertical I-bar indicates that the field is in the right position, so release the mouse. Access places a Notes label along the same line as the Date / Time and Contact Type labels and a Notes field next to the ContactDate-Time and ContactEventTypeDescription field controls in the Detail section, as shown in Figure 30–51.
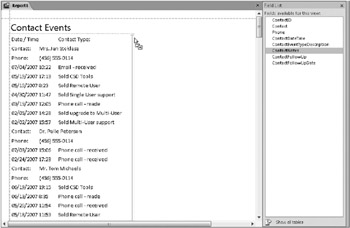
Figure 30–50: Use the vertical 1-bar to help you position the ContactNotes field.
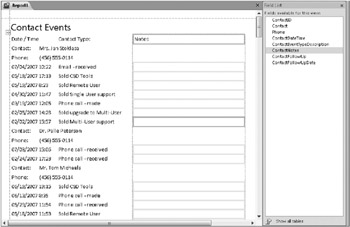
Figure 30–51: After you drop the ContactNotes field on the report Access adds a label and text box control to the appropriate report sections.
The ContactNotes field is too wide at this point, so reduce its width by dragging its right edge toward the left side of the report. Now drag the ContactFollowUp field to the right of the Notes label using the same technique. After the ContactFollowUp field is in place, drag the last field, ContactFollowUpDate, into position to the right of the ContactFollowUp field. Close the field list so that you can see the whole report grid and the right print margin. Because these controls are in a tabular control layout, if you resize the width of one of them, the others move to the left or right accordingly. Make any small adjustments you need to the widths of the fields so that you can see all the data, but make sure the ContactFollowUpDate field does not extend past the right print margin. Your report at this point should look like Figure 30–52.
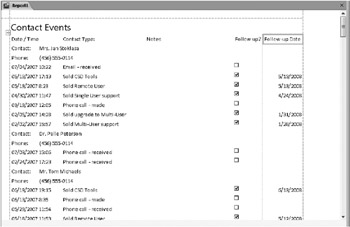
Figure 30–52: Your report is beginning to take shape with all the fields now in place.
Adding Totals to Records
All your fields are in place, so now you can add some controls for counting the events and follow-ups. You can add some of these elements to the report while in Layout view, but you’ll still have to fine-tune the report using Design view, as you’ll soon see. Start with adding a count of the follow-ups by right-clicking on the Follow Up? label and clicking Total Follow Up? and then Count Values, as shown in Figure 30–53.
Access places a new control in the ContactID Footer section in the same column as the ContactFollowUp field, as shown in Figure 30–54. Remember that when you created this report using the Report Wizard, you had to correct the Sum expression for the ContactFollowUp field to display a correct count of the number of contact events requiring a follow-up. (See page 1047.) In this case, Access correctly creates an expression to total the number of True values in the ContactFollowUp field. (The Count Records option, shown in Figure 30–53, would ask Access to calculate a simple count of the number of records in that group, which is not we want for this field.) To align the total with the check boxes, click the new control-where you see the number 5-and then click the Align Left button in the Font group on the Format tab.
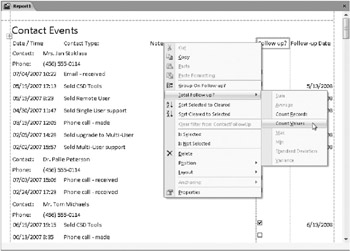
Figure 30–53: Click the Count Values command to create a control to total the follow-ups for each contact.
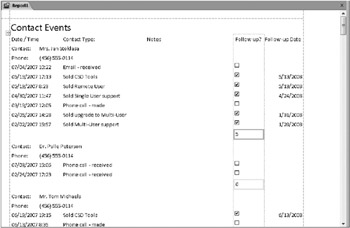
Figure 30–54: Access creates an expression to count the number of True values for the ContactFollowUp field.
You need to create a similar count of event records for each contact, so right-click the first ContactEventTypeDescription field (under the Phone field), and click Total Contact Type and then Count Values, as shown in Figure 30–55.
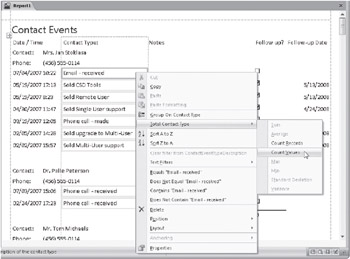
Figure 30–55: Click the Count Values option to create a control to total the event records.
Access places another new control in the ContactID Footer section in the same column as the ContactEventTypeDescription field, as shown in Figure 30–56. Access now displays a correct count of the number of events.
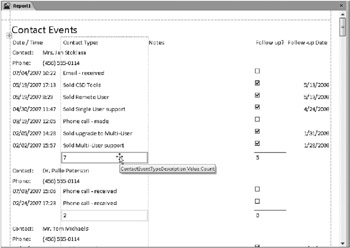
Figure 30–56: Access now correctly displays a total of events for each contact.
When the report is printed, it would be nice to have a page number at the bottom of the page. Click the Insert Page Number button in the Controls group on the Format tab to open the Page Numbers dialog box, discussed in “Completing the Report” on page 1031. Select the following options in the Page Numbers dialog box: Page N Of M, Bottom Of Page [Footer], Alignment set to Right, and Show Number On First Page. Click OK to close the Page Numbers dialog box.
| Note | You won’t immediately see a difference to the report in Layout view after you add a page count. If you scroll to the bottom of this report, you’ll see the control says Page 1 Of 1. In Layout view, Access does not count the number of pages because it is not actually formatting the pages for printing. If you switch to Design view, you can see that Access placed the control on the right side of the report in the Page Footer section. If you switch to Print Preview, you can see the correct page numbers displayed on each page. |
Applying an AutoFormat
Your report is functional right now, but with a little formatting you can make it look more professional and also easier to read. You could selectively add some color to certain controls to highlight specific areas, but here again you can let Access do most of the work. Access 2007 has 25 built-in AutoFormats to spice up your reports. You can easily click one of the AutoFormats to see what it would look like applied to your report. If you don’t like it, click the Undo command on the Quick Access Toolbar and then try another one. To match the report you created previously using the Report Wizard, let’s choose the Access 2007 AutoFormat style. Click the arrow under the AutoFormat button in the AutoFormat group on the Format tab to display the gallery of AutoFormats, and then click the Access 2007 style, as shown in Figure 30–57.
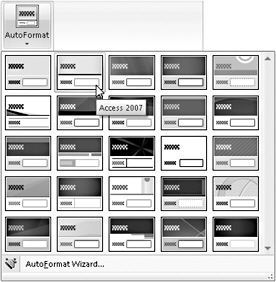
Figure 30–57: Select one of the AutoFormats to give your report a more professional look.
You see an instant change to several elements of your report. Access added some background color to all the labels going horizontally across the screen. The font size changed from 11 to 10 in some of the controls, and Access even added some alternating background color to the detail records, as shown in Figure 30–58.
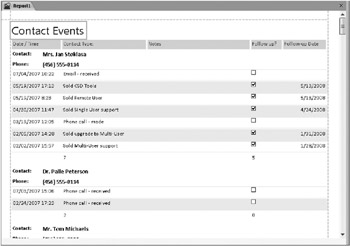
Figure 30–58: Access makes several visual changes to your report when you select an AutoFormat
Save your report and then switch to Print Preview to see how your report will print on paper. The report still needs some fine-tuning to exactly match the reports you created earlier in this chapter. You need to add a label and a text box next to the two Sum controls in the ControlID Footer section to list the name of the contact and the descriptive text of follow-up information. You could also move the Title control into the Page Header section so that it appears on every page instead of only the first page. You can find this report (after we made these few changes) saved as rptXmplContactEvents4 in the sample database. As you can see, Layout view allows you to quickly create a professional-looking report in Access 2007.
You should now feel comfortable with constructing reports. In this chapter, you’ve seen that Access 2007 presents many tools and views to assist you in creating professional and functional reports. In most cases, you’ll find that using a combination of these tools-Design view, Layout view, the Report command, and the Report Wizard-is the best way to create reports.
EAN: 2147483647
Pages: 299