Reviewing, Approving, and Tracking Changes
Collaborating with others typically means your presentation will be shared with others during its development phase. And when others have a chance to work on your presentation, you’re going to want a method for noting all the changes that are made. Obtaining reviews and approvals for your presentation is typically handled by attaching your presentation to an e-mail message and sending it to those you need input from. Reviewers then use the Comments feature to add, edit, or delete comments and show or hide revisions.
Each comment has the initials of the user who made it along with a number to identify the specific comment-these identifying characteristics make it easy to track who made a comment.
Adding Comments
Comments are simply notes that are added to an entire slide or to just a letter or word on a slide. After a comment has been added, reviewers can add new comments and even edit existing comments made by previous reviewers. It’s important to remember that comments are simply that; they do not change any content in your presentation. Whether you agree or disagree with a comment, you will need to make the actual changes on the slide.
To add new comments to a slide, follow these steps:
-
Select the letter, word, or slide where you want to make the comment.
-
On the Review tab, in the Comments group, click New Comment.
-
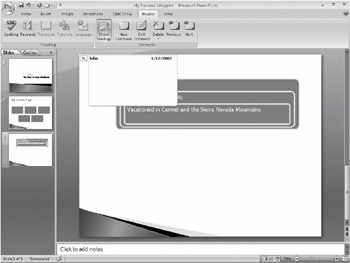
In the comment box that appears on the slide, as shown next, make your comments.

Notice that your name and the date appear in the comment box automatically. The Show Markup command will automatically be enabled when the comment box opens. If you do not want the comment box to appear automatically, click Show Markup to make it disappear.
-
When your comment is complete, click any where else on the slide to close the comment box.
| Note | Comments will not appear during your slide show. However, if someone might read the presentation in another view, you should remove all comments from your slides before sharing the presentation with others. Comment boxes are distracting when viewing the presentation, and many people prefer to simply open a presentation and view it in Normal view-where your comments will appear. If you don’t want to lose the comments forever, cut and paste them into the Notes pane for your slide, and pull that pane down low enough that readers won’t be distracted by it. |
Editing and Deleting Comments
Now that you have added a comment to your presentation, you can perform a couple of actions with it. You might need to edit a previous reviewer’s comment (perhaps you need to respond to a reviewer’s question, for example), or maybe you want to delete a comment.
| Note | Edits to comments are not tracked in any way. You need to review and individually respond to or delete each comment in the presentation. |
To edit a comment, do the following:
-
Click the comment box you want to open.
-
On the Review tab, click Edit Comment in the Comments group.
-
Type your new comments.
-
Click outside the box anywhere on the slide when you’re done. This closes the comment box.
To delete a comment, follow these steps:
-
Click the comment box you want to open.
-
On the Review tab, click Delete in the Comments group.
You can move easily between comments by simply clicking the Previous and Next buttons in the Comments group on the Review tab.
| Note | PowerPoint 2007 will automatically place comments in locations it sees as appropriate on your slide. If you prefer to have all your comments located in a certain area-for example, maybe you want them all located in the upper-right portion of a slide-you can simply click the thumbnail of the comment (where it lists your initials and comment number) and then drag it to the location you prefer. |
EAN: 2147483647
Pages: 299