| The DHCP client configuration procedure is much simpler than that of the DHCP server, where most of the work has to be done. If you elected to use DHCP when installing Solaris 9 on your system, then there is nothing more to do and the DHCP client software will be enabled.  | By default, the DHCP client is enabled to request a hostname dynamically, depending on how the DHCP server has been set up. |
To start using DHCP on a system already running Solaris 9, create an empty file for the primary interface and edit the /etc/default/dhcpagent file so that any IP address assigned to the client is relinquished when the client is shut down or is rebooted: -
Log in as root on the client. -
Edit the client DHCP default parameter file, /etc/default/dhcpagent . -
Go to the entry RELEASE_ON_SIGTERM=yes . This entry is commented out by default, so uncomment it to make the client relinquish its IP address when it shuts down or reboots. -
Create the appropriate interface file to enable DHCP. For example, if your system has an hme0 interface, create the file /etc/dhcp.hme0 as shown here: ultra5# touch /etc/dhcp.hme0 -
Reboot the client.  | When you create the empty interface file, such as /etc/dhcp.hme0 , you do not have to delete the original corresponding interface file, such as /etc/hostname.hme0 . It would still be needed if you disabled DHCP on the client. |
The DHCP client process dhcpagent manages DHCP on the client side and interacts with the DHCP server. When the process starts, it waits for a request from the ifconfig command during the boot process to configure the primary network interface, at which point it starts DHCP. The process also handles the renewing of leases from a DHCP server transparently . The default parameter file, /etc/default/dhcpagent , is read when the process starts and determines the default behavior of the client with regard to DHCP. Configuring a DHCP Client to Request a Specific Hostname The configuration for a client to request a specific hostname, rather than to request a dynamic hostname from the DHCP server, is slightly different, and the procedure to follow is shown here for a system using an hme0 network interface and a hostname of ultra_test : -
Log in as root on the client. -
Edit the default parameter file, /etc/default/dhcpagent . -
Go to the entry REQUEST_HOSTNAME=no . By default this entry is commented out, so uncomment it and modify the entry to REQUEST_HOSTNAME=yes . -
Edit the hostname interface file, such as /etc/hostname.hme0 , and insert the following entry to identify the system hostname as ultra_test , as follows : inet ultra_test -
Disable the dhcpagent process and remove the state file if one exists, as follows: ultra5# pkill dhcpagent ultra5# rm /etc/dhcp/hme0.dhc -
Reboot the client. | | You should note that you still need the file /etc/dhcp.< interface > to be present if you want to use DHCP when the client boots up. If this file is deleted, then DHCP doesn't start up. Also, when specifying a hostname, it must already be configured on the DHCP server as a valid hostname with a valid IP addressyou can't just choose any hostname. |
When you elect to specify a hostname, the DHCP server first checks to make sure the hostname is not already in use on the network, before assigning it to the client. How to Update DNS Dynamically When a client is assigned an IP address and hostname by the DHCP server, the server can also update DNS, so that the new hostname is visible from outside the local domain. To configure DNS dynamic updates, both the DNS server and the DHCP server need to be modified. The following procedure shows how to enable dynamic DNS updates from the DHCP server with an IP address of 192.168.28.28 . -
On the DNS server, log in as root and edit the /etc/named.conf file. For the relevant zone, update both the zone file entry and the reverse lookup entry, adding the following line: allow-update { 127.0.0.1; 192.168.28.28; }; Note that both zone entries must be updated to allow the A records and PTR records to be updated. The modified /etc/named.conf file from Chapter 10, "Domain Name System (DNS)," is shown here to demonstrate the application of dynamic DNS updates: ultra10# cat /etc/named.conf options { directory "/var/named"; }; acl "slaves" { {192.168.28.0/24 ; }; }; zone "." in { type hint; file "named.ca"; }; zone "xyz.com" in { type master; file "db.xyz"; allow-transfer {"slaves";}; allow-update { 127.0.0.1; 192.168.28.28; }; }; zone "28.168.192.in-addr.arpa" in { type master; file "xyz.rev"; allow-update { 127.0.0.1; 192.168.28.28; }; }; zone "0.0.127.in-addr.arpa" in { type master; file "named.local"; }; -
Restart the DNS server process, in.named as follows: ultra10# pkill -HUP in.named -
On the DHCP server, start the DHCP server manager by entering the following command in a CDE window: ultra10# /usr/sadm/admin/bin/dhcpmgr & The DHCP manager window appears. Figure 11.21 shows a sample DHCP server with only two IP addresses configured on the 192.168.28.0 network. Figure 11.21. DHCP Manager window with two IP addresses. 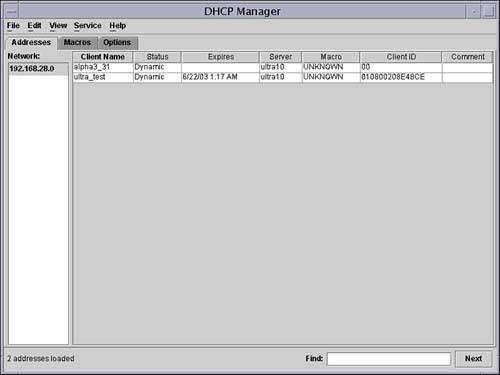 -
Select the Service menu and the Modify option. Figure 11.22 shows the Modify Service Options window. Figure 11.22. DHCP Modify Service Options window. 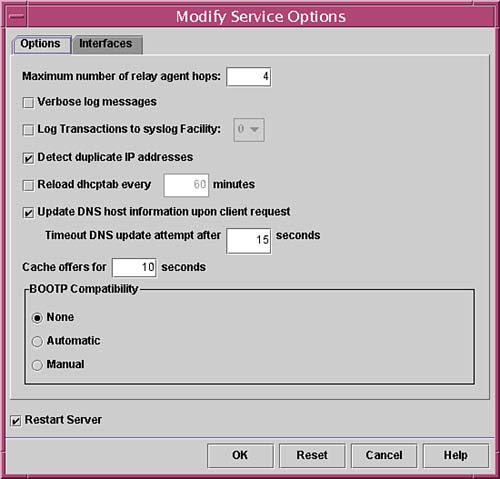 -
Check the Update DNS Host Information Upon Client Request check box. This configures the DHCP server to update the DNS server with newly assigned client information. The default timeout value of 15 seconds should be acceptable, but this can be changed as well, if required. -
Make sure the Restart Server box is also checked at the bottom of the window, so that the changes take effect immediately. -
Click on the OK button to apply the modifications. -
Quit dhcpmgr . |