Controlling the Size of a Shockwave Movie Director gives you control over how your Shockwave movie will behave when a user resizes a browser window. For example, you can set the Shockwave movie to resize dynamically along with the browser window, or to remain the same size regardless of the size of the browser window. To set these resizing options, you use Director's Publish settings. You'll find out more about the Publish settings in the next section, "Working with Publish Settings." Controlling the size of a Shockwave movie involves relationships among three different elements, each of which may be resized independently of the others ( Figure 17.15 ): Figure 17.15. The dimensions of these three elements interact with each other in ways that affect the Shockwave movie's appearance in the browser. 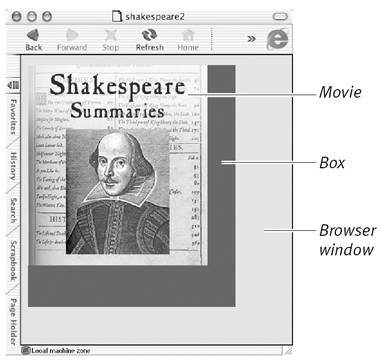 -
The browser window, whose size is determined by the user. -
The rectangle within which the Shockwave movie appears on the HTML page. Macromedia has no official name for this rectangle; we'll just call it "the box." You change the size of the box using the Dimensions menu on the General tab in the Publish Settings dialog box. -
The Shockwave movie itself. You change the size of the movie using the Stretch Style menu on the Shockwave tab in the Publish Settings dialog box. Some of the relationships among these elements may be counterintuitive at first, but will become clear after some experimentation. To set Shockwave movie resizing options: -
Choose File > Publish Settings to display the Publish Settings dialog box. -
Select the General tab ( Figure 17.16 ). Figure 17.16. The General tab allows you to set the size of the box that your Shockwave movie is displayed in.  -
Make a choice from the Dimensions pop-up menu ( Figure 17.17 ): Figure 17.17. Choose a sizing option from the Dimensions pop-up menu.  The choices on this menu affect the size of the box (the rectangle within which the Shockwave movie is displayed), which isn't necessarily the same as the size of the Shockwave movie. -
Choose Match Movie (the default setting) to make the box match the exact dimensions of the Stage in your Director movie. The box will remain at this size regardless of how the user resizes the browser window. If the user makes the browser window smaller than the box, the box (and the movie within it) will be cropped. -
Choose Pixels to set fixed rectangular dimensions for the box by using the Width and Height fields below the menu ( Figure 17.18 ). As with Match Movie, the box will remain at the size you specify regardless of how the user resizes the browser window. Figure 17.18. Set fixed rectangular dimensions for the box by filling in the Width and Height fields when you choose Pixels from the Dimensions pop-up menu.  -
Choose Percentage of Browser Window to make the box change size dynamically along with the browser window. Set percentages in the Width and Height fields below the menu ( Figure 17.19 ) to determine the size of the box relative to the browser window. If you set both of these to 50 percent, for example, then the box will always be half the size of the browser window. The width and height default to 100 percent each. Figure 17.19. Set percentages for the size of the box relative to the browser window by filling in the Width and Height fields when you choose Percentage of Browser Window.  -
Select the Shockwave tab ( Figure 17.20 ). Figure 17.20. The Shockwave tab lets you determine the display characteristics of your Shockwave move, including its size and position. 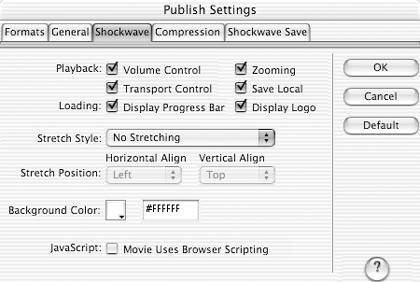 -
Make a choice from the Stretch Style pop-up menu ( Figure 17.21 ): Figure 17.21. Make a selection from the Stretch Style pop-up menu, which determines the size of your Shockwave movie in relation to the box it's displayed in.  The choices on this menu affect the size of the Shockwave movie itself, which isn't necessarily the same as the size of the box you set on the General tab. -
Choose No Stretching (the default setting) to make the movie play at the same size at which it was created in Director, regardless of the size of the box that it's displayed in ( Figure 17.22 ). If the box is smaller or larger than the movie, Director aligns the movie at the upper left corner of the box, as shown earlier in Figure 17.15 . If the box is larger than the movie, Director fills in the unused portions of the box with the color that you'll specify in step 8. Figure 17.22. A Shockwave movie as it looks in a browser when published with the default settings of Match Movie (on the Dimensions menu on the General tab) and No Stretching (on the Stretch Style menu on the Shockwave tab).  -
Choose Preserve Proportions if you want the movie to grow or shrink to fit the size of the box and you also want it to retain its original aspect ratio (that is, its ratio of width to height). If the box is smaller or larger than the movie, Director aligns the movie within the box according to the alignment settings that you'll specify in step 6. If the aspect ratio of the box is different from the aspect ratio of the movie, Director fills in the unused portions of the box with the color that you'll specify in step 8 ( Figure 17.23 ). Figure 17.23. If you choose Preserve Proportions, the movie grows or shrinks to fit the size of the box, but it always retains its aspect ratio. 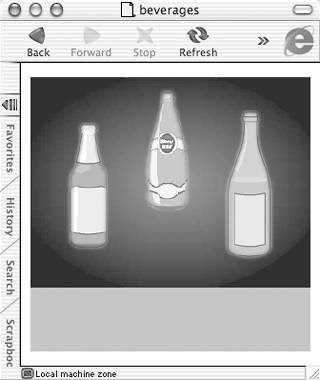 -
Choose Stretch to Fill if you want the movie to grow or shrink to fit the size of the box, without retaining its original aspect ratio. This option is rarely used, since it allows the movie to be distorted ( Figure 17.24 ). Figure 17.24. If you choose Stretch to Fill, the sprites in a movie may appear distorted if the browser window is resized.  -
Choose Expand Stage Size if you want the Stage in the Shockwave movie to grow or shrink to fit the size of the box. Only the Stage changes size; the sprites remain the same ( Figure 17.25 ). If the Stage becomes smaller or larger than the Stage in the original movie, Director aligns the sprites in relation to the Stage according to the alignment settings that you'll specify in step 6. Figure 17.25. If you choose Expand Stage Size, the Shockwave movie's Stage grows and shrinks as the browser window is resized, but the sprites remain the same size. (This movie's original Stage size can be seen in Figure 17.11.)  -
Use the Horizontal Align and Vertical Align pop-up menus ( Figure 17.26 ) to specify how the Shockwave movie is aligned with the box it's displayed in ( Figure 17.27 ). Figure 17.26. Align your movie in the browser window by making choices from the Horizontal Align and Vertical Align pop-up menus.  Figure 17.27. The same movie as in Figure 17.25, with Expand Stage Size still selected, but with the Horizontal Align and Vertical Align pop-up menus set to Center.  (These menus may or may not be available, depending on the previous selections you've made.) -
If you chose anything other than No Stretching from the Stretch Style menu, make sure the Zooming check box is selected ( Figure 17.28 ). Figure 17.28. Choose the Zooming option to allow your movie to resize along with the browser window.  If the Zooming check box (which is selected by default) is deselected, the Shockwave movie will always remain at its original size, regardless of what's chosen on the Stretch Style menu. -
Choose a color from the Background Color menu to specify the color that Director uses to fill unused portions of the box. (This color also fills the entire box when the Shockwave movie is loading.) By default, Director sets this color to be the same as the background color of the Stage. -
Click OK to close the Publish Settings dialog box. |