| Choose File > Publish Settings to change the settings used by the Publish command when you create your Shockwave movie. These settings are saved when you save your Director movie. While the purposes of many of the Publish settings are self-explanatory, a few require some background information: -
Contextual menu: When a Shockwave movie is displayed in a Web browser, users can right-click (Windows) or Control+click (Mac) the browser window to display a contextual menu that contains various playback commands ( Figure 17.29 ). You can determine what commands are available on the contextual menu by making choices on the Shockwave tab in the Publish Settings dialog box. Figure 17.29. This contextual menu becomes available when a Shockwave movie is playing in a browser.  -
Image compression: Because bitmapped images often have large file sizes, it's highly desirable to compress them when they're intended for downloading from the Web. Director allows you to specify compression settings for each bitmapped cast member individually or to set global compression settings on the Compression tab in the Publish Settings dialog box. For more about image compression, see the "Compressing Bitmapped Images" sidebar later in this section. -
Shockmachine: Macromedia used to market a product called Shockmachine that would allow users to download Shockwave movies from the Web, save the movies on their computer, and play them whenever they wanted. (It was mostly used as a games console.) Though Shockmachine is no longer developed or supported, it's still available on a few software-download Web sites. The Shockwave Save tab in the Publish Settings dialog box is intended strictly for movies that are designed for use with Shockmachine. Unless you have reason to believe that your movie will be saved by users of Shockmachine, you can ignore this tab entirely. The Publish Settings dialog box contains up to six tabs, depending on which HTML template you select. This section serves as a reference for these settings. To change the Formats tab settings: -
Choose File > Publish Settings to open the Publish Settings dialog box (if it's not open already). -
Select the Formats tab ( Figure 17.30 ). Figure 17.30. The Formats tab is where you choose the type of HTML file you'd like to associate with your Shockwave movie. It also allows you to rename the movie file and associated files.  -
Choose a template from the HTML Template pop-up menu ( Figure 17.31 ) to determine what sort of HTML file will be created along with the Shockwave movie: Figure 17.31. Choose a template from the HTML Template pop-up menu.  -
Choose No HTML Template to create only the Shockwave movie, without an accompanying HTML file. You might choose this option if you plan to distribute the Shockwave movie with a stub projector (see "To create a stub projector with external movie files" in Chapter 16) or if you plan to create an HTML page in Dreamweaver (see "Creating a Shockwave Movie" at the beginning of this chapter). -
The 3D Content Loader template creates an HTML file identical to that created by Shockwave Default (below), except that it includes a fancier progress bar advertising that the movie includes 3D content. Director selects this as the default template if your movie has any 3D sprites , but there's never any technical need for you to use it. -
Choose Shockwave Default to create an HTML file that simply plays your Shockwave movie, with no " bells and whistles" other than a progress bar and Shockwave logo that appear while the movie loads ( Figure 17.32 ). Figure 17.32. If you select the Shockwave Default template, this logo and progress bar appear while the Shockwave movie loads.  -
Choose Detect Shockwave to create an HTML file that includes code to detect whether users have the correct version of the Shockwave Player installed. If they don't, they receive a message to update their Player; otherwise , the Shockwave movie plays normally. (Note that, due to the many possible combinations of browser versions and operating system versions, this code isn't 100 percent reliable; it can produce false positives and false negatives .) -
Choose Fill Browser Window to expand the Shockwave movie so that it fills the entire browser window. Choosing this option is equivalent to selecting the Shockwave Default template, selecting Percentage of Browser Window (with 100 percent specified for both dimensions) from the Dimensions menu on the General tab, and selecting Stretch to Fill from the Stretch Style menu on the Shockwave tab. (See "To set Shockwave movie resizing options," earlier in this chapter.) -
Choose Loader Game to create an HTML file that displays a game with a progress bar while your Shockwave movie loads ( Figure 17.33 ). When the Shockwave movie is fully loaded, the game disappears (in mid-play!) and the movie plays. Figure 17.33. If you select the Loader Game template, the user can play a game while the Shockwave movie loads.  -
Choose Progress Bar with Image to create an HTML file that displays a progress bar and an image while your Shockwave movie loads. (The image is, by default, the first frame of the Shockwave movie, but this can be changed on the Image tab.) When the Shockwave movie is fully loaded, the image disappears and the movie plays. -
The Shockwave with Image template includes code that automatically installs the Windows version of the Shockwave Player if the user doesn't already have it installed. For Mac users who don't have the Shockwave Player installed, the HTML page displays a still image instead of the Shockwave movie. (The image is, by default, the first frame of the Shockwave movie, but it can be changed on the Image tab.) For users on either platform who already have the Player installed, this template behaves identically to the Progress Bar with Image template (above). -
The Simple Progress Bar template is similar to the Shockwave Default template, but it displays a larger, 3D-style progress bar (without the Shockwave logo) while the Shockwave movie loads (Figure 17.34) . Figure 17.34. If you select the Simple Progress Bar template, this 3D-style progress bar appears while the Shockwave movie loads.  -
The Center Shockwave template is similar to the Shockwave Default template, but it uses an HTML table to center the Shockwave movie on the Web page. -
By default, Director saves the Shockwave, HTML, and image files to the same folder (and with the same name) as the original Director movie. If you want to change the name or location of any of these files, do so in the fields at the bottom of the dialog box ( Figure 17.35 ). Figure 17.35. Specify the names and locations of the HTML and Shockwave files by using the HTML File and Shockwave File fields.  -
The View in Browser check box ( Figure 17.36 ), selected by default, instructs Director to launch the default browser and play your Shockwave movie when you choose the Publish command. If you don't want Director to do these things, deselect the check box. Figure 17.36. Leave the View in Browser option selected if you want Director to launch the default browser and play your Shockwave movie when you use the Publish command.  -
If you don't wish to change any more settings, click OK to close the Publish Settings dialog box.  Tip Tip -
If you choose an HTML template that displays additional material before the beginning of the Shockwave movie, Director may create additional Shockwave files when you publish the movie. (For example, if you choose the Loader Game template, Director will place a file called loader_game.dcr in the same folder in which it places your Shockwave movie.) Be sure to upload these files to the Web server along with the rest of the contents of your distribution folder.
To change the General tab settings: -
Choose File > Publish Settings to open the Publish Settings dialog box (if it's not open already). -
Select the General tab. -
Set the size of the box in which your Shockwave movie will be displayed by making a selection from the Dimensions pop-up menu. (For information about this menu and its choices, see "To set Shockwave movie resizing options," earlier in this chapter.) -
Choose a background color for the Web page by making a selection from the Page Background menu ( Figure 17.37 ) or by entering a hexadecimal value in the adjacent field. Figure 17.37. Use the Page Background color menu to choose a background color for your HTML page.  By default, Director sets this color to be the same as the background color of the Stage. -
If you don't wish to change any more settings, click OK to close the Publish Settings dialog box. To change the Shockwave tab settings: -
Choose File > Publish Settings to open the Publish Settings dialog box (if it's not open already). -
Select the Shockwave tab. -
Set the Playback options to determine which choices will be available to your users from the contextual menu when your movie is played in a browser ( Figure 17.38 ). Figure 17.38. The Playback options determine which menu choices are available from a Shockwave movie's contextual menu during playback.  All of these choices are selected by default. (Note that the contextual menu isn't displayed automatically, so most users won't know that these choices are available.) -
Select Volume Control to allow your users to adjust the volume of your movie. -
Select Transport Control to give your users controls for restarting, pausing, playing, and fast-forwarding your movie. -
Select Zooming to allow the Shockwave movie to resize dynamically when the user resizes the browser window (This option has no effect if No Stretching is selected on the Stretch Style menu. See "To set Shockwave movie resizing options," earlier in this chapter.) -
Select Save Local to allow your users to save the movie in Shockmachine. (This option is, for the most part, obsolete. See the introduction to this section.) -
Set the Loading options to determine what the user will see while the Shockwave movie is being loaded in the browser ( Figure 17.39 ). Figure 17.39. The Loading options determine whether the user will see a progress bar or a Shockwave logo while the Shockwave movie loads.  (These options have no effect unless you've chosen Shockwave Default from the HTML Templates menu on the Formats tab. See "To change the Formats tab settings," earlier in this section.) -
Make a choice from the Stretch Style pop-up menu to determine the size of your Shockwave movie in relation to the box it's displayed in. (For information about this menu and its choices, see "To set Shockwave movie resizing options," earlier in this chapter.) -
Make choices from the Horizontal Align and Vertical Align pop-up menus to determine how the Shockwave movie is aligned with the box it's displayed in. (For information about these menus, see "To set Shockwave movie resizing options," earlier in this chapter.) -
Choose a color from the Background Color menu to specify the color of the box in which the Shockwave movie is displayed. (For more information, see "To set Shockwave movie resizing options," earlier in this chapter.) -
If your movie includes any Lingo scripts that communicate with the browser via JavaScript, select the Movie Uses Browser Scripting check box ( Figure 17.40 ). Figure 17.40. Select the Movie Uses Browser Scripting option if your movie includes any Lingo scripts that communicate with the browser via JavaScript.  -
If you don't wish to change any more settings, click OK to close the Publish Settings dialog box. Tip -
If you don't want viewers of your Shockwave movie to have access to a contextual menu, you can deselect the Display Context Menu in Shockwave check box on the Shockwave Save tab in the Publish Settings dialog box. If you do so, any changes you made to the menu in step 3 become irrelevant.
Compressing Bitmapped Images Director offers two types of compression for bitmapped images: Standard and JPEG. Standard compression is lossless compression, meaning that Director uses sophisticated algorithms to squeeze all the image data into a smaller space for storage. When the movie is played back, Director decompresses the data in order to display the image. The advantage of lossless compression is that the final image looks identical to the original one. However, this form of compression offers relatively little savings in file size, and it causes some delay in playing the movie while the compressed images are being decompressed. If you want to greatly reduce the file size, you can choose JPEG compression. JPEG is a lossy form of compression, meaning that Director throws away information when it stores the image. JPEG compression offers you an image-quality slider that controls how much information will be thrown away, and thus how much the compressed image will differ in quality from the original. There's no "correct" setting for JPEG qualityresults vary from image to image, and the best way to find the optimal setting for a particular movie is trial and error. (Note that JPEG compression doesn't work on images with a bit depth of 8 bits or less.) To get the best results with image compression, you can specify compression settings for each individual bitmapped cast member. Doing so allows you to decide which form of compression (Standard or JPEG) is preferable for each cast member, andif you decide to use JPEGwhat level of quality works best for that particular image. To specify compression settings for a particular cast member, do the following: -
Select the cast member in the Cast window. -
Select the Bitmap tab in the Property Inspector ( Figure 17.41 ). Figure 17.41. The Bitmap tab of the Property Inspector includes compression controls in its lower pane. 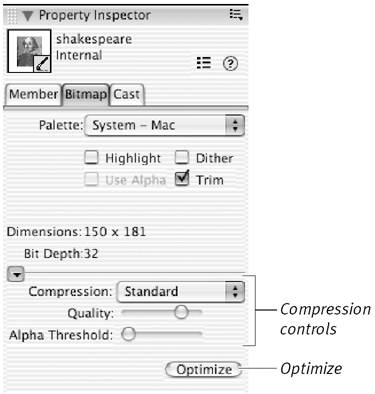 -
Make a choice from the Compression pop-up menu in the lower pane of the Property Inspector ( Figure 17.42 ). Figure 17.42. The Compression pop-up menu.  -
Choose Movie Setting if you want to apply the movie's global compression settings to this cast member (see below). This is the default choice for all bitmapped cast members . -
Choose Standard if you want to apply standard (lossless) compression. -
Choose JPEG if you want to apply JPEG compression; then choose a quality level on the Quality slider beneath the menu. If you have Fireworks MX installed, you can skip these steps and click the Optimize button instead. Fireworks will launch automatically, the cast member will open in Fireworks, and you can use Fireworks' optimization features to find the best compression settings for the cast member. If you don't want to take the time to specify compression settings for each cast member, you can specify global compression settings on the Compression tab in the Publish Settings dialog box (see "To change the Compression tab settings" on the next page). The choices you set there will affect every bitmapped cast member for which individual compression settings haven't been specified. Keep in mind that these compression settingswhether individual or globaltake effect only when a movie is converted to Shockwave format. They have no effect on movies that are saved in a projector, unless the Compress (Shockwave format) option is selected in the Projector Options dialog box. (See Chapter 16, "Creating a Projector.") | To change the Compression tab settings: -
Choose File > Publish Settings to open the Publish Settings dialog box (if it's not open already). -
Select the Compression tab ( Figure 17.43 ). Figure 17.43. Use the Compression tab to compress all bitmapped cast members and sounds used in your movie.  -
Choose either Standard or JPEG image compression (See the sidebar "Compressing Bitmapped Images" for more information.) If you choose JPEG compression, choose a quality level on the Quality slider ( Figure 17.44 ). The lower the quality, the more each image will be compressed. Figure 17.44. Specify JPEG image quality by using this slider.  -
By default, sounds in your movie will be compressed in Shockwave Audio (SWA) format. If you don't want them to be compressed, deselect the Compression Enabled check box ( Figure 17.45 ). Figure 17.45. The sound compression controls affect all sounds in the movie that aren't already compressed.  (This option does not affect MP3 cast members or other sounds that were already compressed when you imported them into your movie. For more information, see "Compressing Sounds" in Chapter 13.) -
If Compression Enabled is selected, choose a bit rate from the pop-up menu. A lower bit rate means more compression but poorer sound quality. -
If you've selected a bit rate of 48 or higher, you have the option to deselect Convert Stereo to Mono. This option, which is selected by default, halves the amount of data in a stereo sound file. -
If you've appended comments to any of your cast members (see "To view and set asset-management fields for a cast member" in Chapter 2) and you want those comments to be included in the Shockwave movie file, select the Include Cast Member Comments check box ( Figure 17.46 ). Figure 17.46. Select the Include Cast Member Comments option to include in the Shockwave file any cast-member comments that you've entered in the Property Inspector.  The comments don't appear in the movie, but they're accessible by Lingo. -
If you don't wish to change any more settings, click OK to close the Publish Settings dialog box. To change the Shockwave Save tab settings: -
Choose File > Publish Settings to open the Publish Settings dialog box (if it's not open already). -
Select the Shockwave Save tab ( Figure 17.47 ). Figure 17.47. In most cases, you can disregard the Shockwave Save tab. It contains controls that allow your movie to work with a discontinued product called Shockmachine.  -
If you don't want viewers of your Shockwave movie to have access to a contextual menu, deselect the Display Context Menu in Shockwave check box. (For more information about the contextual menu, see the introduction to this section.) -
If you specifically need your Shockwave movie to work with Shockmachinean obsolete productfill in the following fields (otherwise, you can just leave them blank): -
In the Suggested Category field, type a category under which the movie will be filed in Shockmachine. -
In the Shockwave Title field, type a movie title that will appear in Shockmachine. -
In the Send URL field, type the URL of the Web page that contains the Shockwave movie. -
In the Icon File field, specify a path to a .bmp file to be used as the icon for the movie in Shockmachine. -
In the Package File field, type the URL of an XML file containing a list of URLs for supporting files (if any) that must be downloaded in addition to the current movie. -
If you entered a URL in the Package File field, use the Total Title Size field to indicate the total size (in bytes) of the files that must be downloaded. -
If you don't wish to change any more settings, click OK to close the Publish Settings dialog box. To change the Image tab settings: -
Choose File > Publish Settings to open the Publish Settings dialog box (if it's not open already). -
Select the Image tab ( Figure 17.48 ). Figure 17.48. Use the Image tab to determine which frame of your movie will be displayed as a still image.  The Image tab becomes visible only when you choose Progress Bar with Image or Shockwave with Image from the HTML Template menu on the Formats tab. (See "To change the Formats tab settings," earlier in this section.) -
In the Poster Frame field, type a frame number from your movie. The specified frame will be displayed as a JPEG image for users who are waiting to view (or cannot view) your Shockwave movie. -
Specify a quality level for the image by using the Quality slider. The lower the quality, the more the image is compressed. -
By default, the image is created as a progressive JPEG file, which means that it will initially display at a low resolution but increase in quality as it downloads. If you want the image to be created as a normal JPEG file (which has a smaller file size but requires a longer delay before it appears), deselect the Progressive check box. -
If you don't wish to change any more settings, click OK to close the Publish Settings dialog box. |