Flylib.com

Books Software


3 Open an Existing Document

 <  Day Day Up  >  

3 Open an Existing Document

Opening an existing document to edit with Writer is simple. You tell Writer you want to open a document file and then locate the file, and Writer loads the document in the editing area.

Before You Begin

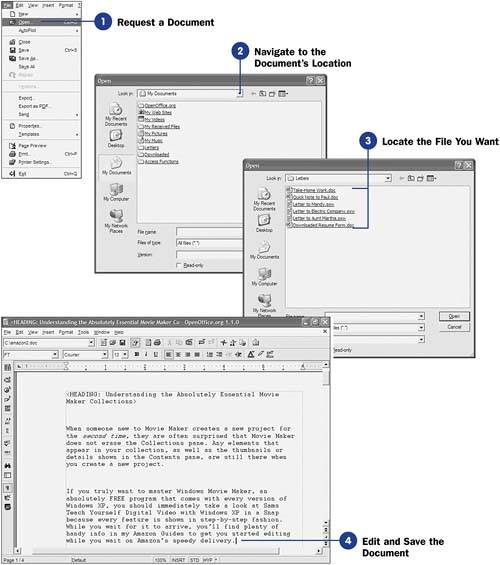
1 Set Writer Options

2 Create a New Document


One important Writer feature is its capability to open documents you create in other word processing programs. Most notably, Writer opens Microsoft Word documents with ease. Although Writer might not fully support 100% of Microsoft Word's advanced features, Writer does a super job of loading Word documents into Writer's workspace so that you can edit the documents using Writer's interface.

See Also

9 Print a Document


graphics/02fig05.jpg

  1. Request a Document

    Select Open from Writer's File menu to display the Open dialog box.

    Writer uses the document extension .sxw for its documents. Writer's file format is XML compatible. Microsoft Word uses the .doc file extension, and both types of files display when you want to locate files to open in Writer.

  2. Navigate to the Document's Location

    The document you want to open might not appear at the default location shown in the Open dialog box, so navigate to the folder in which the document you're looking for resides using the Look in drop-down list.

    TIPS

    graphics/tipbw_icon.gif

    You can open documents from your computer's disk or from elsewhere in the file system. If you want to open a document located on the Web, preface the filename with http:// or ftp:// to open document files from those sources.

    Feel free to open more than one file by holding the Ctrl key while clicking multiple filenames. Writer opens each document you select in its own window. Use the Window menu to select an open document to edit.

  3. Locate the File You Want

    When you locate the folder that holds the document file, select the file you want to open. Then click the Open button to open the selected file in Writer's editing workspace.

    If the default Editing view option on the OpenOffice.org Options page is set, Writer opens the document at the point where it last saved the document. For example, if the document is 35 pages long and you last edited page 20 before saving and closing the document last week, Writer will display that place on page 20 where you last quit editing. The Editing view option enables you to get right back to work where you left off.

  4. Edit and Save the Document

    After the file opens in the Writer workspace, you can edit the file. Navigate to where you wish to make edits (see 5 Edit Text ) or move to the end of the document and add to it (see 4 Type Text into a Document ).

    Once you've made all the changes you wish to make, select File, Save to save your document. Your recent changes will be saved in the document file for your next editing session.

 <  Day Day Up  >  
 <  Day Day Up  >  

4 Type Text into a Document

If you've ever used any word processor before, even a simple one such as WordPad found in Windows, you'll have no trouble editing text in Writer. Writer's editing area remains fairly clear of clutter so you can concentrate on your work.

Before You Begin

2 Create a New Document

3 Open an Existing Document


Writer has tools to help you make the most of your editing sessions. For example, you may want to see more of your document at one time, perhaps to help keep your current paragraph in context with the one before and after it. The Full Screen view removes all menus and toolbars from your editing area to give the maximum amount of space to your editing. Writer's various toolbars are there to provide one-click access to the editing tools you need. For example, Writer's Main toolbar is one of the handiest of all the available toolbars because it puts the common editing tasks just to the left of your editing area, where you can quickly access them. To select an item from the Main toolbar, you'll need to long-click your mouse on one of the buttons .

See Also

5 Edit Text

9 Print a Document


KEY TERM

graphics/newtermbw_icon.gif

Main toolbar ” A vertical toolbar that appears on the screen's left edge, giving you one-click access to spelling, grammar, chart, list, and other tools you'll commonly use.


This task walks you through a short editing session, just to give you a feel for the kinds of movements and tools available to you. Many of the editing skills you acquire in one OpenOffice.org program, such as Writer, will apply to the other OpenOffice.org programs as well. For example, both Calc and Writer offer the capability to display or hide the Main toolbar. The Main toolbar changes slightly depending on which program you use, but most of its functions are similar across the OpenOffice.org programs.

graphics/02fig06.jpg graphics/02fig07.jpg

  1. Position the Insertion Point

    Press the arrow keys to see the text cursor move around your screen. The text cursor is called the insertion point and moves as you press any arrow key. You can also click your mouse within the document to place the insertion point where you next want to type.

    KEY TERM

    graphics/newtermbw_icon.gif

    Insertion point ” A vertical text cursor that shows where the next character you type will appear.

    Text that you type appears at the insertion point. If you make a mistake, press Backspace and Writer moves the insertion point backwards , erasing as you press Backspace . When you get to the right edge of a paragraph, Writer automatically wraps your paragraph onto the next line. Do not press Enter unless you want to end a paragraph and begin a new one. Writer may or may not insert a blank line between paragraphs, depending on how you set up your page (see 14 Set Up Page Formatting ).

    If you press Shift+Enter instead of Enter , Writer ends the current line and begins at the start of the line below without actually creating a new paragraph. You can easily see where paragraphs begin and end by displaying nonprinting characters (see 5 Edit Text ). If you press Ctrl+spacebar instead of the normal spacebar , Writer inserts a nonbreaking space and will not end a line on that space but, if necessary, will move both the word before and after the nonbreaking space to the next line in a word wrap. If you press Ctrl+Enter , Writer begins a new page in the document, even if you had not yet filled up the previous page.

    KEY TERMS

    graphics/newtermbw_icon.gif

    Nonbreaking space ” A space that appears between words when you print the document but does not break at the end of a line. When you want to keep two words together without the end of a line causing them to separate (such as a person's title and name , as in Dr. Smith), use a nonbreaking space so that Writer will wrap them both to the next line if the end of the line would have otherwise separated them.

    Insert mode ” The state of Writer where new text you type is inserted before existing text. It is indicated by the INSRT message on the status bar.

    Overtype mode ” The state of Writer where new text replaces existing text as you type. It is indicated by the OVER message on the status bar.

    For more information about paragraph breaks and using tabs, see 11 About Paragraph Breaks and Tabs .

  2. Type to Add Text Before Other Text

    When you place the insertion point before existing text on a line, Writer normally inserts the text you type in front of the existing text and moves the existing text over to the right. This is called insert mode and is normal behavior for most editors and word processors. If your typing replaces text on the screen, you're in overtype mode instead of insert mode.

    Press the Insert key to switch between overtype and insert modes. If you have a lot of text to replace, you'll find that it's easier to do so in overtype mode because you'll have less text to delete.

  3. Press the Delete Key to Delete Text

    Select text and press the Delete key to delete characters where the insertion point appears. Every time you press Delete , Writer removes one character (including a space, number, or even a blank line if that's where the insertion point is positioned).

    TIP

    graphics/tipbw_icon.gif

    Often you'll start typing a word, such as following , but before you type the fifth letter, Writer finishes the word for you with its word completion feature. Also, if you type a word incorrectly, such as windoes , Writer very well might correct it using its automatic spelling checker. You can turn off this AutoComplete feature from the Tools, Options dialog box.

  4. Gain More Editing Space

    Select Full Screen from the View menu to temporarily hide your toolbars, menu, and the status bar. You will be able to see more of your document at one time. Notice that even when all the other toolbars are hidden in Full Screen mode, the floating Full Screen toolbar appears in the editing area.

    Click the floating Full Screen toolbar's Full-Screen On/Off button to return to the normal editing workspace with full menus, toolbars, and the status bar.

  5. See More of Your Document on the Screen

    Select the Zoom option from the View menu to adjust how much of your document appears on the screen at any one time. In the Zoom dialog box that opens, select from the given list of percentages or click Variable and enter another percentage. The default zoom percentage is 100% , which means that what you see on the screen is the same size as what appears when you print your document. If you change to a higher percentage, such as 200% , you'll zoom more into your document, making the characters look larger on the screen. If you change to a lower percentage, such as 75% , you'll zoom away from your document, seeing more of the page, although you won't see as much up-close detail.

    Click OK to close the dialog box and see the result of your screen adjustment.

    TIP

    graphics/tipbw_icon.gif

    If you're not sure that you want the current version of the file to overwrite the existing version when you save, choose File, Save As instead. Writer asks you for a new filename for the current version of the document, saves it under that name, and doesn't touch the original version.

  6. Save the Document

    After you have edited the text in the document ”and periodically while you are editing ”you should save your changes to the hard disk. To save the document, choose File, Save or click the Save icon on the Function toolbar (the second icon from the left). Writer saves the current version of the file, overwriting the previous version of the file.

 <  Day Day Up  >