| Although Impress's AutoLayout slides define preformatted text, there will be many times when you want to change the text format to something else. You can control many factors related to your presentation's text, including the following: -
Choose the alignment (such as left and right justification) -
Change the text size -
Change the font -
Animate the text (as described in 90 Animate Text ) -
Change the text to a 3D format Before You Begin  87 Enter Text into a Presentation 87 Enter Text into a Presentation
See Also 90 Animate Text  92 Use a Style 92 Use a Style
If you've used other OpenOffice.org programs, such as Writer, you'll feel at home with some of Impress's formatting tools because the font-related options are similar to those of the other OpenOffice.org programs. -
Select Text to Format
Locate the slide that contains the text you want to format. Select the text.
-
Change the Font To change the selected text's font, alignment, display format, or background, select Format, Character from the menu. The Character dialog box appears. You can also right-click over the selected text to display the Character dialog box. Other right-click options are more specific, such as Font, Size, Style , and Alignment , in case you want to change one of those specific aspects of the text. Key Terms  | Superscript ” Small text that begins above the text baseline, as is often used to indicate the square of a number. Subscript ” Small text that begins below the text baseline, as is often used to indicate numbers that drop below the line in chemical formulas. | From the Character dialog box's Font page, you can change the font, the typeface (such as bold or italic), and the size of the text. A preview updates at the bottom of the Font page, showing you how your changes will affect your text. Click to select the Font Effects tab to change other aspects of the text, such as underlining and the text color . The Position tab determines how the text appears on the line (as normal, superscript , or subscript text). Click the OK button to close the dialog box and view your formatted text. 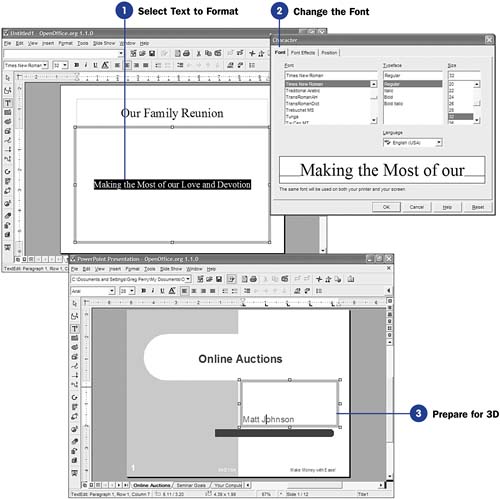 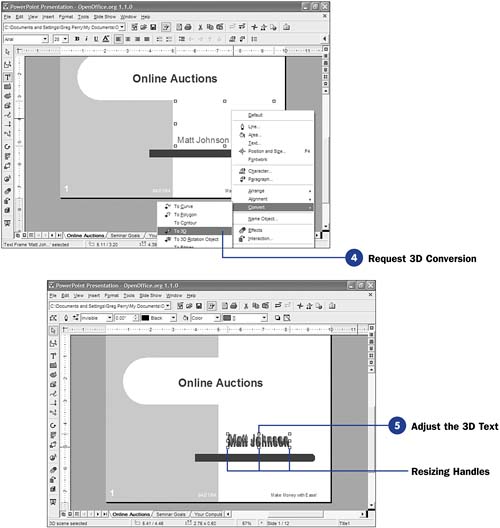 -
Prepare for 3D If you want to convert your text to 3D, you often can, depending on whether Impress can convert the font used to 3D. As appealing as 3D text sounds, I've found that Impress does not perform an adequate conversion. The text is often too dark and thick to work well. You can experiment and decide whether you like the 3D effect. NOTE  | It seems as though Impress makes you jump through hoops to convert text to 3D! | Click to select the text box that holds the text you want to convert to 3D. Impress selects the text and places the resizing handles around it. NOTE | | When converting text to 3D, Impress changes the text to a graphic image. If a text placeholder, such as Type name here , originally appeared where the text was, it may return once the 3D effect occurs. You may need to type a space over the placeholder to hide the placeholder text behind the 3D image. | -
Request 3D Conversion
You now must press the Esc key once. The resizing handles will stay around the text, but the selection outline goes away. Right-click the text to display the menu and then select Convert, To 3D . Impress converts the text to 3D.
-
Adjust the 3D Text
Once the text converts to 3D, drag the resizing handles up and down to make the text appear as clear as possible. Right-click the 3D text and select 3D Effects to adjust the way Impress applies the three-dimensional style to your text.
|