| QuickBook's general preferences affect the way the program works and provide you with an opportunity to set technical performance options, such as what happens when you press the Enter key, how information appears on your screen, and how the editing features work. After you've used QuickBooks for a while, you might want to revisit the general preferences and make changes to those preferences to make your time spent in QuickBooks easier or more efficient. Set Personal General Preferences  Open the Preferences dialog box by selecting Edit, Preferences. Open the Preferences dialog box by selecting Edit, Preferences.
 Click the General option on the left side of the Preferences dialog box. Click the General option on the left side of the Preferences dialog box.
 Click the My Preferences tab at the top of the dialog box if that tab is not already selected. Click the My Preferences tab at the top of the dialog box if that tab is not already selected.
 Check the Pressing Enter Moves Between Fields box if you want to use the Enter key to move between fields the way the Tab key works; otherwise pressing Enter typically completes a transaction. Check the Pressing Enter Moves Between Fields box if you want to use the Enter key to move between fields the way the Tab key works; otherwise pressing Enter typically completes a transaction.
 Check the Automatically Open Drop-Down Lists When Typing box if you want QuickBooks to always display a list of options for your data fields. Check the Automatically Open Drop-Down Lists When Typing box if you want QuickBooks to always display a list of options for your data fields.
 If Beep When Recording a Transaction is checked, you'll hear a "beep" sound every time you complete a transaction. If Beep When Recording a Transaction is checked, you'll hear a "beep" sound every time you complete a transaction.
 If you want to type 1234 and have it appear as 12.34, check the Automatically Place Decimal Point box; otherwise 1234 will appear as 1,234.00. If you want to type 1234 and have it appear as 12.34, check the Automatically Place Decimal Point box; otherwise 1234 will appear as 1,234.00.
 Checking the Warn When Editing option results in a pop-up box appearing every time you make changes to a previously saved transaction. Checking the Warn When Editing option results in a pop-up box appearing every time you make changes to a previously saved transaction.
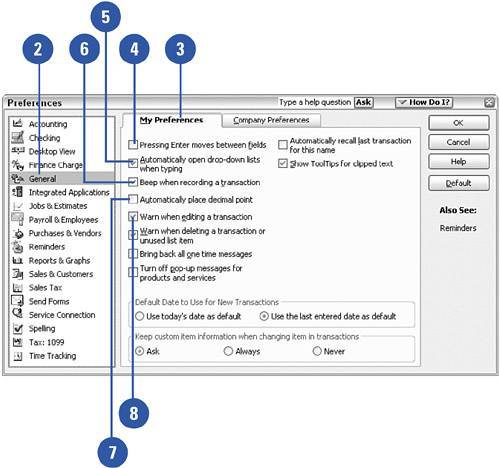  The Warn When Deleting option causes a pop-up warning to appear whenever you attempt to delete a transaction or an item that hasn't been used. The Warn When Deleting option causes a pop-up warning to appear whenever you attempt to delete a transaction or an item that hasn't been used.
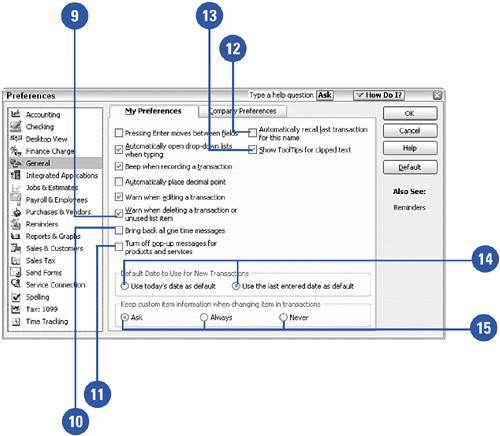
 Check Bring Back All One Time Messages to restore those QuickBooks pop-up reminder messages that give you an option to check the box if you don't want to see the message again. Check Bring Back All One Time Messages to restore those QuickBooks pop-up reminder messages that give you an option to check the box if you don't want to see the message again.
 If the QuickBooks pop-up sales pitch messages are sounding a bit too familiar, you can turn them off completely by checking this box (or uncheck if you want to start seeing them again). If the QuickBooks pop-up sales pitch messages are sounding a bit too familiar, you can turn them off completely by checking this box (or uncheck if you want to start seeing them again).
 Check the Automatically Recall option if you want QuickBooks to read your mind. As soon as you start typing, QuickBooks finds the customer or vendor that matches your entry and fills in all related information. Check the Automatically Recall option if you want QuickBooks to read your mind. As soon as you start typing, QuickBooks finds the customer or vendor that matches your entry and fills in all related information.
Did You Know? You can override customer or vendor information entered by QuickBooks. When you begin a transaction, such as writing a check, you can change the information that fills in automatically right on the form you are using.
|
 When you check the ToolTips option and then place your mouse pointer over a field where the text is too long for the field, QuickBooks displays the extended text. When you check the ToolTips option and then place your mouse pointer over a field where the text is too long for the field, QuickBooks displays the extended text.
 Select Use Today's Date As Default for new transactions, or you can choose the Use the Last Entered Date As Default box instead. Select Use Today's Date As Default for new transactions, or you can choose the Use the Last Entered Date As Default box instead.
 Choose how you want QuickBooks to treat customized descriptions that you enter on formskeep the description you enter on a form even if you change the item selection (Always), remove the descsription when an item is changed (Never), or Ask with each circumstance. Choose how you want QuickBooks to treat customized descriptions that you enter on formskeep the description you enter on a form even if you change the item selection (Always), remove the descsription when an item is changed (Never), or Ask with each circumstance.
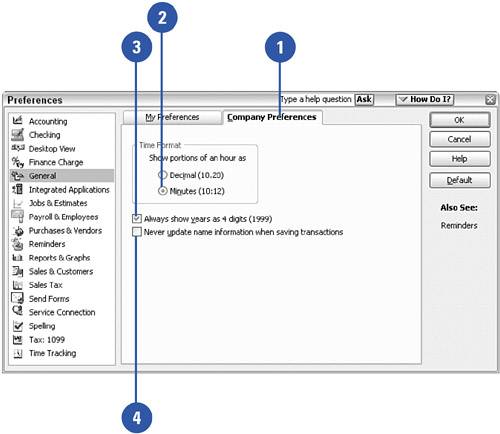
Set Company General Preferences - With General selected on the left side of the Preferences dialog box, click the Company Preferences tab at the top of the box.
- Choose whether you prefer to have time shown in decimal or actual minutes format. The Minutes choice is significant if you use QuickBooks for tracking time.
- Check the Always Show Years As 4 Digits (1999) box, or uncheck the box if you want to display two-digit years.
- If you change vendor or customer information that appears on a form, QuickBooks will prompt you to update the records for that customer or vendor with the new information. Checking the last check box on the Company Preferences tab prevents QuickBooks from changing previously saved information.
TIMESAVER You can quickly update customer or vendor information while filling out a form. With your cursor in the customer or vendor field, press Ctrl+L to open the customer or vendor list. Double-click the name of the customer or vendor you want to edit, make your changes, click OK to save the changes, and then press Esc to close the list. IMPORTANT Save your changes. Any changes you make in the QuickBooks preferences dialog box are ignored by the program if you click the "X" or press Esc to close the preferences window. Be sure to click the OK button to save all your changes.
For Your Information Easy Keyboard Shortcuts for Entering Dates in QuickBooks You don't have to use any special keys like Ctrl or Alt to take advantage of these shortcuts. Just place your cursor in a date field and type the letter or symbol listed here: Action | Shortcut |
|---|
Today | t | Increase date by one day | + | Decrease date by one day | - | First day of week | w | Last day of week | k | First day of month | m | Last day of month | h | First day of year | y | Last day of year | r | Display date calendar | Alt+down arrow |
|
|