Show Me. QuickBooks 2006
Authors: Perry G
Published year: 2005
Pages: 188-191/328
Buy this book on amazon.com >>

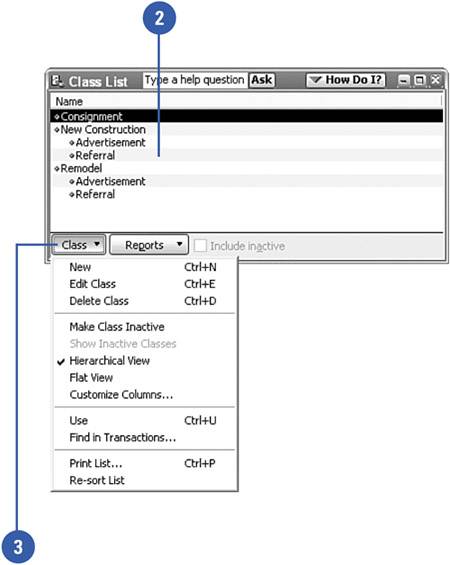
Displaying a Class List

If you click the Lists menu and the Class List does not appear, you haven't turned on the classes feature in QuickBooks. Follow the instructions in the "Setting Up Classes" task that preceded this one to turn on the classes feature. After classes are activated, you can display your class list window at any time.

Select Class List from the Lists menu.

Examine the classes that appear on your list. If you haven't yet started using classes, this list might be blank.

Use the Class menu to perform these tasks :

  • Create a new class (Ctrl+N)

  • Edit a class (Ctrl+E)

  • Delete a class (Ctrl+D)

  • Change the view of classes on the list

  • Search in transactions

  • Print (Ctrl+P) and sort the class list


Using Multiple Classes on One Form

You might think that you can enter only one class per form. But what if the information on your form relates to more than one class? For example, you might need to order items from one vendor that relate to different classes. You can solve this problem by putting a separate class column on the form instead of using the Class box at the top of the form. Then you can designate a separate class next to each item you order.

IMPORTANT

Turn on Classes ! You must have the Class feature turned on before performing this task.


Select Templates from the Lists menu.

Double-click the form to which you want to add a class column.

Click the Columns tab in the Customize window that appears.

Check the box next to Class in the Screen column.

Click OK.


Reporting on Classes

You can display several class- related reports right from the class list window. And don't forget that you can customize many of the QuickBooks standard reports to include a column for your classes. See "Customizing Reports" in Chapter 18, "Preparing the Top Ten QuickBooks Reports ," for more information.

Select Class List from the Lists menu.

Click the Reports button.

Choose from these reports:

  • QuickReport (Ctrl+Q) Displays a report of all the transactions that refer to the selected class.

  • Profit and Loss by Class Select Reports On All Classes, Profit and Loss by Class. This report shows you all income and expenses for the year to date, with a separate column for each class.

  • Profit and Loss Unclassified Select Reports On All Classes, Profit and Loss Unclassified to display the Profit and Loss without breaking out amounts by class.

  • Graphs Select Reports On All Classes, Graphs to select either graphs depicting Income and Expense Items by Class or Budget vs. Actual by Class.


Creating Payment Terms

When you send an invoice to a customer, it is common practice to indicate when you expect to receive payment. You might want to be paid the full amount in 30 days (net 30) or in 15 days (net 15). You might offer a small discount for early payment (2% 10 net 30 = 2% discount if the balance is paid in 10 days, but the full balance is due in any case in 30 days), or you might expect to be paid immediately (due on receipt). All these options are called terms , and QuickBooks starts you out with a sample list of frequently used payment terms. You can add your own favorite terms to this list.

Select Customer & Vendor Profile List from the Lists menu; then select Terms List from the side menu that appears.

Click the Terms button and select New from the drop-down menu to create a new term .

TIMESAVER

You can also press Ctrl+N to open the New Terms window.

Enter a name for this term.

Select Standard to base the term on the date an invoice is issued. Alternatively, selecting Date Driven bases the term on a particular day of the month.

Enter the number of days until the full amount of the invoice is due.

Enter the discount percentage, if any, for early payment.

Enter the number of days during which the customer is eligible to claim the discount.

Click OK.

Did You Know?

Using payment terms results in better record keeping . When you enter payment terms, QuickBooks uses this information to determine due dates of bills and invoices and posts related notices in the Reminders window.


Show Me. QuickBooks 2006
Authors: Perry G
Published year: 2005
Pages: 188-191/328
Buy this book on amazon.com >>

Similar books