Section 73. Creating Layer Comps in Photoshop
#73. Creating Layer Comps in PhotoshopIf you've fallen into the habit of creating multiple design compositions or comps in a single Photoshop file and then turning its layers on and off to review the different design directions, layer comps are definitely going to make your day. Layer comps save the current state of all the layers in the Layers palette, capturing the visibility, position, and appearance of the layers. A layer's appearance is based on the layer styles applied (see #72) and its blending mode.
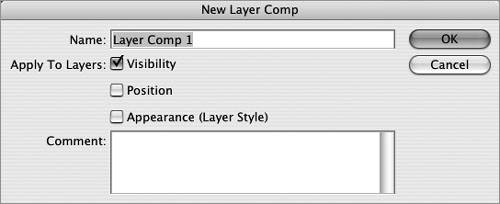
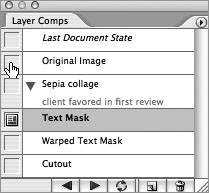
To create a layer comp, make sure the layers are visible and positioned along with their appearance set to how you want the layer comp to be captured. Open the Layer Comps palette (Window > Layer Comps), which by default resides in the palette well. In the Layer Comps palette, click the New Layer Comp button. In the resulting dialog (Figure 73a), supply a name for your layer comp and decide which layer settings should be captured and applied to the layer comp. You can optionally add a comment to the layer comp that then appears below the layer comp name once it's created. Click the OK button to finish creating your layer comp. Figure 73a. When you create a layer comp, you have the option of capturing the visibility, position, and appearance of the layers in your document. Now one layer comp isn't really that useful, since there's nothing to switch back and forth between, so continue to create other layer comps by turning on and off layers and their styles, and repositioning them. Then click the New Layer Comp button again and follow the previous detailed steps. Once you have a couple of layer comps created, you can start viewing them via the Layer Comps palette (Figure 73b). Click the empty box to the left of a layer comp name to view it. The Apply Layer Comp icon Figure 73b. Use the Layer Comps palette to quickly and easily flip through different comps by either clicking the empty gray box next to a layer comp name or using the left and right arrows at the bottom of the palette.
If you want to update a layer comp, select the layer comp in the Layer Comps palette and make your changes to the layer's settings. Then click the Update Layer Comp button Note You can also create layer comps in ImageReady. Illustrator and InDesign now allow you to select a layer comp when placing a Photoshop file that contains them (see #63 and #64). |
EAN: 2147483647
Pages: 143