Plan Your Site Effectively
|
Now that you have learned how to validate your XHTML pages, you are equipped to put up your own Web site. It doesn’t take a lot of expensive software or programming knowledge. All it takes is your time and planning. Yet it is in the planning stage that most would-be Web authors fall short. Web authoring software has made creating a site so easy that it is commonplace for beginning authors to throw together Web sites in an afternoon, publish them, and sit back, confident that the world is going to rush to behold their creations.
If all you want to do is have a site online, this approach works fine. If you actually want an effective site, you’d better reject the haphazard approach. An effective Web site not only reflects care in the design of the pages, it also reflects careful thought in its overall layout.
Just as a building contractor would never think of beginning construction on a building without a good set of blueprints, you shouldn’t begin developing your site without planning it well. A good Web site “blueprint” will take into consideration your site’s layout, your choice of hosts, and an idea of how you are going to promote the site.
Identify Your Site’s Purpose
The first step in creating your site is to identify its purpose. Depending on whether your site is personal, informational, or for business, you will want (and need) to add different things. The more clearly you define a purpose for your site, the easier it will be to decide what needs to go into it. For example, your site could be
-
A personal family album–type site
-
An informational or resource site
-
An entertainment-oriented site
-
A brochure site, advertising a business or organization
-
An online business
By developing a concrete idea of your Web site’s reason for existence, you will find it much easier to decide what—and what not—to include. For example, if you are planning to set up an online business, you’ll probably need to have a page that contains an order form and a catalog for your products. A brochure-type site isn’t likely to need these, but you’ll probably want to include an e-mail link and response form so potential customers can contact you. A family album site won’t need much in the way of bells and whistles, but if you’re putting together an informational site about your model rocketry hobby, you might want to consider a page with a streaming video of a model rocket launch.
A good rule is to put in everything you need; leave out anything that won’t contribute to your site’s goal. The only way to know what those things are is if you have clearly defined that goal.
Identify Your Target Audience
In addition to defining your site’s purpose, you should give some thought to your target audience. Who do you want to attract to your site? How do you plan to get them there? Whether your audience is made up of friends and relatives, people with a shared interest, or potential customers, your site design, layout, and content depend on your having a clear idea of that audience.
Another question about your target audience has to do with the kind of equipment they will be using to view your site. If you’re designing for a corporate network and you know exactly what types of browsers and monitors will be used to display your site, you’ll have a great deal of freedom in design. Likewise, if you’re designing for family and friends, and you don’t really care whether anyone else can see your site, you are free to set things up the way you want. However, if you are trying to reach a broad audience, you must decide whether or not to design your pages with cutting-edge effects, possibly excluding those whose equipment can’t display your pages properly.
As you plan your site, keep the following questions in mind:
-
Who do you want to come to your site? (Family? Friends? People with a shared interest? Potential customers?)
-
What kind of equipment (browsers, monitors, computers, and so on) will your visitors be using?
-
Based on the age and background of your intended audience, what types of graphics and design will they find most appealing?
-
Do you want to design your site so that older browsers will be able to display it, thus increasing your potential audience (but limiting your design options)?
-
If your site is business related, what is its mission or goal? Is it intended for commerce, information, research, leisure, or some other purpose?
Storyboard Your Site
After you have identified your site’s purpose and audience, you can begin drawing up a blueprint. In Web design, this is called storyboarding. If you’ve ever watched a documentary on how Disney produces one of its animated movies, you’re familiar with the idea of storyboarding. For a movie, the writers sketch out various scenes so that they can visualize the overall content of the film. In a similar way, you visualize a Web site’s layout and organization by storyboarding the individual pages that will make up the site.
You can storyboard a site by sketching it out on a piece of paper or by using sticky notes to represent each page—you can even use three-by-five cards. You can get really fancy and draw the layout with a graphics or flow chart program. Most important is that you are able to easily rearrange your layout so you can try out different approaches to structuring your site.
To create a storyboard for your site, follow these steps:
-
Decide what pages you want to start with. You will need a home or an index page, of course, but you also need to plan your other pages. For example, if you are constructing a family album site, you might decide on a page that focuses on each member of the family. Each of those pages could have its own series of subpages such as hobbies, favorite music, pictures, and favorite books.
-
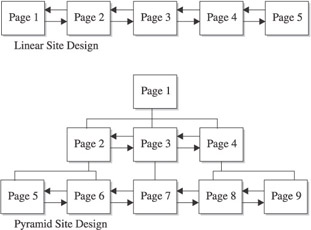
Decide on your layout. Is your site going to be linear? Pyramid? This is partly determined by your site’s content and purpose. If you want visitors to move progressively through your material, you might choose a linear site. If you want them to be able to take different paths, depending on their interests, a site organized like a pyramid might be more suitable. You would have a single “entry” page that leads to several more pages, each of which leads to several more pages related to the topics.
-
Use a 3 5 card to represent each page, and write the page’s main title on the blank side. Obviously, if you’re planning to have hundreds of pages on your site, this could be cumbersome. At this point, you need to storyboard only your main pages.
-
Rearrange the cards, trying different layouts, until you find one you like.
-
Copy the layout onto a sheet of paper.
-
Revise the site design until you are satisfied.
Gather Your Content
In the final step of site organization, you will plan and gather your content. When it comes to planning, don’t skimp here. Your content will determine whether people keep coming back to your site. To find content for your site, you can
-
Write your own. The first and most obvious place to go looking for content is right at home. Whatever your site’s subject matter, if you are going to the trouble of building a Web site, you probably have enough interest or expertise to produce a large portion of the content. If you’re putting up a site dedicated to Monarch butterfly migration patterns, chances are you know enough about the subject to be your own resource for at least a portion of the site.
-
Invite others to contribute. If you are constructing a large site or one that will provide a lot of information, you’ll find it difficult to keep up with the content all by yourself. However, if you make your content needs known to others who share your interest, you might find that your only problem is finding time to put all the offerings onto your site.
-
Use a content supplier. A great way to provide fresh content for your site is by taking advantage of free Web content suppliers. These Web sites provide up-to-date news, financial, weather, and general interest content for your site, and generally they are free of charge. Simply visit the site and choose what content you would like to add to your page. They will send you (generally by e-mail) some code to paste into your HTML document. That’s all there is to it. To find sources, just do a search with the keywords “free Web content” or “syndicated Web content.” You’ll find plenty of resources. The downside of these content suppliers is that a Web browser must contact their site and download the content as your page loads, thus slowing down the loading time. However, it’s hard to beat them for providing fresh content on a consistent basis. You can find a list of free content providers in Table 7-1.
Table 7-1: Sources for Free or Syndicated Web Content Web Content Provider
URL
IT News
www.it-news.com/freecontent.htm
Click for Content
www.clickforcontent.com
Free Sticky
www.freesticky.com/stickyweb
Free Content
www.certificate.net/wwio
IdeaMarketers
www.ideamarketers.com
4Free Content
www.4freecontent.com
Tip Don’t forget to update your content regularly. If your site never updates or provides new information, your visitors have little reason to return.
Develop Your Web Site
When you’re done with your planning, it’s time to begin the process of creating, testing, and previewing your pages. By the time you get to this point, you might be in a hurry to get your site uploaded. Resist the temptation to rush, and take the time to develop your pages carefully. You want your Web presence to be perfectly functional when you finally put it online. Among other things, taking your time here helps make sure that none of your visitors sees a “404 Not Found” message when they try to access one of your pages.
Write Your Pages
It might seem like stating the obvious, but you have to write your pages before you publish them. And with all the options available to would-be Webmasters, that might not be as simple as you think. If you’ve been working through the book and doing the exercises in Notepad or some other text editor, you might have wondered about the different Web authoring tools that are available and which—if any—you should use. Here they are:
-
WYSIWYG programs (Microsoft FrontPage, Macromedia Dreamweaver, Net Objects Fusion, and so forth) WYSIWYG (pronounced wizzy wig) is an acronym for “What you see is what you get.” These programs enable you to construct your pages visually, just as you might lay out a brochure or poster with a desktop publishing program. WYSIWYGs are helpful tools in that they enable you to create pages much more quickly than you can by writing the HTML code yourself. Also, many of them double as site management tools, alerting you to broken links and displaying the structure of your site. Although WYSIWYGs are helpful, they do have some disadvantages. First, they can become crutches that keep you from learning HTML yourself. Even with these programs, you’ll often need to go in and tweak your HTML code. If you don’t know HTML, you’re at the mercy of the program. So, even if you decide to use a WYSIWYG, take the time to learn to work with HTML first.
-
Word processors (Word, WordPerfect, and so forth) Most word processing programs can save pages in HTML format and many of the newest ones will even work like a WYSIWYG editor. Unfortunately, word processors are not known for writing very good code, and you might find it necessary go in and clean it up.
-
Web browsers (Netscape Composer, Microsoft FrontPage Express) Some Web browsers also incorporate their own Web page editing programs. These aren’t bad, although their capabilities are somewhat limited compared to the WYSIWYG programs. They also tend to suffer from the same limitations as the full-featured WYSIWYGs.
-
HTML editors (Amaya, HTML Kit, Coffee Cup HTML Editor, Allaire Homesite, and so forth) HTML editors combine the best of both worlds. They function much like simple text editors, but also include special features for writing HTML. In preview mode, many will give you a WYSIWYG-like display (although you can’t edit in preview mode), so you can keep tabs on what your page actually will look like. What’s more, the best HTML editors are available as freeware just download them and go to work! Table 7-2 lists some shareware and freeware HTML editors you might want to check out.
| HTML Editor | URL | Approximate Cost |
|---|---|---|
| HTML Kit | http://chami.com/html-kit | Freeware |
| First Page | www.evrsoft.com | Freeware |
| Arachnophilia | www.arachnoid.com/arachnophilia | Freeware |
| Amaya | www.w3.org | Freeware |
| Cute HTML | www.globalscape.com | $20 |
| CoolPage | www.coolpage.com | $30 |
| CoffeeCup HTML Editor | www.coffeecup.com | $50 |
| Hot Dog PageWiz | www.sausagetools.com | $70 |
| Hot Dog Professional | www.sausagetools.com | $100 |
| Macromedia Homesite | www.macromedia.com/software | $100 |
Test Your Links and Site Navigation
When writing your pages, or when you are done writing them, the next important step is to test your links. The larger the site you are constructing, the more tempting it will be to let this part slide. However, there’s nothing more frustrating to your visitors than clicking on a dead link. So bite the bullet and test those links. It’s good practice to begin testing as you add each new page, but whether you do it all at once or page by page, make sure every link works.
You’ll also want to make sure your site navigation is straightforward and easy to follow. Don’t leave your visitors guessing about how they should navigate your site. At the very minimum, you should provide a link to the main page and a link to a site map on every page. As its name implies, a site map is a page that functions as a directory, containing direct links to all of your pages. If your visitors want to get a bird’s-eye view of your site rather than following your navigational links, they can go to this page. A site map can be very simple, such as a plain text page of links, or it can be done with graphics and images and made as attractive as the rest of your site. How much time you invest in creating your site map is up to you. But by all means include one so that your visitors can quickly find their way to a particular page.
Preview Your Pages
If your visitors are frustrated by broken and nonfunctional links, you will be equally upset if you discover that the design that looks great on your system looks awful when displayed on a different system. One of the realities of designing for the Web is that your page design is affected by the user’s equipment. There are many variables that can affect the look of your Web site and, as much as possible, you must take them into account:
-
Test your pages in different browsers. You should at least check your pages out in Netscape and Internet Explorer, and it’s not a bad idea to find some older versions of each browser. Although Opera is still a minor player in the browser world, you should try your pages in it, too.
-
See what your pages look like in browsers with the graphics turned off. Some users with slow connections turn off the graphics to speed up page loading. Make sure your Web pages make sense, even with the pictures turned off.
-
See what your pages look like when you set your monitor to different resolutions. Depending on the capabilities of your own monitor, you can preview your pages in different resolutions by right-clicking anywhere on the Windows desktop and selecting Properties from the pop-up dialog box. When the Display Properties window comes up, click the Settings tab. This should give you the different display resolutions your monitor is capable of handling.
After you have tested your links and previewed your pages and are satisfied with any corrections you have made, you are ready to put your site online.
|
EAN: 2147483647
Pages: 126