4.2 CE Reverse Engineering Fundamentals
| < Day Day Up > |
| To review: when a developer writes a program, he typically uses one of several languages. These include Visual Basic, C++, Java, or any one of the other, lesser-used languages. The choice of language depends on several factors; the most common are space and speed considerations. In the infamously bloated Windows environment, Visual Basic is arguably the king. This is because the hardware required to run Windows is usually more than enough to run any Visual Basic application. However, if a programmer needs a higher level of speed and power, he will probably select C++. While these upper-level languages make programming easier by providing a large selection of Application Program Interfaces (APIs) and commands that are easy to understand, there are many occasions in which a programmer must create a program that can fit in a small amount of memory and operate quickly. To meet this goal, she may choose to use assembler , thus controlling the hardware of the computer directly. However, programming in assembler is tedious and must be done within an explicit set of rules. Since every processor type uses its own set of assembler instructions, focus on one device (i.e., one processor type) and become fluent in the operation codes (opcodes), instruction sets, processor design, and methods by which the processor uses internal memory to read and write to RAM. Only after you master the basics of the processor operation can you start to reverse engineer a program. Fortunately, most processors operate similarly, with slight variations in syntax and use of internal processor memory. Since our target in this chapter is the ARM processor used by PDAs, we provide some of the basic information you need to know, or at least to be familiar with, before attempting to study a program meant to run on this type of processor. The rest of this section describes the ARM processor, its major opcodes and their hex equivalents, and how its memory is used. If you do not understand this information, you may have some difficulty with the rest of this chapter. 4.2.1 The ARM ProcessorThe Advanced RISC Microprocessor (ARM) is a low-power, 32-bit microprocessor based on the Reduced Instruction Set Computer (RISC) principles. ARM is generally used in small devices that have a limited power source and a low threshold for heat, such as PDAs, telecommunication devices, and other miniature devices that require a relatively high level of computing power. There are a total of 37 registers within this processor that hold values used in the execution of code. Six of these registers are used to store status values needed to hold the results of comparison and mathematical operations, among others. This leaves 31 registers to the use of the program, of which a maximum of 16 are generally available to the programmer. Of these 16, register 15 (R15) is used to hold the Program Counter (PC), which is used by the processor to keep track of where in the program it is currently executing. R14 is also used by the processor, as a subroutine link register (Lr), which is used to temporarily hold the value of R15 when a Branch and Link (BL) instruction is executed. Finally, R13, known as the Stack Pointer (Sp), is used by the processor to hold the memory address of the stack, which contains all the values about to be used by the processor in its execution. In addition to these first 16 registers, some debuggers allow the programmer to monitor the last 4 registers (28-31), which are used to hold the results of arithmetic and logical operations performed by the processor (e.g., addition, subtraction, comparisons). Here's a list of the registers and their purposes. They are listed in descending order because the processor bits are read from high to low.
Understanding these registers is very important when debugging software. If you know what each of these values means, you should be able to determine the next step the program will make. In addition, using a good debugger, you can often alter these values on the fly, thus maintaining 100% control over how a program flows. Table 4-1 shows some possible conditional values and their meanings. It highlights the most common values that you will see in a debugger. Table 4-1. Sample ARM conditional register values
Figure 4-1 illustrates Microsoft's eMbedded Visual Tools (MVT) debugger, showing the values held in registers 0-12, Sp, Lr, and PC. In addition, this figure shows us the four registers (R31-R28) used to hold the conditional values. See if you can determine what condition the program is currently in, using Table 4-1. Figure 4-1. MVT illustrating the registers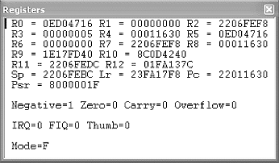 4.2.2 ARM OpcodesThe ARM processor has a predefined set of operation codes (opcodes) that allows a programmer to write code. These same opcodes are used by compilers, such as Microsoft's MVT, when a program is created for an ARM device. They are also used when a program is disassembled and/or debugged . For this reason, you must understand how opcodes are used, as well as what operations they perform. In addition, it is important to have a reference for the hex equivalent of each opcode, in order to find and replace an opcode as it appears in a hex dump of the file. While practice will ingrain the popular opcodes in your memory, this list will get you started. 4.2.2.1 Branch (B)The Branch opcode tells the processor to jump to another part of the program or, more specifically , the memory, where it will continue its execution. The B opcode is not to be confused with the Branch with Link (BL) opcode, discussed next. The main difference is that the B opcode is simply a code execution redirector. The program jumps to the specified address and continues processing the instructions. The BL opcode also redirects to another piece of code, but it eventually jumps back to the original code and continues executing where it left off. There are several variations of the B opcode, most of which make obvious sense. The following is a list of the three most common variants and what they mean. Note that this list relates to the condition table in the previous section. In addition, we have included the hex code that you will need to search for when altering a Branch operation. For where to find a full list, please visit the Section 4.5 at the end of the chapter. B Branch Always branches XX XX XX EA BEQ B if equal B if Z flag = 0 XX XX XX 0A BNE B if no equal B if Z flag = 1 XX XX XX 1A Here are some examples: B loc_11498 07 00 00 EA BEQ loc_1147C 0C 00 00 0A BNE loc_11474 06 00 00 1A 4.2.2.2 Branch with Link (BL)When a program is executing, there are situations in which the program must branch out and process a related piece of information before it can continue with the main program. This is made possible with a Branch with Link opcode. Unlike its relative, the B opcode, BL always returns to the code it was originally executing. To facilitate this, register 14 is used to hold the original address from which the BL was called. The BL opcode has several variants to its base instruction, just like the B opcode. The following is a list of the same three variants and what they mean, which will be followed by examples. It is important to note that the examples show function calls instead of address locations. However, if you look at the actual code, you will find normal addresses, just like with the B opcode. The function naming convention is based on the fact that many BL calls are made to defined functions that return a value or perform a service. As you investigate CE reversing, you will become very intimate with the BL opcode. Note that the MVT debugger will not jump to the BL address when doing a line-by-line execution. It instead performs the function and continues to the next line. If you want to watch the code specified by the BL operation, specify a breakpoint at the memory address to which it branches. This concept is discussed later in this chapter. BL Branch with Link Always branches XX XX XX EB BLEQ BL if = equal BL if Z flag = 0 XX XX XX 0B BLNE BL if not equal BL if Z flag = 1 XX XX XX 1B Here are some examples: BL AYGSHELL_34 7E 00 00 EB BLEQ mfcce300_699 5E 3E 00 0B 4.2.2.3 Move (MOV)A program is constantly moving data around. In order to facilitate this function, registers are updated with values from other registers and with hardcoded integers. These values are used by other operations to make decisions or perform calculations. This is the purpose of the Move opcode. MOV does just what its name implies. In addition to basic moves, this opcode has the same conditional variants as the B and BL opcodes. By this point, you have a general understanding of what the EQ/NE/etc. means to an instruction set, so we will not discuss it further. Note, however, that almost every opcode includes some form of a conditional variant. It's important to understand how the MOV instruction works. This command can move the value of one register into another, or it can move a hardcoded value into a register. However, notice the item receiving the data is always a register. The following are several examples of the MOV command, what they do, and their hex equivalents. MOV R2, #1 01 20 A0 E3 Moves the value 1 into R2 MOV R3, R1 01 30 A0 E1 Moves value in R1 into R3 MOV LR, PC 0F E0 A0 E1 Moves value of R15 into R14 [1] MOV R1, R1 01 10 A0 E1 Moves value R1 into R1 [2]
4.2.2.4 Compare (CMP)Programs constantly need to compare two pieces of information. The results of the comparison are used in many ways: from the validation of a serial number, to continuation of a counting loop, etc. The assembler instruction set that is responsible for this process is Compare , or CMP. The CMP operation can be used to compare the values in two registers with each other or to compare a register value and a hardcoded value. The results of the comparison do not output any data, but they do change the status of the conditional Zero flag. If the two values are equal, the Zero flag is set to 0; if the values are not equal, the flag is set to 1. This Zero value is then used by a subsequent opcode to control what is executed, or how. The CMP operation is used in almost every serial number validation. The validation is accomplished in two ways: first, the actual comparison of the entered serial number with a hardcoded serial number; and second, after the validation check, when the program is deciding what piece of code is to be executed next. Typically, there will be a BEQ (Branch if Equal) or BNE (Branch if Not Equal) operation that uses the status of the Zero flag to either send a "Wrong Serial Number" message to the screen or accept the entered serial and allow access to the protected program. This use of the CMP operation is discussed further later in this chapter. Another use of CMP is in a loop function . Loop functions assist in counting, string comparisons, file loads, and more. Being able to recognize a loop in a sequence of assembler programming is an important part of successful reverse engineering. The following is an example of how a loop looks when debugging a program. 00002AEC ADD R1, R4, R7 00002AF0 MOV R0, R6 00002AF4 BL sub_002EAC 00002AF8 ADD R5, R5, #20 00002AFC ADD R2, R5, #25 00002A00 CMP R3, R2 00002A04 BEQ loc_002AEC This is a simple loop included in an encryption scheme. In memory address 2A04, you can see a Branch occurs if the Zero flag is set. This flag is set, or unset, by memory address 2A00, which compares the values between R3 and R2. If they match, the code jumps back to memory address 2AEC. The following are examples of two CMP opcodes and their corresponding hex values. CMP R2, R3 03 00 52 E1 CMP R4, #1 01 00 54 E3 4.2.2.5 Load/Store (LDR/STR)While the registers are able to store small amounts of information, the processor must access the space allotted to it in the RAM in order to store larger chunks of information. This information includes screen titles, serial numbers , colors, settings, and more. In fact, almost everything that you see when you use a program has at one time resided in memory. The LDR and STR opcodes are used to write and read this information to and from memory. While related, these two commands perform opposite actions. The Load (LDR) instruction loads data from memory into a register, and the Store (STR) instruction stores the data from the registry into memory for later usage. However, there is more to these instructions than the simple transfer of data. In addition to defining where the data is moved, the LDR/STR commands have variations that tell the processor how much data is to be moved. The following is a list of these variants and what they mean:
LDR/STR commands are different from the other previously discussed instructions in that they almost always include three pieces of information, due to the way the load and store instructions work. Since only a few bytes of data are moved, at most, the program must keep track of where it was last writing to or reading from. It must then append to or read from where it left off at the last read/write. You'll often find LDR/STR commands in a loop where they read in or write out large amounts of data, one byte at a time. The LDR/STR instructions are also different from other instructions in that they typically have three variables controlling where and what data is manipulated. The first variable is the data that is actually being transferred. The second and third variables determine where the data is written, and if it is manipulated before it is permanently stored or loaded. The following lists examples of how these instruction sets are used. STR R1, [R4, R6] Store R1 in R4+R6 STR R1, [R4, R6]! Store R1 in R4+R6 and write the address in R4 STR R1, [R4], R6 Store R1 at R4 and write back R4+R6 to R4 STR R1, [R4, R6, LSL#2] Store R1 in R4+R6*2 (LSL discussed next) LDR R1, [R2, #12] Load R1 with value at R2+12. LDR R1, [R2, R4, R6] Load R1 with R2+R4+R6 Notice the two new items that affect how the opcodes perform. The first is the "!" character, used to tell the instruction to write the new information back into one of the registers. The second is the use of the LSL command, which is discussed next. Also related to these instructions are the LDM/STM instructions. These are also used to store or load register values; however, they do it on a larger scale. Instead of just moving one value, like LDR/STR, the LDM/STM instructions store or load all the register values. They are most commonly used when a BL occurs. When this happens, the program must be able to keep track of the original register values, which will be overwritten with values used by the BL code. So, they are stored into memory; then, when the branch code is completely executed, the original register values are loaded back into the registers from memory. The above information should be easy to absorb for those of you who have previous experience with assembler or who are innately good programmers. However, if you are a newcomer, do not be discouraged, as mastering assembler typically takes years of dedicated study. 4.2.2.6 ShiftingThe final instruction sets we examine are the shifting operations. These are somewhat complicated, but they are a fundamental part of understanding assembler. They are used to manipulate data held by a register at the binary level. In short, they shift the bit values left or right (depending on the opcode), which changes the value held by the register. The following tables illustrate how this works with the two most common shifting instruction sets, Logical Shift Left, or LSL (Table 4-2), and Logical Shift Right, or LSR (Table 4-3). Because of space limitations, we will only be performing shifts on bits 0-7 of a 32-bit value. The missing bit values will be represented by ellipses (...). Table 4-2. Logical Shift Left (LSL) shifts the 32-bit values left by x number of places, using zeros to fill in the empty spots
Table 4-3. Logical Shift Right (LSR) shifts the 32-bit values right by x number of places, using zeros to fill in the empty spots
While these are the most common shift instructions, there are three others that you may see. They are Arithmetic Shift Left (ASL), Arithmetic Shift Right (ASR), and Rotate Right Extended (ROR). All of these shift operations perform the same basic function as LSL/LSR, with some variations. For example, the ASL/ASR shifts fill in the empty bit places with the bit value of register 31, which preserves the sign bit of the value being held in the register. The ROR shift, on the other hand, carries the bit value around from bit 0 to bit 31. The previous pages have given you a brief look at assembler programming on ARM processors. You will need this information later in this chapter when we practice some of our RCE skills on a test program ”it will be valuable as you attempt to debug software, find exploits, and dissect hostile code. |
| < Day Day Up > |
EAN: 2147483647
Pages: 211