Developer Secrets
So, you want to get your hands on all the juicy secrets, huh? Then step this way, as we prepare to unveil the following gems for creating great Windows forms applications:
-
Making Your Form Transparent
-
Who Stole the ToolTips?
-
Tricks of the Trade: Resizing Made Easy
-
Five Steps to Split Panels, Explorer Style
-
Highlighting Errors with the ErrorProvider
-
Learning the LinkLabel Control
-
Customizing the MonthCalendar Control
-
Creating Your Own Number-Only Textbox
-
Displaying Animated GIFs Without the Browser Control
-
The Two Methods of Changing Tab Order
-
Secrets of Working with the System Tray
-
Save User Time: Add Autocomplete to Combo Boxes
-
The Power of Command-Line Parameters
-
How to Reset a Form
-
How to Snap the Cursor to a Button
-
Capturing the Screen, Quick and Easy
-
Stunning Navigation Bars with a Little-Known Freebie
-
Seven Steps to Taking Advantage of Windows XP Themes
-
The .NET Way of Checking for Previous Instances
-
Converting RTF to HTML
-
Drag and Drop from Windows Explorer
-
Dialog Boxes: What Did the User Click?
-
Text Printing Class That Works!
-
The Secret Rebirth of .PrintForm
-
The Facts on Visual Inheritance
-
Looking at Windows, Performance Counters, and More
-
Protecting Your Code with Obfuscation
-
Best of All Worlds: Creating an Ultra-Thin Client
And that s just the beginning. Later in this book, after we ve covered other project types such as ASP.NET Web sites, we ll move onto database secrets, a hidden .NET language, special file manipulation code, and much more ”all of which you can easily use straight away in your Visual Basic applications.
Making Your Form Transparent
You can give your Windows form a great transparent look by altering its Opacity property. Set this anywhere between 0% (completely transparent) and 100% (regular opaque ) to see the windows underneath your application.
Who Stole the ToolTips?
If you haven t already noticed, someone stole the ToolTip property in .NET. If you want little popup messages to appear when you hover your mouse over a button or whatever, you ll need to figure out the ToolTip control.
Here s how it works. Firstly, you add an instance of the ToolTip control to your form. This is an invisible component that actually displays the message. You can alter its properties through the Property window, such as the popup delay or whether it is Active .
Next , you need to add the actual ToolTip messages. Click on any of your controls and scroll down to the Misc section (presuming you order your property list by category). You ll see a property called something like ToolTip on ToolTip1 : This is a fresh property that your ToolTip instance gave every control on your form.
Simply set this property to your ToolTip message ”and that s a wrap!
Tricks of the Trade: Resizing Made Easy!
When the user resizes your Windows form at runtime, all of your controls will stay in place by default. They will not automatically resize with the form. You can change this behavior by editing the Anchor property of a control.
The Anchor property determines which sides of a form a control will stretch with. After the default, the most common setting for this property is Top, Bottom, Left, Right ”meaning the control will stretch with all sides of your form, behaving like the majority of resizable Windows applications.
The Dock property of a control is also useful when positioning and resizing controls. It allows you to dock a control to a particular side of a form and stick with that side, regardless of how the form is resized. To set this, simply select a new region via the Dock property drop-down menu.
Five Steps to Split Panels, Explorer-Style
Download supporting files at www.apress.com .
The files for this tip are in the Ch2 ” Split Panels folder.
If you re looking to create the split-panel look seen in many modern applications, you ll be happy to learn that a new .NET Splitter control can help you achieve exactly that.
Here are the simple steps to creating the split-panel look in your own programs:
-
Add the control you want to appear down the left of your screen to your form. This could be a TreeView control, if you re going for the Explorer effect, or a Panel control if you want to add numerous controls (such as a list of icons for a menu, in the style of Outlook).
-
Set the Dock property of this control to Left .
-
Add a Splitter control to your form. It should automatically set its Dock property to Left . This is the widget your users will grab to resize the panels.
-
Add your final control to your form. If you re continuing that elusive Explorer look, this will probably be the ListView control.
-
Set the Dock property of this control to Fill . (Click on the box in the center.)
And that s it. Try running your application. Your users will be able to drag the Splitter and your two controls/panels will automatically resize. (See Figure 2-1.)
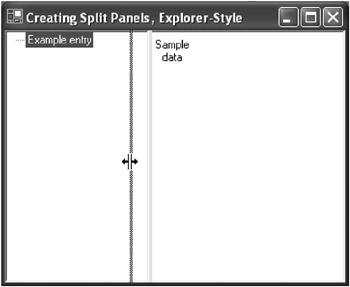
Figure 2-1: Our Splitter control in action
Highlighting Errors with the ErrorProvider
The ErrorProvider control provides a great way of providing visual user feedback. If a problem occurs ”say, your user entered an incorrect customer number into a text box ”you can use the ErrorProvider to add a flashing error icon next to the control, along with a ToolTip describing the error.
The following code demonstrates use of the ErrorProvider in its simplest form. The code assumes that you have a Windows form containing an instance of the ErrorProvider control called ErrorProvider1, and a TextBox control called TextBox1:
' Set an error on a control ErrorProvider1.SetError(TextBox1, "Invalid Phone Number - Try Again") ' Remove the error ErrorProvider1.SetError(TextBox1, "")
The first line here sets the error. This results in a blinking error icon to the right of the control, which displays the error as its ToolTip. (See Figure 2-2.) By default, the blinking stops as soon as you view the error message. The second line here removes the error flag.
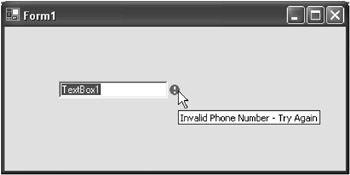
Figure 2-2: Neat visual error handling with the ErrorProvider component
It s worth noting that each of these settings ”icon, blink style, and rate ”is completely customizable. Simply edit the ErrorProvider control via the Properties window. Also, the ErrorProvider does a particularly good job working with data bound forms. Check out ErrorProvider component, overview in the help index for more information on this feature.
Learning the LinkLabel Control
The LinkLabel control is a great addition to your programming toolbox. It looks and acts like a Web page hyperlink, however has all the functionality of a regular Button.
By default, the link appears in blue, and changes to red when clicked on. These defaults can be altered by changing the LinkColor and ActiveLinkColor properties. The LinkLabel control has a Click event, to which you can add code to respond to a click. If you want the link to change to its default VisitedLinkColor , set the LinkVisited property to True either in code, or through the Properties window.
If you want your LinkLabel to open a Web site, use code similar to the following behind its Click event:
System.Diagnostics.Process.Start("http://www.karlmoore.com/") LinkLabel1.LinkVisited = True Customizing the MonthCalendar Control
Your control toolbox includes an incredibly useful control called the MonthCalendar control. (See Figure 2-3.) However, few programmers really appreciate quite how customizable this widget really is. You can change virtually any aspect of how it works.
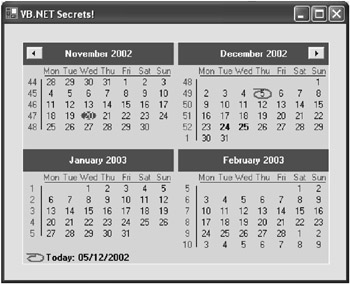
Figure 2-3: The MonthCalendar control. Is there anything it can t do?
As you d expect, you can alter colors and fonts. The ForeColor , TitleBackColor , TitleForeColor , TrailingForeColor , and Font properties will help you out there. You can also alter the minimum and maximum dates that can be selected, either through the Properties window or in code, with the MinDate and MaxDate properties.
The ScrollChange property determines the number of months the control moves when its scroll buttons are clicked. ShowToday and ShowTodayCircle dictate whether today s date is highlighted and circled.
And there s still more. For example, ShowWeekNumbers displays the week numbers , which is highly useful to true business applications. You can change the FirstDayOfWeek property to another day, too, if necessary. The AnnuallyBoldedDates , BoldedDates , and MonthlyBoldedDates properties allow you to add dates, in code or through the Properties window, that are highlighted perhaps on a monthly or annual basis.
But best of all is probably CalendarDimensions . Use the Properties window to alter the Width and Height values to view multiple months at once, perhaps creating a six-month or full-year view in your desktop application at once. Highly useful!
Creating Your Own Number-Only Text Box
Download supporting files at www.apress.com .
The files for this tip are in the Ch2 ” Number-Only Text Box folder.
In some instances, you ll want to restrict the user to entering only a numeric value in a TextBox control on your Windows form.
To do this, you need to write code to check every key press in that textbox. You need to verify that the ASCII key value of each typed character is not less than 48 (the number 0 key) and not greater than 57 (the 9 key). If it s outside these ranges, you simply tell the TextBox control that you have handled that character and it doesn t get added to the box.
Here is a chunk of sample code you could add underneath a TextBox KeyPress event to do this:
If Asc(e.KeyChar) < 48 Or Asc(e.KeyChar) > 57 Then ' Cancel non-numeric characters e.Handled = True End If
Another way to do this would be to create a list of allowable characters. Here, for example, we re allowing numbers, spaces, colons, and dashes:
Dim strAllowableChars As String strAllowableChars = "0123456789-: " ' If the character they have entered isn't in our list... If InStr(strAllowableChars, e.KeyChar.ToString) = 0 Then ' Cancel the character e.Handled = True End If
Displaying Animated GIFs Without the Browser Control
When it comes to displayed animated images in a Windows application, many developers instantly head off and incorporate the Web browser control. This isn t only going a little overboard for the sort of benefits an animation will provide your application ”but it s completely unnecessary.
You see, the PictureBox control automatically handles animated GIFs for you. Simply set the Image property, and it ll cycle through frame after frame both at design time and at runtime.
Want to create your own animated GIFs? Try checking out Paint Shop Pro and Animation Shop from Jasc Software at www.jasc.com.
The Two Methods of Changing Tab Order
In Windows forms, the tab order determines which controls receive the focus and in what order as your user presses the Tab key.
To stop a control from receiving the focus when your user presses the tab key, set its TabStop property to False . To change its tab order, alter the TabIndex property to a value starting at 0, where 0 is the first control to receive the focus.
However, a simpler way is to select View ![]() Tab Order from the menu, and then select your controls in the proposed tab order. The TabIndex property will be automatically set for you. (See Figure 2-4.)
Tab Order from the menu, and then select your controls in the proposed tab order. The TabIndex property will be automatically set for you. (See Figure 2-4.)
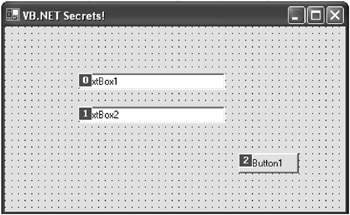
Figure 2-4: Visually setting our tab order
Secrets of Working with the System Tray
Working with the Windows system tray was never the easiest of tasks . Officially called the status notification area , it always involved a bundle of API calls and a little too much effort than it actually deserved. In .NET however, it s all about knowing which controls to use.
The heart of the whole process is the NotifyIcon component. Found in the toolbox, you ll need to drag and drop this little beast straight onto your form or component. Then you need to get editing those properties: change the Icon property to the icon you wish to display in the system tray and Text to the name you wish to appear as a ToolTip.
Try running your form or component as it stands so far: exactly zero lines of code later and your application can already display an icon in the system tray. But I m guessing you want to do just a little more than that.
Most applications display a menu when the user selects the icon. For this, you need to add another toolbox component: the ContextMenu. If you ve dropped this straight onto a form, you ll be able to edit it just like a regular menu: add separators, write code to respond to the Click events of the individual menu items, and so on. Then change the ContextMenu property of the NotifyIcon component to point to your new menu. Next, run your application and click on your icon in the system tray ”result achieved!
If, on the other hand, you simply want to run a little code or display a form when your icon is clicked, then check out the useful events supplied by the NotifyIcon property. You have Click , DoubleClick , MouseDown , MouseMove , and MouseUp . Simply use the code window to select one of these, and start writing your code.
And that s it. Two controls, a couple of properties, and a handful of events are all you need to know to master the system tray. (See Figure 2-5.)
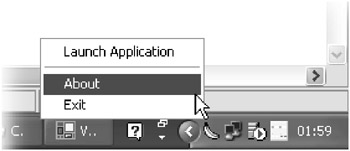
Figure 2-5: Is that a banana in my system tray?
Save User Time: Add Autocomplete to Combo Boxes
Download supporting files at www.apress.com .
The files for this tip are in the Ch2 ” AutoComplete folder.
Develop an application in a program such as Microsoft Access and all your combo boxes will by default incorporate autocomplete, that ability to be able to tap a few characters in a drop-down list and have the nearest matching selection picked out for you.
In Visual Basic, however, there s no such intrinsic support. If you want autocomplete, you ve got to do it yourself. And this tip shows you how.
Simply add the following methods to your form. The first is called AutoCompleteKeyUp and accepts a combo box and KeyEventArgs objects as arguments. You need to call this in the KeyUp event of your combo box: it looks at what the user has typed and selects the most appropriate match. The second is called AutoCompleteLeave and should be called when the Leave event of your combo box is fired . This one simply takes whatever you ve finally chosen and cases it properly, as per the matching selection in the combo box.
Let s look at those functions now:
Public Sub AutoCompleteKeyUp(ByVal Combo As ComboBox, _ ByVal e As KeyEventArgs) Dim strTyped As String Dim intFoundIndex As Integer Dim objFoundItem As Object Dim strFoundText As String Dim strAppendText As String ' Ignore basic selection keys Select Case e.KeyCode Case Keys.Back, Keys.Left, Keys.Right, Keys.Up, _ Keys.Delete, Keys.Down, Keys.CapsLock Return End Select ' Find what user has typed in list strTyped = Combo.Text intFoundIndex = Combo.FindString(strTyped) ' If found... If intFoundIndex >= 0 Then ' Get list item (actual type depends on whether data bound) objFoundItem = Combo.Items(intFoundIndex) ' Use control to resolve text - in case data bound strFoundText = Combo.GetItemText(objFoundItem) ' Append the typed text to rest of the found string ' (text is set twice due to a combo box quirk: ' on certain platforms, setting just once ignores casing!) strAppendText = strFoundText.Substring(strTyped.Length) Combo.Text = strTyped & strAppendText Combo.Text = strTyped & strAppendText ' Select the appended text Combo.SelectionStart = strTyped.Length Combo.SelectionLength = strAppendText.Length End If End Sub
Public Sub AutoCompleteLeave(ByVal Combo As ComboBox) ' Correct casing when leaving combo Dim intFoundIndex As Integer intFoundIndex = Combo.FindStringExact(Combo.Text) Combo.SelectedIndex = -1 Combo.SelectedIndex = intFoundIndex End Sub
And here s how you may call these functions from your combo box:
Private Sub ComboBox1_KeyUp(ByVal sender As Object, _ ByVal e As System.Windows.Forms.KeyEventArgs) Handles ComboBox1.KeyUp AutoCompleteKeyUp(ComboBox1, e) End Sub Private Sub ComboBox1_Leave(ByVal sender As Object, _ ByVal e As System.EventArgs) Handles ComboBox1.Leave AutoCompleteLeave(ComboBox1) End Sub
That s all you need to create your own autocomplete combo boxes. (See Figure 2-6.) And if you re feeling really adventurous, you might even want to wrap all of this up into a neat little user control. But we ll leave that for another tip.
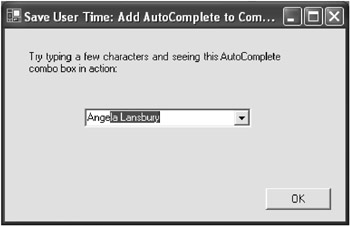
Figure 2-6: Our autocomplete combo box strutting its stuff
The Power of Command-Line Parameters
Command-line parameters can be incredibly useful because they allow users or other applications to pass startup information to your program. For example, if your program was called myapp.exe, they might run the following:
myapp.exe /nodialogs
Here, we have one command-line parameter, /nodialogs . In VB6, we could read this using the Command property. In VB .NET, this has been replaced with the System.Environment.GetCommandLineArgs function, which returns an array of any passed startup parameters.
And here s a chunk of code to show you just how to read them:
Dim MyStartupArguments() As String, intCount As Integer MyStartupArguments = System.Environment.GetCommandLineArgs For intCount = 0 To UBound(MyStartupArguments) MessageBox.Show(MyStartupArguments(intCount).ToString) Next
How to Reset a Form
Download supporting files at www.apress.com .
The files for this tip are in the Ch2 ” Reset Form folder.
If you ve created a data entry “style Windows form that needs resetting with each addition, all the necessary code to clear the TextBox controls, uncheck the CheckBox controls, deselect combo boxes, ad infinitum , can all get a little repetitive ”particularly if you have to write it for multiple forms.
This is where the following method could prove useful. Simply pass in a form as a parameter, and it ll reset the main data entry controls: TextBox, CheckBox, and ComboBox, even those hidden away inside Tab Pages and other container controls. You might want to extend this routine to cater for RadioButton, ListBox, CheckedListBox, DomainUpDown, NumericUpDown, MonthCalendar, and DateTimePicker controls, too, depending on your requirements: simply edit the ClearControl method. To ensure flexibility, this subroutine automatically bypasses all controls with skip somewhere in the Tag property.
Here s the code:
Public Sub ResetForm(ByVal FormToReset As Form) ' Resets the main data entry controls on the passed FormToReset Dim objControl As Control ' Loop around every control on the form and run the reset method For Each objControl In FormToReset.Controls ResetControl(objControl) Next End Sub Public Sub ResetControl(ByVal ControlToReset As Control) ' Resets the core control, then loops and ' resets any sub controls, such as Tab pages Dim intCount As Integer ClearControl(ControlToReset) If ControlToReset.Controls.Count > 0 Then For intCount = 1 To ControlToReset.Controls.Count ResetControl(ControlToReset.Controls(intCount - 1)) Next End If End Sub Public Sub ClearControl(ByVal ControlToClear As Control) ' Clears the value of a particular control - ' you may wish to extend this to suit your exact needs If InStr(ControlToClear.Tag, "skip", CompareMethod.Text) = 0 Then If TypeOf (ControlToClear) Is System.Windows.Forms.TextBox Then ControlToClear.Text = "" ' Clear TextBox ElseIf TypeOf (ControlToClear) Is System.Windows.Forms.CheckBox Then Dim objCheckBox As System.Windows.Forms.CheckBox = ControlToClear objCheckBox.Checked = False ' Uncheck CheckBox ElseIf TypeOf (ControlToClear) Is System.Windows.Forms.ComboBox Then Dim objComboBox As System.Windows.Forms.ComboBox = ControlToClear objComboBox.SelectedIndex = -1 ' Deselect any ComboBox entry End If End If End Sub
You could use this function behind your form, as so:
ResetForm(Me)
How to Snap the Cursor to a Button
Download supporting files at www.apress.com .
The files for this tip are in the Ch2 ” Snap to Control folder.
If you re attempting to create that foolproof Windows application, one great technique to use is that of snapping the cursor to a particular control, thus anticipating the user s next click.
The following neat little function does exactly that. Simply pass in a control to get it started: it ll calculate the exact bottom middle location of the control and then snap the cursor to that position. (See Figure 2-7.) Here s the code:
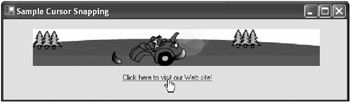
Figure 2-7: A simple little application, this time snapping to a LinkLabel control
Public Sub SnapToControl(ByVal Control As Control) ' Snaps the cursor to the bottom middle of the passed control Dim objPoint As Point = Control.PointToScreen(New Point(0, 0)) objPoint.X += (Control.Width / 2 ) objPoint.Y += ((Control.Height / 4) * 3) Cursor.Position = objPoint End Sub
And here s how you might use this to snap to, say, a Button control:
SnapToControl(Button1)
Capturing the Screen, Quick and Easy
Download supporting files at www.apress.com .
The files for this tip are in the Ch2 ” Screen Capture folder.
When it comes to showing people how to capture the screen, most VB .NET authors I ve seen tend to revert to the old school method of working: using the API. There is, however, a better way.
The following function is called GetScreenCapture and returns an Image object. It captures the screen by running a series of Print Screen key presses, which puts a screen grab on the clipboard, ready for my nifty little function to devour and return. (See Figure 2-8.) My function accepts a FullScreen argument, too: pass True to capture the whole screen, and False to capture just the active window.
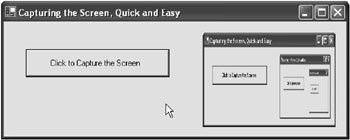
Figure 2-8: My sample application, capturing the active window (again and again)
Here s the code:
Public Function GetScreenCapture( _ Optional ByVal FullScreen As Boolean = False) As Image ' Captures the current screen and returns as an Image object Dim objSK As SendKeys Dim imgCapture As Image If FullScreen = True Then ' Print Screen pressed twice here as some systems ' grab active window "accidentally" on first run objSK.SendWait("{PRTSC 2}") Else objSK.SendWait("%{PRTSC}") End If Dim objData As IDataObject = Clipboard.GetDataObject() Return objData.GetData(DataFormats.Bitmap) End Function And here are a couple of examples demonstrating how to use that Image object ”firstly, saving it as a file, and, secondly, using it to set the Image property of a PictureBox control:
GetScreenCapture(True).Save("c:\screengrab.bmp", _ System.Drawing.Imaging.ImageFormat.Bmp)) PictureBox1.Image = GetScreenCapture() Stunning Navigation Bars with a Little-Known Freebie
Download supporting files at www.apress.com .
The files for this tip are in the Ch2 ” XtraNavBar folder.
If you ve ever used Office, Windows XP, or Visual Studio .NET (which I m hoping you have), you may have admired the user interface and wondered how you could implement something like that yourself.
Well, unless you re willing to invest weeks into creating your own superior user interface components , you d typically have to shell out a thousand bucks on some fancy third-party solution. Unless, of course, you read on.
Software group Developer Express has developed a whole range of user interface components and, to promote its new .NET range, is giving away their $99 XtraNavBar Suite to anyone who knows the download address.
The component has been written from the ground up for .NET and allows you to add that professional Microsoft feel to any application within seconds, with support for taskbars, sidebars, XP themes, and more. (See Figure 2-9.) All for the grand price of zero.

Figure 2-9: Sample navigation bars, all created with the free XtraNavBar Suite
To download and register your copy, simply head to www.devexpress.com/free. This backdoor will remain open indefinitely, but, just in case you miss the offer, I ve arranged to bundle the installation with the downloadable source for this book at www.apress.com. Enjoy!
Seven Steps to Taking Advantage of Windows XP Themes
A lot has been written about how to integrate your application with Windows XP themes, and most of it is complete hogwash. I ve personally wasted hours trying to figure out how to get it working.
All the online tutorials I ve encountered , including MSDN, are critically flawed in their how to description. This top tip, however, hopefully isn t.
So, what are Windows XP themes? Themes are a sort of limited, user-selected skin for the operating system, a make it look nice feature introduced in XP and to be continued and expanded upon in future versions of Windows.
Providing theme support in your application gives it that integrated Windows feel (for example, the default Windows XP theme gives all buttons an orange outline glow as the user hovers over ”something your own applications can inherit) and sets it up for greater customization in later versions of the operating system.
But how? Firstly, we design our application as normal, occasionally setting a button style to System . Then we create a manifest file from a template I ll provide and add it as a resource to our final executable. The contents of this manifest file tell the application to bind itself to ComCtl6, the Windows Common Controls component that will then draw the controls for your application and apply the themes as relevant.
And here are the seven easy steps to get it all up and running:
-
Design your application as normal. Where possible, set the FlatStyle property of your controls to System . This is very important.
-
When you re ready to roll out the final version of your application, compile your program. Open the Bin folder through Windows Explorer, right-click and select the Version tab. Make a note of the file version exactly as it is displayed here.
-
Create a new file on your machine and call it MyManifest.manifest . Using Notepad, or a similar text editor, add the following text to this file:
<?xml version="1.0" encoding="UTF-8" standalone="yes"?> <assembly xmlns="urn:schemas-microsoft-com:asm.v1" manifestVersion="1.0"> <assemblyIdentity version="Insert Your Exact Version Number Here" processorArchitecture="X86" name="Name of Application" type="win32" /> <description>Description of Application</description> <dependency> <dependentAssembly> <assemblyIdentity type="win32" name="Microsoft.Windows.Common-Controls" version="6.0.0.0" processorArchitecture="X86" publicKeyToken="6595b64144ccf1df" language="*" /> </dependentAssembly> </dependency> </assembly>
-
Back in Visual Studio .NET, open your actual assembly, which is typically the executable file you just compiled. Click on File
 Open File, and then select your assembly.
 -
Right-click anywhere on the new window and select Add Resource. Choose Import and select your MANIFEST file. You will be asked for a resource type. Type RT_MANIFEST and click on OK.
-
In the Properties window, change the ID of the strange screen that has appeared from 101 to 1. Click on File
Close to close this window, and accept any changes. Do the same with the next window, displaying details about your executable file, again ensuring that you save changes. -
Go back to Windows Explorer and give your application a test run, then uncork the champagne ! (See Figure 2-10.) If you get an error message, it s likely you either typed out the MANIFEST file incorrectly, or used the wrong version number ”in which case go back and try again.
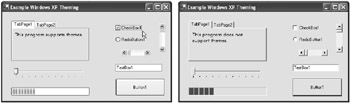
Figure 2-10: Two applications: one supporting the default XP theme, the other theme-less
The .NET Way of Checking for Previous Instances
Download supporting files at www.apress.com .
The files for this tip are in the Ch2 ” Previous Instances folder.
It s often useful to check whether another instance of your application is already running. The prime use for this is to ensure that only one instance of your program is active at any one time by checking during startup, and, if one is already running, providing that instance with the focus, then quitting.
In Visual Basic 6, you had the App.PrevInstance property to check. In VB .NET, we need to check whether the current process name is already running. That s what our code does here, encapsulated in the PrevInstance function. It returns a True if your application is already running on the same machine:
Public Function PrevInstance() As Boolean If Diagnostics.Process.GetProcessesByName _ (Diagnostics.Process.GetCurrentProcess.ProcessName).Length > 1 Then Return True Else Return False End If End Function
You might use this code as so:
If PrevInstance() = True Then ' Get all previous instances Dim Processes() As Process Processes = Diagnostics.Process.GetProcessesByName( _ Diagnostics.Process.GetCurrentProcess.ProcessName) ' Activate the first instance AppActivate(Processes(0).Id) ' Exit the current instance Application.Exit() End If
| TOP TIP | There s a little bug you may run into when using this code that turns the hair of most developers a funny shade of gray. If your application name is greater than fifteen characters, and running on either Windows NT or 2000, your code won t be able to tell whether a previous instance is running. It s weird, but true. The solution is to upgrade to XP or higher, or change your application name (Project |
Converting RTF to HTML
Download supporting files at www.apress.com .
The files for this tip are in the Ch2 ” RTF to HTML folder.
One amazingly common developer request is a method of converting the contents of a RichTextBox control to HTML. But, unless you re willing to spend hundreds on a third-party text editing control, you re out of luck. Even in VB .NET, Microsoft has chosen to remain ignorant to this much-desired feature.
So, you need to do it yourself, and the following chunk of code I ve put together should get you started. Just pass it a RichTextBox control as a parameter, and it ll return a string of HTML, ready for you to perhaps save to a file. (See Figure 2-11.)
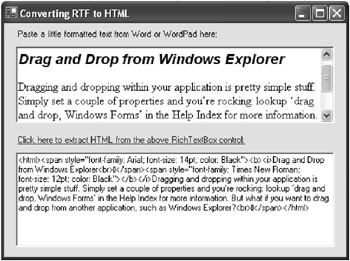
Figure 2-11: Our code doing its stuff: translating RTF into HTML
It doesn t handle more-complicated features, such as images or tables, but it will easily cope with fonts, sizes, colors, bold, italic, and paragraphs. Of course, you re more than welcome to expand it to exactly suit your needs.
You can call this code, as so:
strHTML = ConvertToHtml(RichTextBox1)
And here s the actual ConvertToHTML function:
Public Function ConvertToHTML(ByVal Box As RichTextBox) As String ' Takes a RichTextBox control and returns a ' simple HTML-formatted version of its contents Dim strHTML As String Dim strColour As String Dim blnBold As Boolean Dim blnItalic As Boolean Dim strFont As String Dim shtSize As Short Dim lngOriginalStart As Long Dim lngOriginalLength As Long Dim intCount As Integer ' If nothing in the box, exit If Box.Text.Length = 0 Then Exit Function ' Store original selections, then select first character lngOriginalStart = 0 lngOriginalLength = Box.TextLength Box.Select(0, 1) ' Add HTML header strHTML = "<html>" ' Setup initial parameters strColour = Box.SelectionColor.ToKnownColor.ToString blnBold = Box.SelectionFont.Bold blnItalic = Box.SelectionFont.Italic strFont = Box.SelectionFont.FontFamily.Name shtSize = Box.SelectionFont.Size ' Include first 'style' parameters in the HTML strHTML += "<span style=""font-family: " & strFont & _ "; font-size: " & shtSize & "pt; color: " & strColour & """>" ' Include bold tag, if required If blnBold = True Then strHTML += "<b>" End If ' Include italic tag, if required If blnItalic = True Then strHTML += "<i>" End If ' Finally, add our first character strHTML += Box.Text.Substring(0, 1) ' Loop around all remaining characters For intCount = 2 To Box.Text.Length ' Select current character Box.Select(intCount - 1, 1) ' If this is a line break, add HTML tag If Box.Text.Substring(intCount - 1, 1) = Convert.ToChar(10) Then strHTML += "<br>" End If ' Check/implement any changes in style If Box.SelectionColor.ToKnownColor.ToString <> strColour _
Or Box.SelectionFont.FontFamily.Name <> strFont Or _ Box.SelectionFont.Size <> shtSize Then strHTML += "</span><span style=""font-family: " _ & Box.SelectionFont.FontFamily.Name & _ "; font-size: " & Box.SelectionFont.Size & _ "pt; color: " & _ Box.SelectionColor.ToKnownColor.ToString & """>" End If ' Check for bold changes If Box.SelectionFont.Bold <> blnBold Then If Box.SelectionFont.Bold = False Then strHTML += "</b>" Else strHTML += "<b>" End If End If ' Check for italic changes If Box.SelectionFont.Italic <> blnItalic Then If Box.SelectionFont.Italic = False Then strHTML += "</i>" Else strHTML += "<i>" End If End If ' Add the actual character strHTML += Mid(Box.Text, intCount, 1) ' Update variables with current style strColour = Box.SelectionColor.ToKnownColor.ToString blnBold = Box.SelectionFont.Bold blnItalic = Box.SelectionFont.Italic strFont = Box.SelectionFont.FontFamily.Name shtSize = Box.SelectionFont.Size Next ' Close off any open bold/italic tags If blnBold = True Then strHTML += "</b>" If blnItalic = True Then strHTML += "</i>" ' Terminate outstanding HTML tags strHTML += "</span></html>" ' Restore original RichTextBox selection Box.Select(lngOriginalStart, lngOriginalLength) ' Return HTML Return strHTML End Function
| TOP TIP | Looking to turn HTML back into text? Check out my Converting HTML to Text, Easily tip in the Working with the Internet section, within Chapter 7. |
Drag and Drop from Windows Explorer
Download supporting files at www.apress.com .
The files for this tip are in the Ch2 ” Drag and Drop Explorer folder.
Dragging and dropping within your application is pretty simple stuff. Simply set a couple of properties and you re rocking: look up drag and drop, Windows Forms in the help index for more information. But what if you want to drag and drop from another application, such as Windows Explorer?
One of the most commonly requested , yet infrequently answered Windows form questions is How can I let my users drag and drop files and folders directly into my applications? It s simple; just follow these three easy steps:
-
Change the AllowDrop property of the control you want users to drop the files onto to True . This could be a ListBox control, a Panel control, or even your form itself.
-
Add code to the DragOver event of the control, so the typical copy icon is displayed when files are dragged over.
' As dragged over, check data is file drop If e.Data.GetDataPresent(DataFormats.FileDrop) Then ' Display the copy (or other) icon e.Effect = DragDropEffects.Copy End If
-
Finally, add code to the DragDrop event of the control, to receive and process information about the dropped files.
' Check this is a file drop If (e.Data.GetDataPresent(DataFormats.FileDrop)) Then ' Retrieve list of files and loop through string array Dim strFiles() As String = e.Data.GetData(DataFormats.FileDrop) Dim intCount As Integer For intCount = 0 To strFiles.Length MessageBox.Show(strFiles(intCount)) Next End If
And that s it! In three simple steps, your application is ready to interoperate with Windows Explorer or any other application that supports the standard Windows file drag-and-drop routines. (See Figure 2-12.)
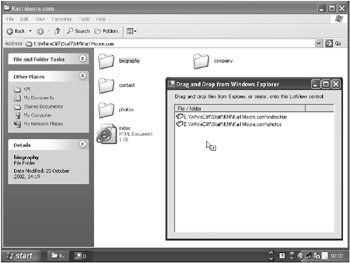
Figure 2-12: Dragging and dropping from Windows Explorer
Of course, we re simply displaying the dropped files or folders in a message box. However, you could be doing something much more exciting: generating an MP3 play list, processing special work files, loading documents into your own mini word processor, and so forth. The possibilities are endless.
Dialog Boxes: What Did the User Click?
If you work a lot with your own popup dialog boxes rather than simply using the MessageBox class, you might be interested to learn about the new way in which Microsoft has made it easy to pass a response back to the code that displayed the dialog box.
In older versions of Visual Basic, you d typically display the form, setup properties and enumerations to set and retrieve the user response ”and more. Now, it s much easier, with the DialogResult property.
Here s how it works: you create your dialog box as usual. You might be asking the user a simple question, or getting him or her to confirm or cancel an action. For each response, add a button to the dialog box and change its DialogResult property to the result you wish that button to return.
Next, from your calling form, create an instance of your dialog form in code and run .ShowDialog . This opens the form modally and keeps it there until your user clicks on one of the response buttons. As soon as they do, the form closes and the result is passed back as the result of the .ShowDialog function, as so:
Dim objForm As New Form2() ' If you need set any properties on ' the form, do it here! If objForm.ShowDialog = DialogResult.Yes Then MessageBox.Show("You clicked Yes!") Else MessageBox.Show("You did not click Yes!") End If It s pure simplicity!
Text Printing Class That Works!
Download supporting files at www.apress.com .
The files for this tip are in the Ch2 ” Printing folder.
You can print from your program in a number of ways. One option, for example, is to automate Microsoft Word, edit a document in code, and then programmatically print it out.
However, if you re looking to print directly from your application, the .NET Framework provides a number of components to help you in the System.Drawing.Printing namespace.
The core component here is PrintDocument. At its simplest, printing involves instantiating a PrintDocument object, setting its properties, and calling the Print method. With each page to be printed, PrintDocument raises a PrintPage event, to which you need to add your own printing logic. Other key classes in the same Printing namespace include PrinterSettings , PageSettings , and PrintPreviewControl .
As you can imagine, this is a large area and can get relatively complex. The following class attempts to simplify one of the most common uses: the simple printing of text. Simply add the following class code to your project and use as directed.
It s worth noting that this class actually works, as opposed to the less-functional TextFilePrintDocument class bundled by Microsoft in the Windows Forms Quick-Start tutorials, which only reads from text files plus cuts out as soon as a blank line is encountered. This class is also neatly encapsulated and allows you to change its font through a simple property, unlike Microsoft s second attempt with its highly publicized 101 VB .NET Samples.
Here s the code:
Public Class TextPrint ' Inherits all the functionality of a PrintDocument Inherits Printing.PrintDocument ' Private variables to hold default font and text Private fntPrintFont As Font Private strText As String Public Sub New(ByVal Text As String) ' Sets the file stream MyBase.New() strText = Text End Sub Public Property Text() As String Get Return strText End Get Set(ByVal Value As String) strText = Value End Set End Property Protected Overrides Sub OnBeginPrint(ByVal ev As Printing.PrintEventArgs) ' Run base code MyBase.OnBeginPrint(ev) ' Sets the default font If fntPrintFont Is Nothing Then fntPrintFont = New Font("Times New Roman", 12 ) End If End Sub Public Property Font() As Font ' Allows the user to override the default font Get Return fntPrintFont End Get Set(ByVal Value As Font) fntPrintFont = Value End Set End Property Protected Overrides Sub OnPrintPage(ByVal ev _ As Printing.PrintPageEventArgs) ' Provides the print logic for our document ' Run base code MyBase.OnPrintPage(ev) ' Variables Static intCurrentChar As Integer Dim intPrintAreaHeight, intPrintAreaWidth, _ intMarginLeft, intMarginTop As Integer ' Set printing area boundaries and margin coordinates With MyBase.DefaultPageSettings intPrintAreaHeight = .PaperSize.Height - .Margins.Top - .Margins.Bottom intPrintAreaWidth = .PaperSize.Width - .Margins.Left - .Margins.Right intMarginLeft = .Margins.Left 'X intMarginTop = .Margins.Top 'Y End With ' If Landscape set, swap printing height/width If MyBase.DefaultPageSettings.Landscape Then Dim intTemp As Integer intTemp = intPrintAreaHeight intPrintAreaHeight = intPrintAreaWidth intPrintAreaWidth = intTemp End If ' Calculate total number of lines Dim intLineCount As Int32= CInt(intPrintAreaHeight / Font.Height) ' Initialize rectangle printing area Dim rectPrintingArea As New RectangleF(intMarginLeft, intMarginTop, _ intPrintAreaWidth, intPrintAreaHeight) ' Initialise StringFormat class, for text layout Dim objSF As New StringFormat(StringFormatFlags.LineLimit) ' Figure out how many lines will fit into rectangle Dim intLinesFilled, intCharsFitted As Int32 ev.Graphics.MeasureString(Mid(strText, _ UpgradeZeros(intCurrentChar)), Font, _ New SizeF(intPrintAreaWidth, intPrintAreaHeight), objSF, _ intCharsFitted, intLinesFilled) ' Print the text to the page ev.Graphics.DrawString(Mid(strText, _ UpgradeZeros(intCurrentChar)), Font, _ Brushes.Black, rectPrintingArea, objSF) ' Increase current char count intCurrentChar += intCharsFitted ' Check whether we need to print more If intCurrentChar < strText.Length Then ev.HasMorePages = True Else ev.HasMorePages = False intCurrentChar = 0 End If End Sub Public Function UpgradeZeros(ByVal Input As Integer) As Integer ' Upgrades all zeros to ones ' - used as opposed to defunct IIF or messy If statements If Input = 0 Then Return 1 Else Return Input End If End Function End Class We could use this class as follows :
' Create object, passing in text Dim MyPrintObject As New TextPrint(TextBox1.Text) ' Set font, if required MyPrintObject.Font = New Font("Tahoma", 8) ' Issue print command MyPrintObject.Print() The Secret Rebirth of .PrintForm
Download supporting files at www.apress.com .
The files for this tip are in the Ch2 ” Print Form folder.
If you ve managed to print anything in .NET, you ll know it s no mean task. What, you may ask, happened to the old .PrintForm method of VB6 fame? Unfortunately, like a number of older features, it got sold out in the name of standardization.
But don t fret: with just a few lines of extra code, we can bring it back from the dead. How? Simply follow these four easy steps:
-
Design your form as usual, adding all the required controls you wish to be printed.
-
From your toolbox, add one PictureBox, PrintDocument, and PrintDialog controls to your form. Your code will use these to support the printing of your form. For this code sample, I ve named my controls MyPictureBox, MyPrintDocument, and MyPrintDialog, respectively. The PictureBox is the only visible control, which you can make invisible if you wish.
-
Add the following code behind your form. These routines perform the basic function of taking a screenshot and sending the results to the printer. The main method is PrintForm :
Public Sub PrintForm() ' Takes a screenshot, then initiates the print GrabScreen() MyPrintDialog.Document = MyPrintDocument If MyPrintDialog.ShowDialog = DialogResult.OK Then MyPrintDocument.Print() End If End Sub ' API call to help generate final screenshot Private Declare Auto Function BitBlt Lib "gdi32.dll" _ (ByVal hdcDest As IntPtr, ByVal nXDest As Integer, _ ByVal nYDest As Integer, ByVal nWidth As Integer, _ ByVal nHeight As Integer, ByVal hdcSrc As IntPtr, _ ByVal nXSrc As Integer, ByVal nYSrc As Integer, _ ByVal dwRop As System.Int32) As Boolean ' Variable to store screenshot Private bmpScreenshot As Bitmap Private Sub GrabScreen() ' Performs a screenshot, saving results to bmpScreenshot Dim objGraphics As Graphics = Me.CreateGraphics Dim objSize As Size = Me.Size Const SRCCOPY As Integer = &HCC0020 bmpScreenshot = New Bitmap(objSize.Width, _ objSize.Height, objGraphics) Dim objGraphics2As Graphics = objGraphics.FromImage _ (bmpScreenshot) Dim deviceContext1 As IntPtr = objGraphics.GetHdc Dim deviceContext2 As IntPtr = objGraphics2.GetHdc BitBlt(deviceContext2, 0, 0, Me.ClientRectangle.Width, _ Me.ClientRectangle.Height, deviceContext1, 0, 0, SRCCOPY) objGraphics.ReleaseHdc(deviceContext1) objGraphics2.ReleaseHdc(deviceContext2) End Sub Private Sub MyPrintDocument_PrintPage(ByVal _ sender As System.Object, ByVal e As _ System.Drawing.Printing.PrintPageEventArgs) _ Handles MyPrintDocument.PrintPage ' Method that handles the printing Dim objImageToPrint As Graphics = e.Graphics objImageToPrint.DrawImage(bmpScreenshot, 0, 0) bmpScreenshot.Dispose() objImageToPrint.Dispose() e.HasMorePages = False End Sub
-
Add a Print button to your control, add code to run the PrintForm method, and then simply wait and let our code run its magic. Don t forget, you may wish to make certain controls (such as the Print button itself) invisible before running the PrintForm method, then making it visible again afterward.
And that s quite simply all you need to print your form. Admittedly, it s not as easy as .PrintForm , but when the code is already written and ready to roll, who s complaining?
The Facts on Visual Inheritance
Visual inheritance allows you to create one master form, and then have other Windows forms inherit its layout and code. For example, you might create one master form for your program s wizard, and then add further wizard forms that automatically inherit its appearance and functionality, customizing each as appropriate.
To use visual inheritance, first design and code your master form, then build your application ( Ctrl+Shift+B ). Next, select Project ![]() Add Inherited Form from the menu. Enter a name, click on Open, and choose the form you wish to inherit from. Then, further customize this form to meet your needs.
Add Inherited Form from the menu. Enter a name, click on Open, and choose the form you wish to inherit from. Then, further customize this form to meet your needs.
It s worth noting that any changes you make here will not alter your original form; rather, they will just override the original settings inherited from your master form.
Looking at Windows, Performance Counters, and More
Building great applications isn t all about amazing code snippets that can make your programs look great and run like the wind. It s also about being intelligent ” and one big part of that is the ability for your program to look at the world around it (Windows) and figure out exactly what s happening.
Well, as you can imagine, this is one obviously huge area, so I ll be brief and provide just a few core code tips that ll give you a great starting point when trying to find out just what you want.
First off, to find out about your current environment ”such as command-line arguments, the user domain name, tick count, and so on ”simply explore the System.Environment class. There s no need for any sticky API calls. Here s a System.Environment example that retrieves the name of the current version of Windows:
x = System.Environment.OSVersion.ToString
To discover more about the actual system itself ”such as the computer name, number of monitors attached, whether visual aids should be used rather than audio, the default icon size, and so on ”check out the System.Windows.Forms.SystemInformation class. Here s an example that checks whether the computer booted normally (that is, didn t use safe mode):
If System.Windows.Forms.SystemInformation.BootMode = _ BootMode.Normal Then ' Computer booted in normal mode End If
Finally, performance counters are an excellent way of tapping into exactly what the system is up to. This is one huge subject on its own, and a mound of books has already been written on the subject. However, in brief, performance counters report on the status of the system and its applications. They re predefined and return a number, which you can look at in a variety of formats (an instantaneous figure, an average, percentage, et cetera).
Examples include the amount of system memory available, a processor s busy time, the number of ASP.NET applications running, or even how many SQL Server connections you have open. (See Figure 2-13.)
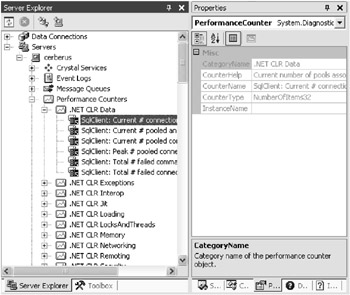
Figure 2-13: Viewing the available performance counters through the Server Explorer
You can browse the existing performance monitors by using the Server Explorer (View ![]() Server Explorer), expanding upon your server and exploring the Performance Counters node. If you see an item you think you ll want to use in your code, you can drag it onto your form and manipulate the newly created PerformanceCounter object in code, or just do it all in code. The following snippet demonstrates the latter, displaying the amount of available memory in a message box:
Server Explorer), expanding upon your server and exploring the Performance Counters node. If you see an item you think you ll want to use in your code, you can drag it onto your form and manipulate the newly created PerformanceCounter object in code, or just do it all in code. The following snippet demonstrates the latter, displaying the amount of available memory in a message box:
Dim perfFreeMemory As New PerformanceCounter("Memory", _ "Available MBytes") MessageBox.Show("There are " & perfFreeMemory.NextValue & _ "MB of memory available on your system. This program requires more.") A bundle of .NET-specific performance counters are available, too ”and good system administrators will be more than familiar with these figures, which you can analyze through the PerfMon.exe tool. The .NET revolution also allows you to set up your own custom performance counters with ease, recording data such as the number of sales per second. You can learn more about all of this by looking up performance counters in the help index, and then browsing the subcategories .
| TOP TIP | If you re attempting to use performance monitors in ASP.NET applications, you may initially find yourself experiencing a bundle of Access denied error messages. That s because .NET is picky about exactly who can and can t see this system information. You can resolve this by following the security guidelines at http://aspnet.4guysfromrolla.com/articles/041002-1.aspx, or if you re simply wanting to retrieve data such as how long your Web server has been up, check out my tips in the next chapter. |
EAN: 2147483647
Pages: 76