Configuring and Managing DNS Zones
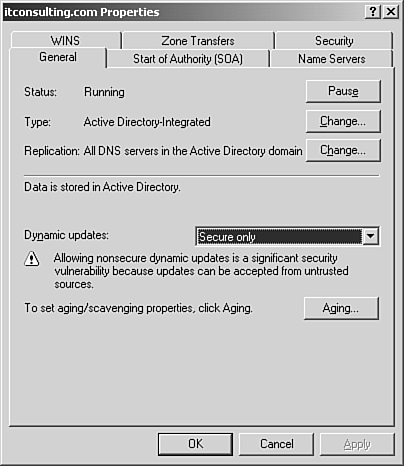
| Configuring DNS zones includes configuring zone options, secure dynamic updates, and configuring AD-integrated zones. Now that you have forward and reverse lookup zones created on your Windows 2003 DNS server, let's explore DNS zone options next . Configuring Zone OptionsIn the DNS Console, right-click the forward or reverse lookup zone and choose Properties. Your zone's General tab displays as shown in Figure 6.7. Figure 6.7. Forward Lookup Zone Properties, General tab. The zone properties dialog box on Windows Server 2003 is very similar to the zone properties dialog box on Windows 2000 Server. One difference is the General tab on Windows 2003 DNS Server. Added beneath Status and Type is Replication along with a Change button. Click the Change button to change the replication scope for an AD zone. The Active Directory Zone Replication Scope dialog box opens. This dialog box previously appeared under the heading Create a Forward Lookup Zone (step 5 in the list that described how to install forward and reverse lookup zones). If you have installed AD on your Windows Server 2003, your zone type by default is Active Directory (AD) Integrated. AD-integrated zones store their zone information in Active Directory's database. To change the zone type to primary, secondary, or stub zone (discussed later), click the Change button. You can also change zone types using the dnscmd command-line tool.
The zone property tabs and their descriptions are listed in Table 6.1. Table 6.1. Zone Property Tabs
Active Directory “Integrated Zones and Secure Dynamic UpdatesAD-integrated zones store and replicate DNS information as part of the AD database replication. AD-integrated zones are created on domain controllers hosting DNS. Each DC contains a read-write copy of the zone information stored in AD. In the Dynamic Updates section on the General properties tab, Secure Only is selected by default. Secure dynamic updates are supported only for AD-integrated zones. Clients using secure dynamic updates automatically register and update their own resource records with the DNS server. Using secure dynamic updates eases DNS administration and reduces the need to manually add and update resource records. Properly configured DHCP servers can dynamically register records for down-level clients such as Windows NT and Windows 98 computers. For good security practices, you should not change the default dynamic updates unless you have a valid reason. For example, a Unix DNS server not supporting the latest version of BIND on your network is a good reason to choose the medium-level security dynamic update option, nonsecure and secure.
Zone Transfers and SecuritySecondary DNS servers receive their zone information from the master name DNS server. The Zone Transfers tab has options to Send Zone Transfers to Any Server, Only Servers Listed in the Name Servers Tab, or Only to the Following Servers. You add DNS servers by typing their IP addresses and clicking the Add button. Windows 2000 and Windows Server 2003 both support incremental zone transfers. Early implementations of DNS supported only full zone transfers. When you use incremental zone transfers, only the zone changes that occur on the primary DNS server are transferred and synchronized with the secondary DNS server, thus reducing DNS network traffic. Primary servers have the Notify button and can be configured to notify selected secondary servers as soon as a change is made. Otherwise, the secondary servers will query the primary at each Refresh Interval. Secondary DNS servers have a Notify button located on the Zone Transfer tab of the Zone Properties page. After clicking the Notify button, you can use this property page to specify the secondary servers to be automatically notified when the zone changes. You use this to restrict or limit zone transfer access to specific servers in the list.
Another method used for assigning DNS administration tasks is to delegate control. Delegations are used to separate servers in the same domain so that certain individuals or groups can manage one server and others can manage other servers. To create a zone delegation, right-click the domain to which you want to delegate control and choose New Delegation. The New Delegation Wizard guides you through the process. |
EAN: 2147483647
Pages: 132