9.3. Working with Multiple Drawings Life's pretty simple when all you want to do is add a single shape or line to your slide: you just add it, customize it, maybe add some text, and move on. But if you want to draw something more complex, then you begin to run into problems. Say you've added fifteen small shapes to your slide and then realize they all need to be shifted two inches to the right. Or imagine that you've got a bunch of shapes that need to be positioned precisely or overlapped in a very specific waythink cards spread out in a fanto create the effect you're after. PowerPoint gives you three different ways to deal with multiple shapes and lines: by grouping, arranging, and aligning them. 9.3.1. Grouping Objects Grouping multiple lines and shapes lets you resize or reposition them by dragging in one fell swoop, as easily as though you were manipulating a single line or shape. For example, say you want to move all of the shapes on your slide exactly two inches. Instead of repositioning each shape individually, you can group them into a single shape, reposition that shape, and then ungroup it.
Note: You don't have to group multiple drawings to apply formatting effects such as colors or shadows. If that's what you want to do, simply shift and click to select the multiple objects.
Select the objects you want to group. PowerPoint displays individual selection borders around each object (Figure 9-21, left). Go to Home  Drawing Arrange Group. PowerPoint changes the individual selection borders into one big selection border (Figure 9-21, right). You can then resize, reshape, or reposition the grouped object using any of the techniques for individual objects described earlier in this chapter. Drawing Arrange Group. PowerPoint changes the individual selection borders into one big selection border (Figure 9-21, right). You can then resize, reshape, or reposition the grouped object using any of the techniques for individual objects described earlier in this chapter. 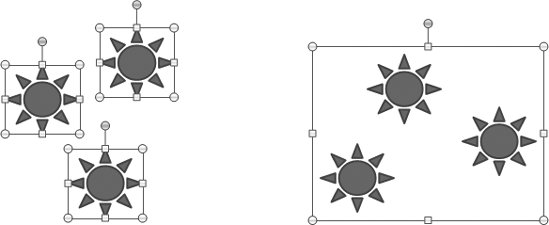 | Figure 9-21. On the left, you see three different spheres selected separately. Grouping them (right) tells PowerPoint to treat the three different shapes as a single shapeuntil you ungroup them. | |
To ungroup objects, select the grouped object, and then click Home Drawing Arrange Ungroup. PowerPoint replaces the single selection border with individual selection borders.
Note: If you haven't selected a grouped object, PowerPoint grays out the Ungroup menu option. And until you've ungrouped a grouped object, PowerPoint grays out the Regroup menu option.
9.3.2. Stacking Objects PowerPoint assumes you want each new shape or line you add to your slide to appear on top of the previous shape or line. If that's not the effect you want, you can restack meaning rearrangeoverlapped shapes (Figure 9-22). Just right-click the line or shape you want to restack, and, from the shortcut menu that appears, choose one of the following options: -
Bring to Front Bring to Front. Pulls the selected line or shape all the way to the top (the front) of the stack. -
Bring to Front Bring Forward. Pulls the selected line or shape one up in the stacking order. -
Send to Back Send to Back. Pushes the selected line or shape all the way to the bottom (the back) of the stack. -
Send to Back Send Backward. Pushes the selected line or shape one back in the stacking order. 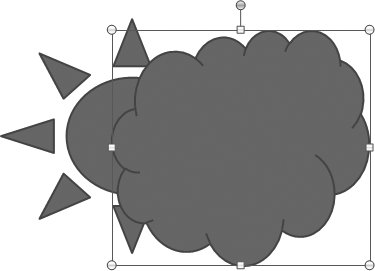 | Figure 9-22. Right-clicking an object lets you change its stacking order. When you're dealing with only two shapes, bringing an object to the front has the same result as bringing that object forward. Here, the cloud that appeared behind the sun has been brought forward so that it appears in front. | |
9.3.3. Aligning Shapes and Lines To help you lay out the different shapes and lines you add to your slides, PowerPoint lets you display helpful rulers and gridlines. It also lets you align multiple objects quickly. For example, you can line up a bunch of shapes on the left or right side of your slide simply by clicking a button. To help you get the alignment right, you can have PowerPoint display rulers or gridlines (Figure 9-23). Choose View Show/Hide Ruler or View Show/Hide Gridlines. Another way to show these helpful tools: right-click a blank spot on a slide and choose Ruler or "Grids and Guides from the shortcut menu. 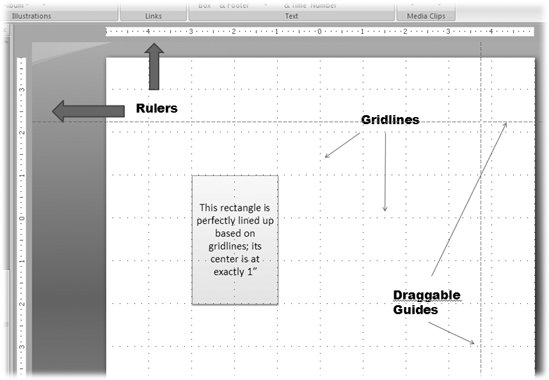 | Figure 9-23. Displaying horizontal and vertical rulers and gridlines, as shown here, lets you layout your shapes exactly. Rulers and gridlines don't appear when you run your slideshow. Pressing Shift+F9 toggles grids on and off; to find out how to customize how far apart PowerPoint places the gridlines, turn to page 301. | |
Note: You can create additional guides by turning guides on (page 129), and then Ctrl-clicking a guide and dragging to create a new guide.
First select the lines or shapes you want to align. Then go to Home Drawing Arrange Align to display the alignment menu shown in Figure 9-24. 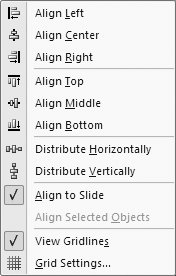 | Figure 9-24. The number of options that PowerPoint activates (as opposed to grays out) depends on how many objects you've selected. | |
Choose one or more of the following: -
Align Left, Center, Right, Top, Middle, or Bottom. Tells PowerPoint to line up your selected objects with respect to the slide (see Align to Slide, in this list), or with respect the selected objects themselves (see Align Selected Objects, in this list). For example, choosing Align Left repositions your objects so that they're lined up on the left side of the slide ( assuming you've also selected Align to Slide; see next ). -
Distribute Horizontally, Vertically. Tells PowerPoint to spread out multiple objects so that they're equally distant from the sides and top-and-bottom of a slide, respectively. -
Align to Slide. Tells PowerPoint to align left, center, right, top, middle, or bottom (see above) with respect to the edges of the slide. -
Align Selected Objects. Tells PowerPoint to align left, center, right, top, middle, or bottom (see above) with respect to the other objects you've selected. -
Show Gridlines. Tells PowerPoint to show gridlines. -
Grid Settings. Displays the Grid and Guides dialog box (Figure 9-25), which lets you customize the gridlines that appear (if you've told PowerPoint to show them as described above). The Grid and Guides dialog box also lets you tell PowerPoint to help you position objects so that they touch ( snap to ) gridlines or other objects on your slide.  | Figure 9-25. Because turning on snapping affects how PowerPoint lets you position objects when you're dragging them, most folks tend to either hate it or love it. Turning on the "Snap objects to grid" affects object positioning even when the gridlines aren't showing. | |
Note: You can display the Grid and Guides dialog box shown in Figure 9-25 by right-clicking a slide and choosing Grid and Guides.
 |