| Layers can be an easy way to design your page; however, your audience might be limited because not all browsers support layers. Although most current browsers will support layers, earlier browsers display layer contents without any positioning and without any control about the placement. If you decide to design your page using layers, you might want to convert the layers to a table to provide an alternate page for those viewers with browsers that do not support layers. Test your pages in different browsers and see what your audience is using to help determine if you want to provide an alternative page. After you have converted the layers to a table, you can switch to Layout view to complete any design changes. You can then use the Check Browser behavior to redirect users based on their browser version. The following exercise shows you how to convert layers, but the recommended method of creating tables is using Standard view to create tables or Layout view to draw tables and table cells (you worked with both methods in Lesson 6). A few restrictions apply when you're converting layers to tables: You can't have nested layers, and the layers can't overlap. If these conditions exist, Dreamweaver displays an alert and does not create the table. You also cannot convert a single layer or group of layers to a table while leaving other layers as layersthe entire page and all the layers that it contains will be converted to a table. | | 1. | In the layers.html document, choose File > Save As and type layers_tables.html in the Save As (Macintosh) or File name (Windows) text field. Save the file in the Lesson_09_Layers folder.
The layers in this document will be converted and replaced with a single table.
Tip The conversion to a table removes the layer names. | 2. | Click in the Document window. On the Layers panel, check the Prevent Overlaps box. Adjust the placement of the layers at the top of the page so that the layers are not next to another and do not overlap.
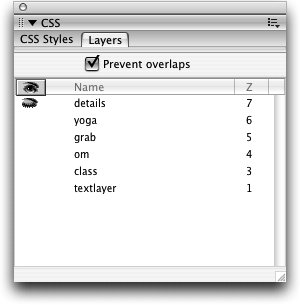 Overlapping layers cannot be converted to a table. If you select this option before you begin drawing layers, Dreamweaver prevents the layers from overlapping. After the Prevent Overlaps box is checked, you might want to test it by trying to move the class layer over the om layer. By using the Prevent Overlaps option, you can move layers as close as possible to other layers.
If you already have layers that overlap, checking the Prevent Overlaps checkbox does not move those layers. You have to move them to stop them from overlapping.
| | | 3. | Select the <body> tag in the tag selector, select the Drag Layer behavior in the Behaviors panel, and click the Remove Event button. Select the jayne.jpg image in the Document window, select the Show-Hide Layers behavior in the Behaviors panel, and click the Remove Event button.
 When you use behaviors that apply to or are intended to affect layers, those behaviors are no longer be necessary after you convert the layers to a table. Such behaviors should be removed to keep your document clean, keep it free of errors and unnecessary code, and reduce the file size.
| 4. | Choose Modify > Convert > Layers to Table.
The Convert Layers to Table dialog box opens with a number of options:
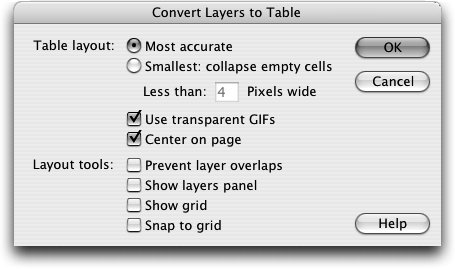 Most accurate creates a table cell for every layer plus any additional cells that are necessary to preserve the space between layers. Smallest: collapse empty cells specifies that the layers' edges should be aligned if they are positioned within the specified number of pixels. If this option is selected, the resulting table might have fewer empty rows and columns. Use transparent GIFs fills the last row of the table with transparent GIFs, which ensures that the table displays the same way in all browsers. When this option is selected, you cannot edit the resulting table by dragging its columns. When this option is deselected, the resulting table does not contain transparent GIFs, and its appearance might vary slightly in different browsers. Center on page centers the resulting table on the page. If this option is deselected, the table is left-aligned. Layout tools allows you to set any desired layout or grid options.
| | | 5. | Keep the default settings of Most accurate, Use transparent GIFs, and Center on page; then click OK.
If you have any layers that overlap, you get a warning dialog box, informing you that Dreamweaver cannot convert the layers to a table. If this happens, go back to your document and make sure that none of the layers overlap.
Any hidden layers are deleted. After you convert your layers to a table, you can make any necessary adjustments to the table.
 | 6. | Select the <style> group in the CSS Styles Panel and click the trash icon at the bottom of the panel. In the Document window, select the instruction text located in the table cell below the class image and delete it.
|
The process of converting layers to tables replaces the <div> tags in the body of the document with a corresponding <table> tag; however, the internal CSS properties that were defined in the head of the document still remain. You can use the CSS Styles panel to delete the internal style sheet entirely or remove only those styles that defined the layers. If you look in the CSS Styles panel you will see two groups of styles: sangha.css and <style> . The external style sheet that is used throughout the project site is sangha.css, whereas the <style> group is the internal style sheet that was created while you worked with layers in this lesson. The textlayer layer for example, is defined in the <style> group as #textlayer . Any styles that use the names of the layers that you previously created are no longer necessary and can be deleted. Although in this case the entire internal style sheet can be deleted, you might want to be cautious when deleting an internal style sheet and check to be sure that there are no additional styles that were included that specify properties that defined things other than the layers themselves, such as font styling. When performing operations such as converting layers to tables, certain functionality might be lost. In this case, the user can no longer drag the class image to a different location on the pageso any references to or instructions regarding such features should be removed. |