| After you create a table, you might find that it is too large or too small, or you might need to add columns and rows. You can adjust these table properties easily. 1. | In the index.html document, select the table and change the Width value on the Property inspector from 500 to 650. Press Return (Macintosh) or Enter (Windows) to apply the change.
You have enlarged the table.
Note You can also adjust the size of the table by moving the pointer over the bottom or right edges of the table border. When the pointer changes to a two-headed arrow, drag the column border to adjust the table to the desired size. You can see the new width by selecting the table and looking at the number in the Width text field in the Property inspector. Use caution when dragging a border of a table to change its size. Whenever you drag table borders in this way, Dreamweaver automatically assigns and updates widths and/or heights. Sometimes, this may not be what you want. If you want to get rid of the widths or heights, press the Clear Column Widths and Clear Row Heights buttons in the Property inspector. You can also use the Clear All Heights and Clear All Widths commands in the table width menu accessible from the gray bar at the top of the table. | | | 2. | Click in the right cell of the last row of the table (the lower-right cell) and then press Tab.
If the pointer is in the last cell of a table, pressing Tab causes the insertion point to be placed in the leftmost cell of a new row.
Tip You can also add new rows and columns by choosing Modify > Table and selecting one of the following options: Insert Row (inserts one row above the current row), Insert Column (inserts one column to the left of the current column), or Insert Rows or Columns (this option allows you to choose whether to insert rows or columns, specify the number of rows or columns that should be inserted, and to select where those rows or columns will appear). You can also add new columns by clicking the green line spanning a column on the gray bar and choosing Insert Column Left or Insert Column Right. | 3. | In the left cell of the row you just inserted, click and drag to the right to select all the cells in the row. Click the Merge Cells button in the Property inspector.
 The four cells now form one long cell that spans four columns. Any attributes of the first cell, such as color and alignment, are applied to the merged cell. The four cells now form one long cell that spans four columns. Any attributes of the first cell, such as color and alignment, are applied to the merged cell.
Note You can split cells in the same manner by clicking the Split Cell button in the Property inspector or by choosing Modify > Table > Split Cell. This method returns the number of cells to the original number if you merged them, or it can split a cell into any number of rows or columns. You can merge any number of cells in one column or any number of cells in one row. You can also merge cells in multiple rows and columns, but the cells to be merged must form a rectangle. You can't merge cells to create an L shape.
Tip To merge cells, you can also choose Modify > Table > Merge Cells. The keyboard shortcuts for merging rows are Option+Cmd+M (Macintosh) or Ctrl+Alt+M (Windows). Pressing just the M key also merges the selected cells. | | | 4. | In the cell you have just merged, type © 2006, Yoga Sangha.
Merging cells gives you a great deal of additional options for layout.
Note If you need to delete a row, click the row and then choose Modify > Table > Delete Row. You can also Ctrl-click (Macintosh) or right-click (Windows) on the table and choose Table > Delete Row from the context menu. | 5. | With the insertion point in the last row of the table, choose Modify > Table > Insert Rows or Columns. In the Insert Rows or Columns dialog box that appears, choose Rows from the Insert options, type 1 in the Number of rows text field, and choose Above the Selection in the Where options. Click OK.
|
The Insert Rows or Columns dialog box allows you to specify whether to insert before or after the current row. When you use this dialog box, you have control over where the new rows or columns are placed, and you can insert any number of rows or columns. 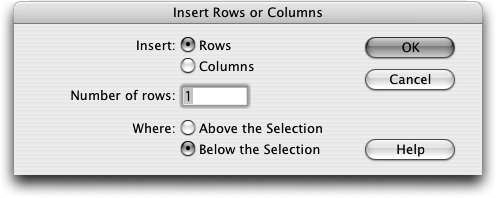 Note If you choose Modify > Table > Insert Row, the new row is inserted above the current row by default. You can also Ctrl-click (Macintosh) or right-click (Windows) the row above and choose Table > Insert Rows Or Columns from the context menu.
This new row you have inserted acts as a spacer between the copyright and the information about the class schedule above it. Giving each section or block of information on your page a little space helps the viewer to differentiate between the text on the pageit is difficult to read information when there is a lot of text that all runs together. |