| Digital IDs are used to electronically sign PDF documents. Although you can create a Digital ID in Adobe Reader, to digitally sign a document, you need to use a PDF file prepared with special usage rights from authors using Adobe LiveCycle Reader Extensions. When you create a Digital ID, there are two parts to the ID, as explained earlier in this chapter. When you create a Digital ID, the signature appearance is a façade that hides a unique "fingerprint" customized with encryption to prevent someone from duplicating your signature. When you electronically sign a document or open documents signed by other users, you need to confirm the authenticity of the PDF document, and validate the signatures against a public certificate. You might think of a public certificate as a being like driver's license or identification card carrying your signature. When you write a check, a retail clerk looks at your license or ID card and compares that signature to the one on your signed check. Anyone can view your identification, but only you are legally authorized to sign a document. In Adobe Reader, when you create a Digital ID, you have a means of exporting your public certificate and sharing it with other users who can then electronically compare your certificate to documents you digitally sign. In addition, you can collect public certificates from other users when you want to authenticate their signatures. Collecting public certificates from other users is referred to as building a list of trusted identities. Adobe Reader lets you create Digital IDs, export public certificates, and build a list of trusted identities by acquiring public certificates from other users. Creating a Personal Digital ID The first order of business when working with Digital IDs is to create your own personal Digital ID. You may or may not use the ID to sign documents, depending on the kind of files you work with. However, creating a Digital ID is important if you want to share a public certificate with other users. When a PDF author has your public certificate, the author can encrypt a PDF document specifically for you using your certificate. No special requirements are needed to create a Digital ID, to share your public certificate, or to open files encrypted with your certificate. What's the advantage of securing documents with certificates? Suppose your work involves receiving confidential material from several people. You may receive proposals, requests, applications, or other documents where the information needs to be secure against unauthorized viewing. Assume for a moment you receive 25 different documents from individuals who all secure the files with password protection. If each document author secures a file with password protection, you need to acquire and maintain a list of 25 individual passwords. But if you send your personal certificate to users, or post your certificate on a Web site or network server, all users can acquire your certificate and encrypt each document using your certificate. Then when you receive the encrypted documents, you can open them using the password used when you created your Digital ID. In this case you need only a single password to open all 25 documents. |
When you create a Digital ID, you have the option of creating a signature appearance. Appearances are only an optionthey're not required when using Digital IDs. If you create an appearance, the appearance is shown on a document each time you sign it. You can use a scanned image of your analog signature, an icon or logo, a photo, or any kind of PDF document for an appearance. You can create multiple appearances and choose which appearance you want to use when signing a document. You can create an appearance either before or after you create a Digital ID. Creating an appearance You can create Digital IDs with or without a custom appearance. If you want to use an analog signature as part of your signature appearance, you need to scan your signature and save the file as a PDF document. If you use Adobe Photoshop or Adobe Photoshop Elements, you can save to a PDF file from either application. If you choose not to use a graphic image as part of your signature appearance, you can choose from different options Adobe Reader provides for appearances. To create an appearance for your Digital ID: 1. | Press Ctrl/Command+K to open the Preferences dialog.
| 2. | Click Security in the left pane, and the right pane changes (Figure 17.1).
Figure 17.1. Click Security in the Preferences dialog to open the Digital Signatures preferences pane. 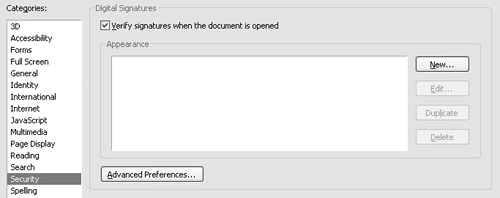
NOTE Among other settings you need to specify are the Identity preferences. If you have not filled in the Identity preferences as discussed in earlier chapters, click Identity in the Preferences dialog and fill in the text boxes in the right pane. | 3. | The right pane in the Preferences dialog offers appearance settings choices. Click the New button to create a new Digital ID appearance. The Configure Signature Appearance dialog opens (Figure 17.2).
Figure 17.2. Click New to create a new appearance. 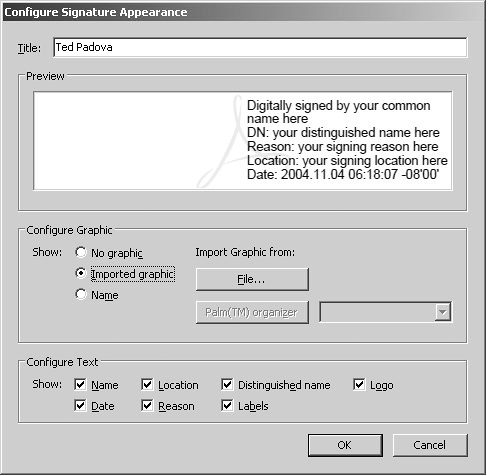
| 4. | Type a title for your appearance in the Title text box. The text can be any text you want to use to describe the appearance.
| 5. | The Configure Text section by default enables all text options for the signature appearance. You can choose which text items you want to include by checking the boxes on or off. In the Preview box, you see the text as it will appear on your signature.
| 6. | If you have a graphic image you want to use for your appearance, click the Imported graphic radio button, and then select File.
| 7. | The Select Picture dialog opens. Click the Browse button, and the Open dialog appears. Navigate your hard drive to find the PDF file you want to use as an appearance, select the file in the Open dialog, and click Select.
NOTE Imported graphics can be included with or without the text appearances. TIP Macintosh users can create a PDF document from any authoring program. Select File > Print. In the Print dialog select Output Options. Click Save as File and select PDF as the format. Click Print and the file is saved as a PDF document. | 8. | You are returned to the Select Picture dialog, and the preview box shows you an image preview for the selected image (Figure 17.3). Click OK, and you are returned to the Configure Signature Appearance dialog.
Figure 17.3. The preview box in the Select Picture dialog displays the selected PDF file to be used for your appearance. 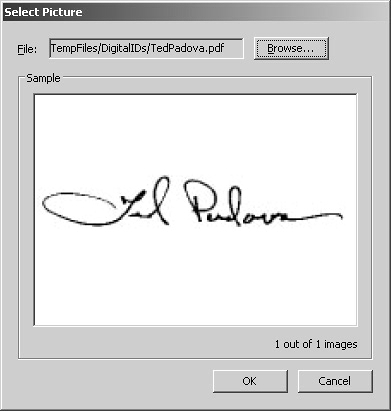
| 9. | Click OK in the Configure Signature Appearance dialog, and you are returned to the Security preferences. The name you used for the Title appears in the Appearance window.
TIP If you frequently sign documents for different purposes and want to use different appearances when signing documents of various types, you can add additional appearances. Click the New button in the Digital Signatures preferences to add another appearance. Be certain to provide different descriptive titles for each new appearance you create. | 10. | Click the Advanced Preferences button and the Digital Signatures Advanced Preferences dialog opens (Figure 17.4). The three tabs in the dialog offer options for signature verification, for security methods to use, and for Windows integration (for Windows users).
Figure 17.4. Click Advanced Preferences to open the Digital Signatures Advanced Preferences dialog. 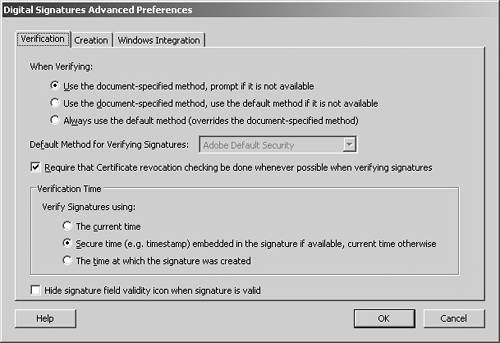
| 11. | To learn more information about the options in the Digital Signatures Advanced Preferences dialog, click the Help button. The Adobe Reader Help document opens and takes you to the page where definitions for setting options in Advanced Preferences are explained.
|
Why can't I sign a document after configuring the appearance settings? All options you choose in the Configure Signature Appearance dialog apply to an appearance for a Digital ID. As yet, you have not created the Digital ID. You can create multiple appearances and use any one of them with a single Digital ID or with multiple IDs. |
Creating a Digital ID Before you can sign a document or work with public certificates, you need to create your personal Digital ID. This ID can use any of the appearance settings you create in the Security preferences dialog or you can choose not to use a custom appearance. To create a Digital ID: 1. | Select Document > Security Settings. The Security Settings dialog opens (Figure 17.5).
Figure 17.5. Select Document > Security Settings to open the Security Settings dialog. 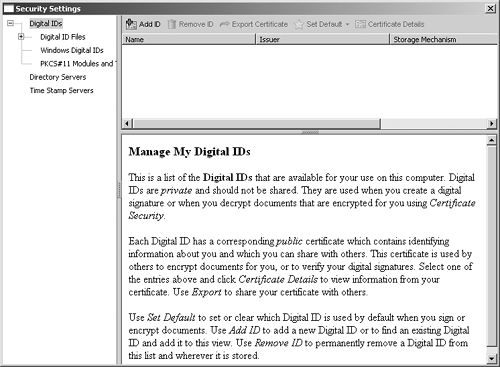
NOTE You can create a Digital ID without having a document open. | 2. | Click Add ID. The Add Digital ID window opens (Figure 17.6). You can choose from three options: finding an existing ID, creating a new Self-Signed ID, and using a third-party ID.
Figure 17.6. Click the Create a Self-Signed Digital ID radio button to create a new ID. 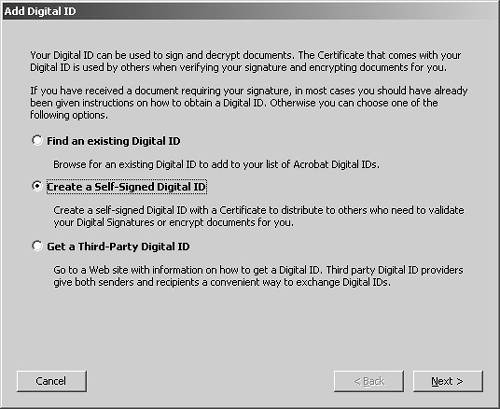
| 3. | Select Create a Self-Signed Digital ID.
| 4. | Click Next. An informational window informs you that you are about to create a Self-Signed Digital ID. Read the information and click Next to choose how to store your ID (Figure 17.7).
Figure 17.7. This pane offers options for how to store your ID. 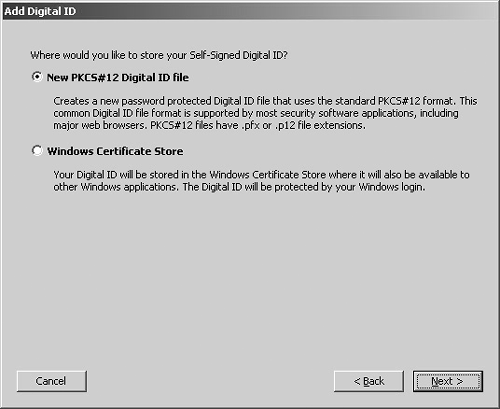
| 5. | In Windows, you have two options for how to store your ID. You can choose to use the ID exclusively with Adobe Reader by selecting the first radio button, or you can select Windows Certificate Store so that other Windows applications can use the ID. On the Macintosh, you have a single selection for using the New PCKS#12 Digital ID file option. On the Macintosh, click Next. In Windows, select the option you prefer and click Next.
| 6. | The next pane shows you identifying information derived from your Identity preferences. If the Identity preferences are not filled in, the text boxes are empty. Fill in the identifying information for any empty fields (Figure 17.8).
Figure 17.8. Fill in any empty text boxes to complete the identifying information. 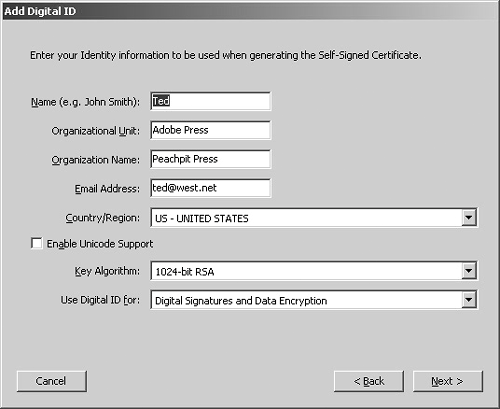
| 7. | Click Next, and the last pane in the Add Digital ID window opens (Figure 17.9). You must enter a password of at least 6 characters in the Password text box. Type the same text in the Confirm Password text box.
Figure 17.9. Add a password and type the same password in the Confirm Password text box. 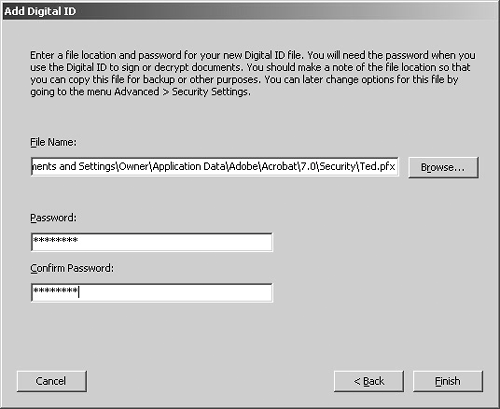
| 8. | Click Finish and your Digital ID is created. You are returned to the Security Settings dialog.
|
How many characters should I use for my password? If you use few characters, you run the risk of having your password broken by a decryption algorithm. The more characters you use, the less likely someone can break the password. As a rule, use no fewer than eight characters. Note that Adobe Reader encrypts certificates with a unique "fingerprint." As of this writing, no one has broken encryption for certificates. If you work with highly sensitive material, you may want to use a third-party signature handler. Third-party signature handlers are the most secure method of working with Digital IDs. To find out more information about using third-party signature handlers, select Get a Third-Party Digital ID in the Add Digital ID window (Figure 17.6) when the first pane opens. Click Next, and your default Web browser launches. The browser opens the Enterprise Solutions Web page on Adobe's Web site (Figure 17.10). Information about using third-party solutions and links to vendor's Web sites are found on the Adobe Web site. Figure 17.10. Select Get a Third-Party ID in the Add Digital ID window, and click Next to open the Enterprise Solutions Web page on Adobe's Web site for more information. 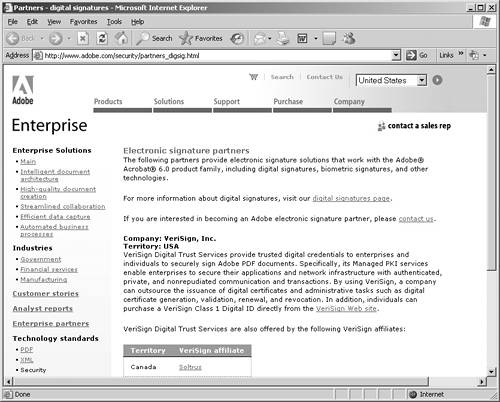
|
Sharing Your Digital ID Certificate Once you create a Digital ID, you can export a public certificate. Your private ID should not be shared with others. This is the portion of your digital ID that's protected by your password. From the Security Settings dialog, you can export a public certificate that can be distributed to other users. PDF authors can use your public certificate to encrypt files according to your personal identity, and also to authenticate your signature. To export a public certificate: 1. | If the Security Settings dialog is not open, select Document > Security Settings.
| 2. | The Security Settings dialog opens.
| 3. | At the top of the dialog (Figure 17.11), you see the Digital ID created in the last series of steps. Click the ID in the list to select it.
Figure 17.11. Select the Digital ID you want to use for the certificate export. 
| 4. | Click Export Certificate at the top of the Security Settings dialog.
| 5. | The Data Exchange File Export Options dialog opens (Figure 17.12). You have two options for exporting your certificate. If you want to email the certificate to another user, select Email the data to someone. If you want to save the certificate to your hard drive, select Save the data to a file. Choose the option you want to use and click Next.
Figure 17.12. Choose to either email the certificate or save it to a file. 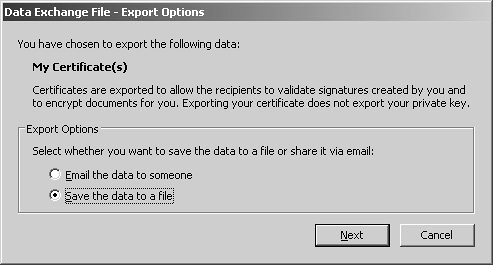
TIP If you periodically send your certificate to different users, save the certificate as a file. In your email program, attach the file to an email message when you want to send the certificate to another user. | 6. | If you select Email the data to someone, the Compose Email dialog opens (Figure 17.13). Add the recipient's address in the To text box and click Email. The message window alerts the recipient that a data file is attached to the mail, and instructions are added to your email message. When you click Email, your default email program launches and the message and file attachment are added to a new message window.
Figure 17.13. Add your recipient's address, and click Next to email the certificate to that user. 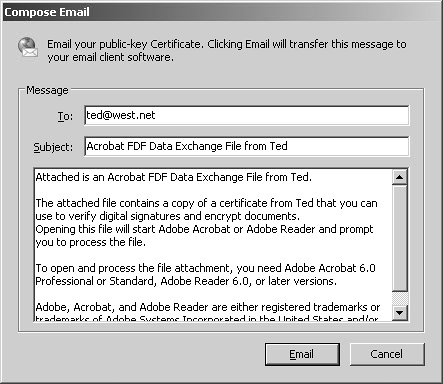
|
Building a List of Trusted Identities Public certificates are exchanged freely among users and will not compromise your private ID. You can collect certificates from other users and send your certificate to members of your workgroup and anyone you choose. Certificates you collect can be used to create a list of trusted identities you can then use to verify digital signatures. And PDF authors can use your certificate to encrypt PDF documents for your use.  | Use the public certificate JohnSmith.fdf file, which you can download from www.peachpit.com/adobereader7. |
To build a list of trusted identities: 1. | Select Document > Trusted Identities. The Manage Trusted Identities dialog opens (Figure 17.14).
Figure 17.14. Select Document > Trusted Identities to open the Manage Trusted Identities dialog. 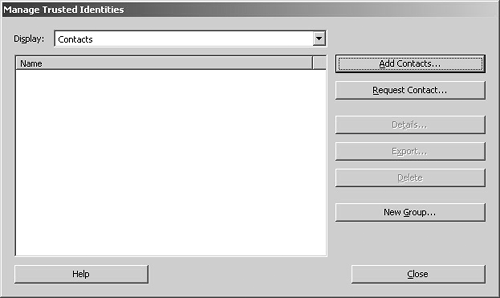
NOTE You can build a list of trusted identities without opening a file in Adobe Reader. | 2. | Click Add Contacts. The Choose Contacts to Import dialog opens.
| 3. | Click Browse, and the Locate Certificate File dialog opens. Navigate your hard drive to locate public certificates you've received from others. For this step, use the JohnSmith.fdf file you downloaded. Be certain the file is selected and click Open.
| 4. | Continue adding as many certificates as needed by clicking the Browse button. You return to the Choose Contacts to Import dialog after opening each certificate. All added certificates are listed in a window. In this example, a single certificate is added (Figure 17.15).
Figure 17.15. All added certificates are listed in the Choose Contacts to Import dialog. 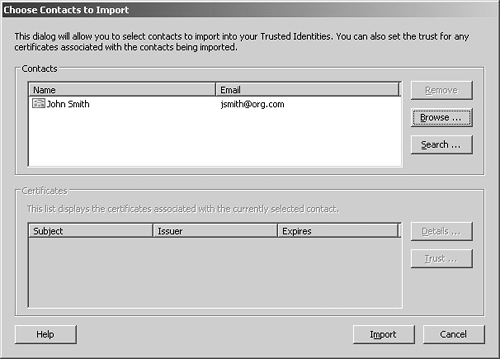
NOTE Selecting Search will initiate a search, via a preconfigured path through your directories, to locate public certificates you can place in your trusted identities list. For example, a system administrator can configure your search to look in your company's LDAP server to locate certificates from other employees if you need to verify their digital signatures. | 5. | When you're finished collecting certificates, click the Import button and you are returned to the Manage Trusted Certificates dialog. All the new contacts are added in the list window (Figure 17.16).
Figure 17.16. All added contacts are listed in the Manage Trusted Identities dialog. 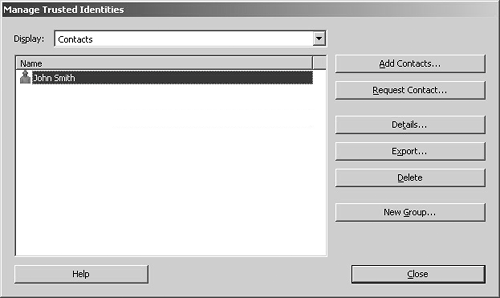
| 6. | Click Close. Your trusted identities are ready to use for validating signatures.
|
|


