| Before setting up for DV capture, quickly review the sections "Selecting Your Capture Drive," "Defragmenting Your Capture Drive," and "Testing Your Capture Drive" in Chapter 2. I'm assuming that you have a FireWire connector or card installed in your computer. If you don't, start there, and make sure it's up and running. Don't spend too much on the connector; for your purposes, virtually all cards will serve equally well, from the $19 variety on up, and they all plug into an available PCI card slot inside your PC. Choosing one with at least two ports will allow you to connect both your camcorder and a FireWire hard drive, as needed, for additional storage space for your captured video. Note that if you have an HDV camcorder, it should perform identically to a DV camcorder during capture. Specifically, you connect it the same way, and control the camera the same way as shown on these pages. FireWire to the Rescue FireWire technology was invented by Apple Computer and then standardized by the Institute of Electrical and Electronic Engineers as IEEE 1394. Sony's name for FireWire is i.Link, and companies refer to the connectors as FireWire, DV, or IEEE 1394. Whatever the name, they should all work together seamlessly. Some newer DV cameras, like the Canon GL2, have Universal Serial Bus (USB) ports to transfer still images from camera to computer, but that doesn't work for DV video. To capture DV, ignore this connector (and the traditional analog connectors) and find the FireWire plug. While most computers use a six-pin port, some computers (like my Dell Latitude D800 laptop) use a four-pin connector identical to that in most cameras. Identify which connector you have before buying a cable; cables come in three varieties: four-pin to six-pin, four-pin to four-pin, and six-pin to six-pin. |
To connect your camera and computer for DV capture 1. | Plug in your DV camcorder to AC power.
Battery power should work, but it doesn't work with all cameras.
| 2. | Make sure that the camcorder is in VCR, VTR, or Play mode.
| 3. | Connect your FireWire cable to the camera's DV connector (Figure 3.7).
Figure 3.7. The DV port on a Canon GL2 camera. Note the single analog A/V connector for composite video and both audio channels. 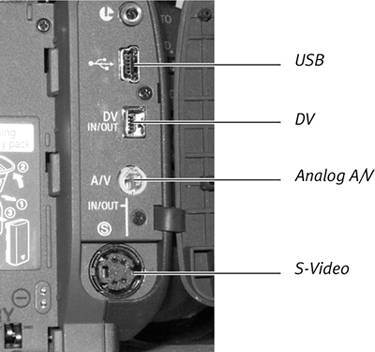
Virtually all cameras use a tiny four-pin connector like that on the left side of the cable in Figure 3.8.
Figure 3.8. A four-pin (on the left) to six-pin DV cable. DV cables also come with dual four-pin and dual six-pin connectors. 
| 4. | Connect the FireWire cable to your computer using one of the two slots shown on the left in Figure 3.9 and the larger six-pin connector shown on the right in Figure 3.8. Some computers laptops especially come with a four-pin FireWire port installed. For these, you'll need a FireWire cable with four-pin connectors on each end.
Figure 3.9. The typical six-pin DV connectors (on the left) are found on most but not all computers. 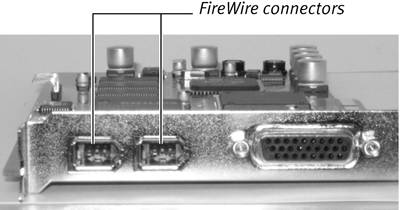
You're now ready to run Studio and enter Capture mode.
|
 Tip Tip
Speaking of buying a cable, basic FireWire cables are priced between $12 and $50, depending on brand and store. If you're buying, check out www.cables.com, which offers a complete line of FireWire cables (including those with four-pin connectors at each end) at very reasonable prices.
|