The DV Capture Interface
| < Day Day Up > |
| Let's have a quick look at the tools you'll use to control and monitor DV capture. Note that the interface is different when you're capturing from a DV camcorder than it is when you're capturing from an analog camcorder. (See Chapter 4 for the scoop on analog capture.) You access the main capture window by clicking the Capture tab at the upper left of the Studio interface (Figure 3.1). In Capture mode, Studio has four main components: the Album, where Studio displays the captured clips; the Player, which displays video during capture; the Camcorder Controller; and the Diskometer. Figure 3.1. The four main windows of Studio's DV capture interface. The Album. The Album contains your captured clips, though you can't play them back while in Capture mode. If you enable scene detection (see the sidebar "Making the Scene with Scene Detection," later in this chapter), each scene from that file appears in the Album, thus accounting for the multiple scenes in the Album in Figure 3.1. Had you captured more scenes than could fit on the two pages in the Album, you would see a little white arrow at the upper right of the second page of the Album, indicating that more scenes are stored on subsequent pages. Studio stores captured files either during capture or, in the case of MPEG files, immediately after capture. Either way, no user intervention is needed to store the files. Once you start to capture another file, your previously captured files disappear from the Album but don't worry; they are safely stored and accessible in Edit mode. The Player. Note the lack of playback controls in the Player window. The Player's role during capture is to let you preview the incoming video and give you information about dropped frames. To play the captured files, you have to switch to Edit mode. The Camcorder Controller. The controls in the Camcorder Controller mimic those on your camcorder (Figure 3.2). Use these to navigate through the tape to find the scenes you want to include in your project. Figure 3.2. The Camcorder Controller lets you control the playback of your DV camcorder.
The Diskometer. The Diskometer serves multiple purposes. First, the wheel and associated text describe how much additional video you can store on the capture drive at the selected format and capture quality. For example, Figure 3.3 shows about 21 GB of space left on the capture drive, which means the drive has enough available space to hold 1.5 hours (at 13 GB per hour) of video recorded in DV format. Figure 3.3. The Diskometer tells you how much video you can store on your capture drive, lets you choose among the three capture options, and contains the Start Capture button.
In the middle of the Diskometer are controls for toggling between DV and MPEG capture options discussed later in this chapter (see the section "Choosing Your Capture Format"). You also control capture from the Diskometer, clicking Start Capture to start. After you start the capture, this button changes to Stop Capture, which you click to stop the capture (Figure 3.4). Figure 3.4. The Start Capture button changes to Stop Capture during capture. You can also press the Esc key on your keyboard to end capture.
Click the Settings button in the lower-right corner to open the Pinnacle Studio Setup Options dialog box. The Capture Format tab is where you choose your capture parameters if you capture in a format other than DV (Figure 3.5). Figure 3.5. The Capture Format tab. Since DV is a standard format, there are no options, but you'll have to select options here when capturing in MPEG or preview format. The Capture Source tab is where you select your capture device and scene-detection options (Figure 3.6). This is also where you choose and test the capture drive (see "Testing Your Capture Drive" in Chapter 2). Figure 3.6. Here's the Capture Source tab again. Chapter 2 explained how to select and test the capture drive from this screen; this chapter explores the scene-detection options and how to choose among various capture devices.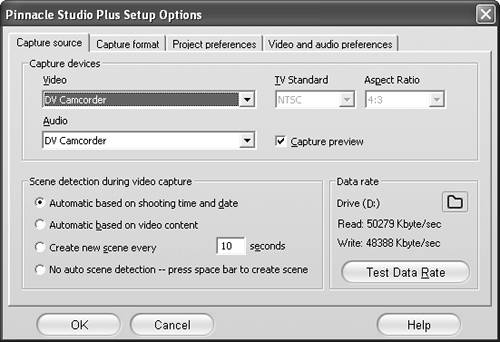
|
| < Day Day Up > |
EAN: N/A
Pages: 189