| If you're a new Studio user, I recommend that you produce your first few DVD projects using templates. Keep in mind that the key to success with template-based DVD authoring isn't what you'll learn on these pages, as production is largely automated, but how you've prepared your videos beforehand. Specifically, Studio automatically inserts chapter flags at the start of each scene. If you have too many scenes, you'll have multiple menu pages, which are cumbersome to navigate. To avoid this problem, combine scenes in the Album (see Chapter 6) or the Movie window (see Chapter 7) before starting your DVD. Also see "Creating DVD Menu Templates"in Chapter 10 for more on menus. The one downside of this approach is that you can't trim or place transitions between scenes and then combine them. If this limitation prevents you from combining your scenes into usable chunks, you should tell Studio not to create chapter links automatically when you drag in your first menu, and simply create the links manually (see "To create a chapter link" later in this chapter). As it turns out, the template approach worked well for a concert DVD I produced while writing this book, Galax's own No Speed Limit rocking the Fabulous Rex Theater (pronounced thee-a-tor around these parts). I'll use this project to demonstrate the use of templates and then get back to Charleston for the rest of the chapter. To use a menu template 1. | In Edit mode, place all project assets on the Timeline (Figure 12.6).
Figure 12.6. All concert videos are on the Timeline. 
| 2. | Click the Show Menus icon to open the Disc Menus tab of the Album (Figure 12.7).
Figure 12.7. Welcome to the Menu Album. Note that the menus you create are stored in a separate folder. 
If you've created your own menus, you access them by choosing My Menus from the list of menus.
| 3. | Drag the desired menu to the front of the project, placing it on the Video track.
Studio opens the Adding Menu to Movie dialog box (Figure 12.8).
Figure 12.8. Select Yes, and Studio practically builds the DVD for you. 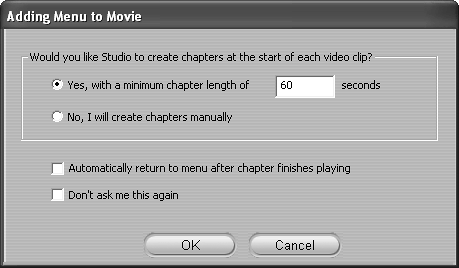
| 4. | Click Yes to create links automatically to each scene after the menu.
Note the option to insert a minimum chapter length in seconds. This can be really helpful if automatic scene detection produced lots of small scenes that really don't need separate chapter points. My take is to combine the scenes beforehand into the desired chapters, which makes this control superfluous.
Studio automatically creates as many menus as necessary for all video scenes, inserts the Next and Previous buttons where necessary, and populates the thumbnail buttons with videos from the Timeline.
| 5. | If desired, Click Automatically Return to Menu After Chapter Finishes Playing.
In a concert video like this one, I want the viewer to move from song to song, so I won't select this option. If you think your viewers will want to consume your video in short chunks, rather than from start to finish, select this option.
|
 Tips Tips
Studio automatically uses the first video frame as the menu thumbnail, not the thumbnail you've selected for either the Album or the Timeline (see Chapter 10). When you use a menu template, Studio shows only one copy of the menu on the Timeline, even though the program may ultimately produce multiple menus. See "To select the next menu page" later in this chapter for information on navigating through these pages in the Menu Clip Properties window. Studio enables four options when you select a menu, as shown in Figure 12.9. I stick with the default option, Ask If Chapters Should be Created, so that I can easily opt out of Studio's automatic menu creation, which I usually do. To access this dialog box, choose Setup > Video and Audio Preferences from Studio's main menu. Figure 12.9. Chapter and return options. I stick with the default, Ask If Chapters Should Be Created. 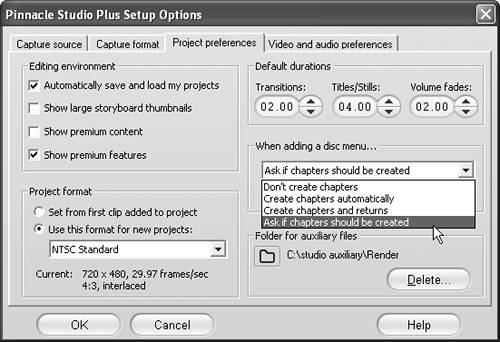
To edit the menu 1. | Double-click the menu.
Studio opens the Menu Clip Properties tool (Figure 12.10).
Figure 12.10. The initial menu showing the first four chapter links. 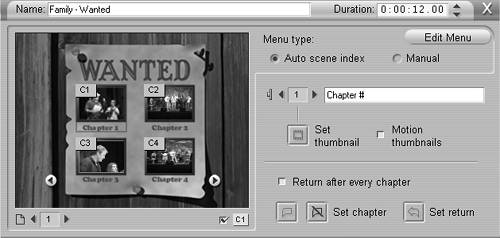
| 2. | At the upper right, click Edit Menu.
The Title editor opens (Figure 12.11). See Chapter 10 for editing details.
Figure 12.11. The Title editor, where you can customize this template. 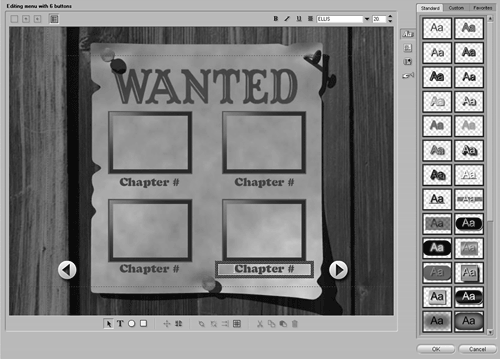
| 3. | Make your edits; then do one of the following:
- At the lower right, click OK (or press F12) to save the menu and return to the Edit window.
Studio overwrites the original menu on the Timeline, but doesn't change the menu in the Menu Album.
- Choose File > Save Menu As to save the file using a unique name, preserving the original Studio menu for reuse. Then click OK to return to the Edit window.
|
To create a chapter link 1. | Using the Timeline scrubber or the Player controls, navigate to the target starting point of the new chapter (Figure 12.12).
Figure 12.12. To create a chapter flag, drag the Timeline scrubber to the desired frame. 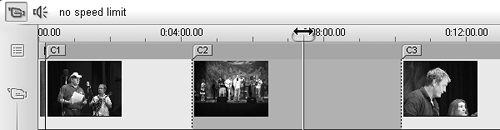
| 2. | Do one of the following:
- Right-click the Menu track and choose Set Disc Chapter (Figure 12.13).
Figure 12.13. Right-click the Menu track and click Set Disc Chapter. 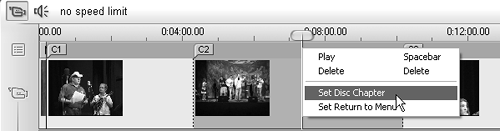
- Right-click the Video track and choose Set Disc Chapter.
Studio inserts chapter link 3 (C3) at the insertion point, and creates a new link (C4) where C3 was previously located (Figure 12.14).
Figure 12.14. The new chapter link is created. 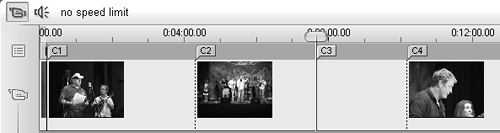
|
Tip
Maintaining Order Or Not If you elect to have Studio automatically create chapter points at all scenes (Figure 12.8) and then later add chapter points at other locations on the Timeline, Studio automatically places each new scene in its chronological sequence. For example, in Figures 12.12 through 12.14, I added a chapter point between C2 and C3, which Studio automatically named C3; Studio then renumbered all subsequent chapter points on the Timeline, increasing each one by one number. In Studio parlance, this means that the menu type is Auto Scene Index, which you can see at the upper right of Figure 12.10. In contrast, if you elect to assign chapter points manually and then insert a chapter point between two current chapter points, Studio inserts the next available chapter point at the selected location and doesn't automatically reorder the chapters. This is shown in Figure 12.15, where I added all chapter points manually. Here, the inserted chapter point is C13, rather than C5. This means that this chapter point will be out of sequence when played from the menu. This menu type is Manual, shown at the upper right of Figure 12.10. Figure 12.15. Here's how the link would look if I selected Manual rather than Auto Scene Index. 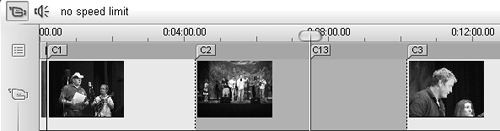
Note that you can convert from Manual to Auto Scene Index at any time by clicking the Auto Scene Index checkbox in the Menu Clip Properties window, and Studio will reorder the chapter points into sequential order. This process is described in "To change menu type" later in this chapter. Here's the lesson: So long as your videos are laid out sequentially on the Timeline in the order you want your viewers to access them, and you have a reasonable number of scenes, you can have Studio automatically assign chapter points. This approach is also easier if you delete chapter points, since Studio will automatically reorder all subsequent videos and close any gaps in the menu. On the other hand, if you want to customize the menu order of the chapter points, you have to use the second approach and manually assign all chapter points. Note that if you delete any chapter points under this approach, Studio doesn't automatically fill the gaps, and you'll have unassigned buttons in your menus. You can easily address this issue by switching to Auto Scene Index mode, but then all chapter points will be assigned sequentially, and you'll lose the custom order you've already created. |
To assign chapter points manually 1. | In Edit mode, place all project assets on the Timeline (Figure 12.6).
| 2. | Click the Show Menus icon to open the Disc Menus tab of the Album (Figure 12.7).
If you've created your own menus, you can access them by choosing My Menus from the list box shown at the top of Figure 12.7.
| 3. | Drag the desired menu to the front of the project, placing it on the Video track.
Studio opens the Adding Menu to Movie dialog box (Figure 12.8).
| 4. | Click No to create links manually to each scene after the menu.
| 5. | At the bottom of the Menu Clip Properties tool, click the Show chapter numbers checkbox (Figure 12.16).
Figure 12.16. Click here to see the chapter links (or the absence of links). 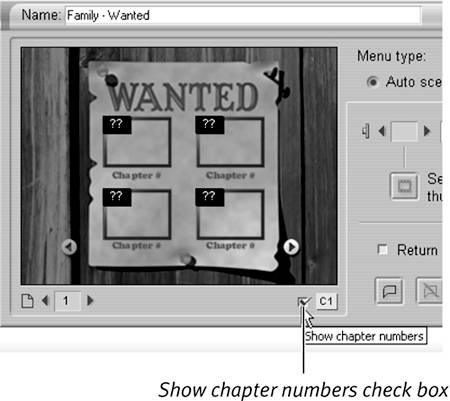
| 6. | Link scenes to the menu buttons by doing one of the following:
- In the Timeline, drag the target scene into the target button frame (Figure 12.17).
Figure 12.17. Drag the scene into the target frame to create the link. 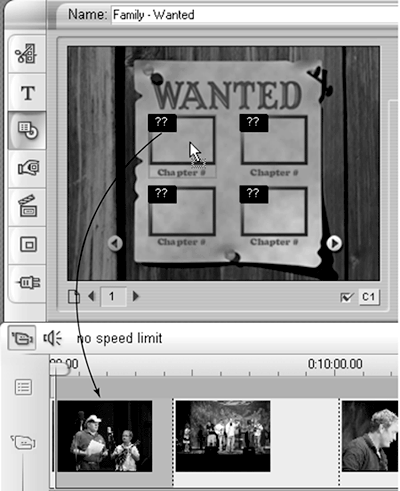
- Click the target button frame in the Menu Clip Properties tool (Studio highlights the frame). Click the target scene on the Timeline (Studio highlights the scene). Then click the Create Chapter Link button in the Menu Clip Properties tool (Figure 12.18).
Figure 12.18. Or click the frame and then the scene and then click here. 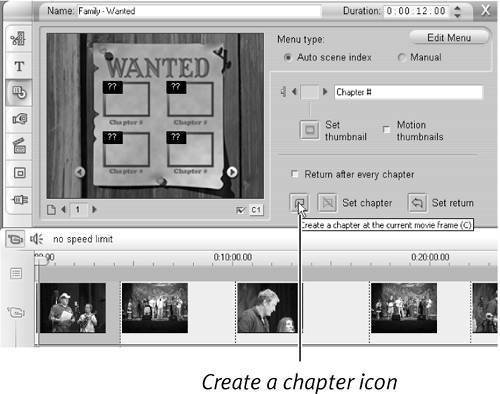
Studio lists C1 in the button frame and C1 on the Timeline and places the first frame of the video as a thumbnail (Figure 12.19).
Figure 12.19. The C1 on the button identifies the chapter point the button is linked to on the Timeline. 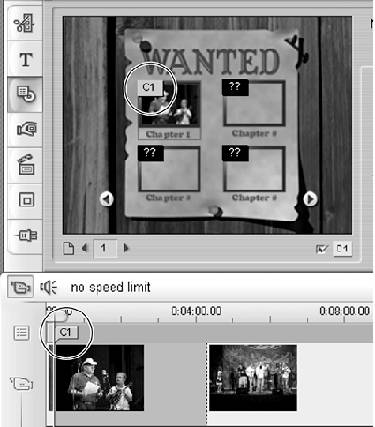
| 7. | Repeat Step 6 until you populate all button frames on the first menu.
| 8. | At the bottom of the Menu Clip Properties tool, click the Show Next Page icon (Figure 12.20). Studio advances to the next menu page, identified as Menu Page 2 in the page selector (Figure 12.21).
Figure 12.20. Once you create all links on a menu, click here to see the next menu page. 
Figure 12.21. Here we are at Page 2. Now you can start inserting links here as well. 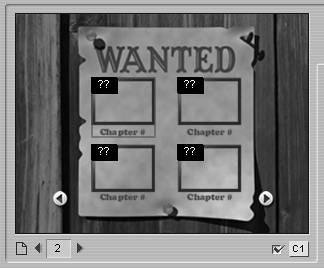
| 9. | If Studio doesn't automatically advance to the next page, use the page selector icons to advance to the next menu.
You have to create the new chapter link before attempting to advance to the next menu page because Studio won't create the page until necessary to host all chapter points.
| 10. | Repeat Steps 6 through 9 until all desired scenes are added to the menu.
|
To change menu type - In the Menu Clip Properties tool, select Auto Scene Index (Figure 12.22).
Figure 12.22. To place chapter flags in numerical sequence, click Autoscene index. 
Studio sorts the chapter flags sequentially and updates all affected menus (Figure 12.23).
Figure 12.23. Order restored. Compare this figure to Figure 12.15. 
To delete chapter links - To delete chapter links, do one of the following:
- In the Menu Clip Properties tool, select the button linked to the target chapter link. Click the Delete the Current Chapter icon or press V (Figure 12.24).
Figure 12.24. To clear chapter links (and delete chapters), select the chapter and then click the Delete the Current Chapter icon. 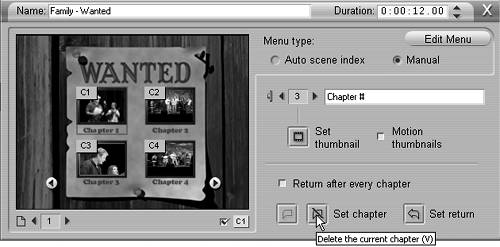
- On the Menu track, select the chapter flag, right-click, and choose Delete.
- On the Menu track, select the chapter flag and press the Delete key.
Studio deletes the chapter flag and clears the menu link (Figure 12.25).
Figure 12.25. The chapter flag and link created in Figure 12.14 are both gone. 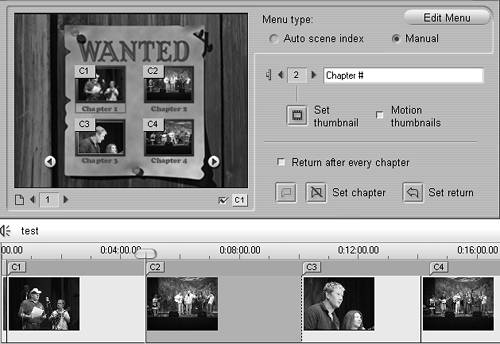
To change a button caption 1. | Select the button in the Menu Clip Properties tool; then select the button caption description to make the field active.
| 2. | Insert the new text.
| 3. | Press Enter to save the text (Figure 12.26).
Figure 12.26. Enter the button title here. 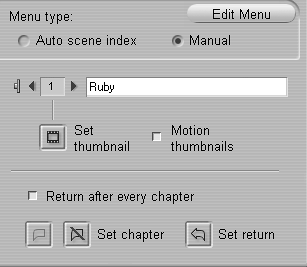
Studio saves the new description and changes the menu.
|
Tip
To change a button thumbnail 1. | Select the button in the Menu Clip Properties tool; then use the Timeline scrubber or Player controls to navigate to a new thumbnail frame.
| 2. | Do one of the following:
- Right-click the Video track and choose Set Thumbnail.
- In the Menu Clip Properties tool, click the Set Thumbnail icon (Figure 12.27).
Figure 12.27. To change the thumbnail, navigate to the target frame and click Set Thumbnail. 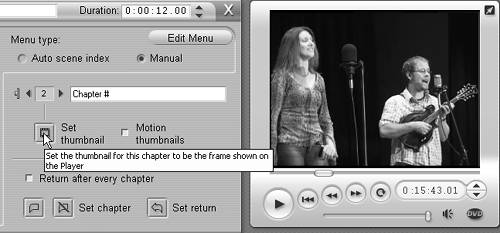
Studio replaces the default image with the new thumbnail.
|
To select another button to edit - In the Menu Clip Properties tool, do one of the following:
- Click the button to edit.
- Use the button selection control to move to the button you want to edit (Figure 12.28).
Figure 12.28. Use the button selection control to move from button to button. 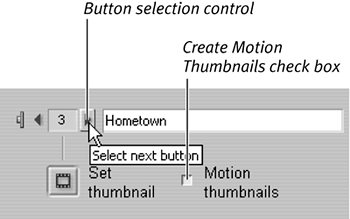
To create video buttons - In the Menu Clip Properties tool, select Motion Thumbnails (Figure 12.28).
Studio replaces the still-image thumbnail with a tiny version of the video, creating a video button.
Tips The video button will play for the duration of the menu and then restart. Video buttons are most aesthetically pleasing when menus have a duration of at least one minute. See "To change menu duration" later in this chapter. Because video buttons must be separately rendered before they appear, these won't immediately show up when you preview your video. If you selected background rendering (see Chapter 8), you'll see the green bar above the menu that indicates that it's rendering (Figure 12.29). Figure 12.29. Expect some rendering time when you select Motion Thumbnails, especially with multi-menu productions. 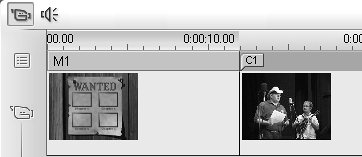
Maybe it's just me, but I find video buttons irritating. They take a long time to render, and slow the computer when rendering in the background. These head my list of "don't try this at home" features.
To select the next menu page - In the Menu Clip Properties tool, click the Show Next Page icon (Figure 12.30).
Figure 12.30. Click here to display the next menu page. 
Tips Use this procedure to move through the sequential menus automatically created by Studio, to access all linked chapters. To select a completely different menu, double-click that menu on the Timeline.
To set Return to Menu links 1. | On the Menu track, double-click the target menu.
Studio displays the menu in the Menu Clip Properties tool.
| 2. | Click the video that, after playback, should return the viewer to the target menu (rather than automatically moving to the next scene on the Timeline).
| 3. | Do one of the following:
- In the Menu Clip Properties tool, click the Return to This Menu icon (Figure 12.31).
Figure 12.31. To set Return to Menu links, double-click the menu to open it in the Menu Clip Properties tool and then click this icon or press M. 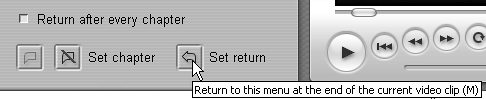
- Right-click the Menu track and choose Set Return to Menu.
- Right-click the Video track and choose Set Return to Menu.
- Click the Return After Every Chapter checkbox to return to the menu after each chapter finishes playing.
Studio sets the Return to Menu flag (Figure 12.32).
Figure 12.32. Whatever method you use, look for the flag. It should be the same number as the menu you want to return to (in this case, M1 = Menu 1) and blue. 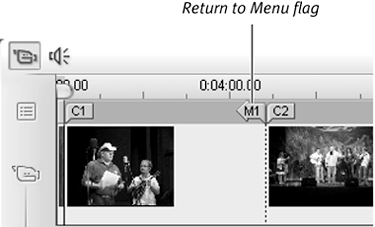
|
Tip Studio always sets the Return to Menu flag at the end of the video, figuring you'd probably never want to interrupt playback of a clip in the middle. If your intent is to interrupt the clip in the middle, simply drag the flag to the desired location.
To change menu duration - To change the menu duration, do one of the following:
- Select the menu and drag it to the desired length (see Chapter 7 for details).
- At the upper right of the Menu Clip Properties tool, change the Duration field by typing the desired duration or using the controls to the right of the field (Figure 12.33).
Figure 12.33. You can set the menu duration here, or simply drag the menu to the desired length, just like a still image. 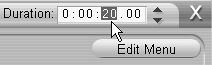
|