| With a buildup like that, it's a letdown to start in tutorial mode, but you gotta walk before you can run. So spend some time learning about DVD authoring before diving in. When planning your DVD, you have two basic issues to consider: video flow and menu structure. Video flow Video flow relates to the way the video plays over the course of the DVD. There are two extremes, with many points in between. Linear production: At one extreme is a linear movie that simply happens to be on DVD. You've designed it to flow from beginning to end, like a Hollywood movie, and you're using DVD simply as a convenient distribution medium, perhaps in addition to dubbing to VHS tape. Maybe you want viewers to be able to jump in at certain points, but once the video starts, it will play from start to finish unless interrupted by the viewer. When planning a linear production, you have to build the entire movie on the Timeline first and then start adding the interactivity. The key link between DVD menus and the video content on the Timeline are chapter points that connect menu buttons with the video scenes you select during authoring. Studio makes these chapter points easy to spot by creating flags on the menu track, which are labeled sequentially, starting with C1 (Figure 12.1). At the end of each chapter, you can also choose whether viewers automatically continue on to the next video scene or return to the menu so that they can choose another option. If you choose the latter approach, Studio places Return to Menu flags on the Menu track. Figure 12.1. Studio's DVD authoring interface. Note the Menu Track icon above the Video Track icon, and the Menu Clip Properties tool, where you'll do most of your linking and customization. 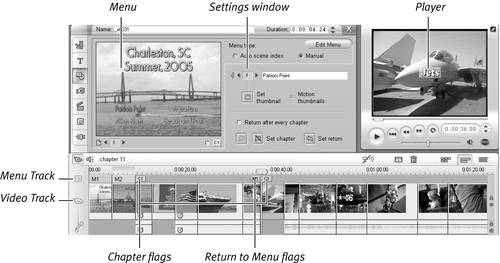
Disparate videos or slide shows: The opposite of linear productions are collections of related but essentially disparate videos or slide shows that don't flow from start to finish. Perhaps you're converting your three-month tape from last summer, which covered Johnny's trip to the Little League World Series, Sally's diving championship, and that ridiculously expensive trip to Disney World. In addition to the videotapes, you also shot pictures with a digital still-image camera, and you'd like to build them into a slide show viewable from the DVD. You'll spend some time consolidating scenes from each event into a discrete movie, but you don't expect viewers to watch the video from start to finish. After each movie or slide show, you want viewers to return to the original menu so that they can choose another sequence. When planning this second type of production, you start by building all individual movies and slide shows on the Timeline. You again use chapter flags to link to the various movies and scenes within the movies. Then, using techniques discussed in this chapter, you insert Return to Menu flags (Figure 12.1), which return viewers to a menu after the video or slide show finishes. The net-net is that two tools control video flow. Chapter flags allow viewers to jump to any spot in the video, and Return to Menu flags let you direct where viewers go after watching any particular video.
Irrespective of the production type you choose, it's best to get the video and slide show production done first and then start your DVD authoring. Some Words of Advice The best advice I can give to those new to DVD authoring is to be unambitious. In general, most DVD authoring tools, like Studio, offer a cornucopia of development options. Once you start to experiment, development time can go through the roof, and advanced options like video thumbnails and menus lengthen rendering time drastically. With your first DVD projects, it's better to be unambitious and finished than frustrated with no end result. And while Studio is a mature, tenth-generation video editor, it's only a third-generation DVD authoring program. If you scan the Pinnacle message boards, you'll notice a disproportionate share of messages that relate to exotic DVD authoring attempts. In my experience, with all authoring programs, not just Studio, the more you push the design envelope, the more likely you are to find yourself immersed in untested waters. So get a few simple and successful projects under your belt before going crazy on the authoring front. |
Menu structure Menu structure determines the way menus link to each other. Studio uses three basic types: Linear menus: Linear menus flow sequentially backward and forward, as shown in Figure 12.2. You create these by using any Studio template or by building your own template, as described in Chapter 10. Figure 12.2. Linear menus flow sequentially. Studio builds them automatically, making them easy to create, but viewers have to navigate through them sequentially, which can get old. 
When you use a linear menu, Studio automatically builds enough menus so that each chapter in your video has a link. Viewers move through the menus sequentially, using links between the menus that Studio automatically inserts. Because Studio does all the work for you, using linear menus is fast and easy. However, though linear menus are acceptable for linear movies, they're poor choices for collections of loosely connected, nonsequential content. For example, if the trip to Disney World was the last event of the summer, you may have to toggle through 10 menus to see that killer sunset from the hotel room balcony definitely not optimal. The Two Faces of DVD Recordable DVDs have two basic roles in life. The first is to serve as a place to store data, similar to a CD-recordable disc but with a 4.7 GB or 8.5 GB capacity rather than 650 MB or 700 MB. More to our interests, however, is the recordable DVD's second role, as a medium for playing back interactive productions on DVD players connected to TV sets and computers with DVD drives and the necessary player software. Whereas any program capable of writing data to a disc can use DVD-R and DVD+R discs in their first capacity, only an authoring program like Studio can produce titles that play on DVD players. |
Custom menus: When working with disparate collections, you may want to consider building your own custom menus, which have direct links from one to many menus, as shown in Figure 12.3. In my production, I created separate pages for different sites in Charleston, including Patriots Point, the Aquarium, the (supposedly haunted) Aiken-Rhett House, and a page for beach and pool shots. If viewers want to jump to the haunted house videos, they need click only twice rather than multiple times. Figure 12.3. You build 'em, you link 'em custom menus are more work, but are customized for your content, enhancing the playback experience. 
Studio provides tremendous flexibility in this regard, allowing you to customize menus and link menu to menu at will. Though you'll get vastly improved navigation, the obvious downside is you have to build multiple menus and perform most of your linking manually. You'll also have to build links from these pages back to the home page and insert Return to Menu flags at the end of each main sequence. Hybrid menus: The third menu structure, shown in Figure 12.4, is a hybrid structure that includes both linear and custom menus. This is the structure used in my Charleston vacation project, because several of the menus had more sequences than I could fit on one page. Figure 12.4. Hybrid menus offers the best of both worlds: they provide great navigation, and Studio handles some of the linking for you. 
For example, the Patriots Point section contained eight videos, requiring two menu pages. Since I used a linear rather than a custom menu, Studio built the second menu for me, along with links back and forth between the first and second locations menus.
If you study the custom menus in Figure 12.4, you'll notice they all look somewhat similar. That's because to speed production, I created the first menu by hand, saved it, and then swapped the background image and title by section, saving each menu as I went along. (Total production time for the five custom menus was about 10 minutes.) For a $100 program, Studio is surprisingly adept at authoring, with elegant touches such as displaying only linked buttons on a menu and hiding those that are inactive, as shown in the Player window on the right in Figure 12.5. Figure 12.5. Here are the linear menu template (left) and the Preview window (right). Note that unpopulated buttons (those with ?? instead of letter/number markers) don't show up in the Preview window. 
In the figure, the Menu Clip Properties window on the left shows the linear menu template, and the Preview window on the right shows how the menu will look during playback. The single unpopulated video icon (with ?? at the upper right) is not displayed during playback, and neither are the Previous (left arrow) and Next (right arrow) buttons, which are unnecessary because this section has only one menu. On the other hand, Studio also lacks link-checking capabilities and didn't notice the ?? in the bottom left of the page, which is supposed to be a link back to the home page. Had I produced this disc without the link, the viewer wouldn't have been able to navigate back to the main menu using menu links, though the Menu button on their remote would certainly get the job done. To avoid producing a disc with incomplete links, you need to preview and check links thoroughly before burning the disc. You'll learn how later in this chapter. |