Flylib.com

Books Software


brighten a video clip


brighten a video clip

Since we often shoot in less than ideal conditions--either dark rooms or bright sunlighthaving to adjust video brightness and contrast is pretty common. Fortunately, Premiere Elements has an excellent Brightness & Contrast adjustment. Find a clip that's either too dark or too light and let's give it a try.

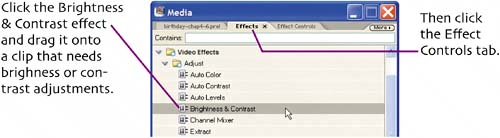
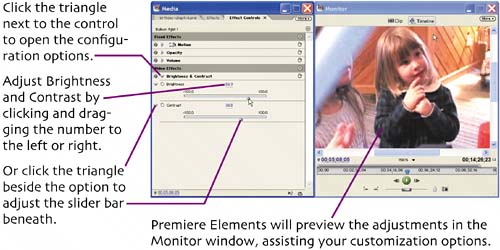
When you're done, just move on to your next edit, Premiere Elements saves your adjustments in real time.


common effect tasks

After applying an effect, you can guage its effectiveness by toggling it on and off, which will enable and disable the effect in the Monitor window.

If you don't like the results, you can adjust the controls some more, and see if that helps.

You may decide to simply delete the effect. Here's how.

Right click.


save a preset

Most of the time, when you have to color correct or adjust the brightness of one clip in a project, you have to adjust several others as well. Premiere Elements simplifies this process by allowing you to save a preset, which is essentially the effect and the customized parameters.

Here's how to save the brightness and contrast parameters you just applied to your video.

Ignore the Type commands, which are beyond the scope of this book.

To apply it, simply drag it onto a clip, just like any other effect.


change playback speed

I use this effect a lot, generally to increase playback speed, but sometimes to slow it down as well. In my movie, I have a sequence of guests walking down the stairs to eat that was just begging to be sped up, since folks walking at double speed ( especially to eat cake) looks pretty funny. Find a sequence in your movie where there's a lot of action and try the same thing. When you preview, the audio will probably sound funny as well, as it will when sped up or slowed down, but you'll learn how to mute a clip in Chapter 7.

Click the target clip in the Timeline.

Right click.

I choose 200%, which doubles the speed, while 50% would create a slow motion effect at half speed.

I'll be muting this clip, so I don't check Maintain Audio Pitch. Give this a try if you're keeping your audio, but be sure to listen to the audio to make sure it's not too distorted .

As you learned last chapter, the red line in the Work Area bar indicates that Premiere Elements needs to render the effect to play at full speed. Use the procedure described in Render Your Transition in Chapter 4 to render the effect.


adjust image size

When you add a digital picture to a project, Premiere Elements displays the complete image, without scaling which prevents distortion.

For example, Premiere Elements inserted this picture in its entirety, placing black bars on the sides to completely fill the picture.

What I'd like to do is zoom into my daughters and eliminate the black bars. If you have any pictures you'd like to adjust in your project, work with me.

Now let's move the image around to get the best framing.

Click the image in the Monitor window to make it active.

Hold down your mouse button, and drag the image to the desired location (if necessary).

It will probably take several Scale and positioning adjustments to get it right, so experiment until you get the result you want.


add motion to images

Once you've learned to adjust image size , adding motion to your images is a snap. Basically, you choose a starting position, then choose an ending position. To do this, you'll use keyframes, or the beginning and end points for the motion effect.

I'll add motion to this image, starting here and then zooming in for a close up.

As before, start by double clicking the image in the Timeline to make it active.

This sets both keyframes for your ending position.

Adjust the Scale and Position parameters to your ending position.

When Premiere Elements renders your final movie, it will produce all frames required to move from the position at the first keyframe, shown on the previous page, to the position of the final keyframe, shown in this figure.

Adding motion is a great way to make your pictures more interesting to watch (just ask Ken Burns, who produced several prime time shows using these techniques).