Three-Point Lighting-The Art of Lighting
| < Day Day Up > |
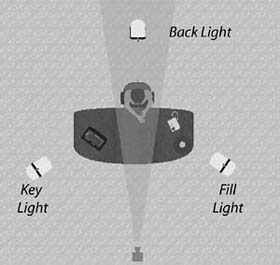
Three-Point Lighting The Art of LightingThree-point lighting has its roots in lighting as art, rather than lighting as a necessary evil for a camera to do its work. The basic theory goes like this: Video is a two-dimensional medium served on a flat screen. Flat lighting, which lights each scene area equally, is visually uninteresting and serves only to emphasize video's two-dimensional nature. To get around this, lighting should create "depth" within the video image and contrast between the foreground speaker and the background. The basic tool for accomplishing both goals is three-point lighting, as shown in Figure 3.1. Figure 3.1. Positioning your lights for three-point lighting. The Key LightAs the name suggests, three-point lighting uses three lights. The key light is the primary light, and its job is to expose the shape of the subject; it does this by shining down on the subject from an angle, producing shadows, a technique also known as modeling. As you can see in Figure 3.1, you position the key light at an angle of approximately 45 degrees from the camera, pointing directly on the subject. The light should be above the subject and shining down at an angle of about 45 degrees. A key light must be a "hard light" that produces shadows, but not so harsh that it creates excessive contrast between the lighted and the shadowed regions. I'll discuss hard and soft lights and lighting contrasts in depth in the Video Fundamentals section. Positioning the key light is more art than science. When positioning this light, take note of the shadow cast by the nose, also referred to as the "nose caret," clearly visible in the key light image (left) in Figure 3.2. As a rule of thumb, the nose caret should never touch the lip (which means the light is too high) or protrude into the cheek area (which means the light is too far to the side). Figure 3.2. Key light on left; key and fill light, center; key, fill, and back light on the right. You can position the key light slightly higher to produce shadows that hide a double or triple chin, but make sure the eyes remain clearly visible. This is a problem for me because my bushy eyebrows can block the light, making my eyes difficult to discern. As you can see on the left in Figure 3.2, the key light did its job, producing a shadow that adds depth to my face. However, the contrast between the lighted area on the right side of my face and the shadows on the left is a little too strong. To moderate this, we'll add a fill light to "fill" the shadows. The Fill LightWhere the effect of the key light is obvious, the fill light is more subtle, softly reducing the shadows produced by the key light rather than announcing the presence of another light. To accomplish this, the intensity of the fill light must be less than the key light, an effect you can produce by using a softer light or less powerful bulb, or by placing the light further from the subject. As shown in Figure 3.1, the fill light should be placed at approximately the same angle as the key light, but on the other side of the camera. Placing the fill light at a different height from the key light will produce an asymmetry that enhances the desired modeling effect. Compare the key light image in Figure 3.2 with the key and fill light image. You'll notice that the fill light did its job, softening the dark shadows produced by the key light, and revealing some of the detail on the left side of my face. The Back LightThe back light is placed behind and shines down the subject. Rather than provide true lighting for the scene, the back light should produce a subtle halo on the top and back of the subject that provides contrast and visually separates the subject from the background, enhancing the three-dimensional appearance of the scene. Ideally, you should place the back light directly opposite the camera and it should have the same intensity as the key light. If it's impossible to place the light directly behind the subject, place it on the side and shine the light down on the subject, or place a light on either side both, of course, shining down onto the back of the subject. Be careful when positioning the light so that it does not also shine down on the camera lens this can produce lens flares and even burn out pixels in the LCD viewfinder or panel. If you look at the key, fill, and back light image in Figure 3.2, you'll notice that my hair and shoulders are lighted, providing contrast from the background. As discussed in the next section, though many television producers eschew three-point lighting for flat lighting, virtually all employ back lights to create this contrast. So what are the takeaways of three-point lighting? First, shadows are acceptable, if not desired. This is critical, because you can drive yourself crazy, especially out in the field, if you try to get rid of all facial shadows. By strategically placing the lighting and the subject, you can ensure that the shadows will enhance, rather than disrupt the image. Second, uneven lighting is acceptable, if not desired. Again, don't go nuts trying to get even lighting on each subject's face. Rather, for reasons discussed more completely in Video Fundamentals, it's critical to limit the contrast between the brightest and darkest regions in the video. Third, back lights are essential to separate the subject from the background, especially (in my experience) with indoor shots. |

| < Day Day Up > |
EAN: 2147483647
Pages: 110