#5 Working with Dual Monitors Editing on a single monitor can be a constant exercise in window shifting and resizing. Fortunately, it's fairly inexpensive to add a second monitor to your system, especially if you already have a dual-head graphics card. It's also quite easy to configure your dual-monitor system for effective editing in Premiere Pro and After Effects. VGA-to-DVI If your current graphics card has two outputs, you should be able to configure your system for dual-monitor editing. If one or both of your connectors is an old-style blue VGA connector and you're installing a flat-panel monitor that connects via DVI, you should be able to buy a VGA-to-DVI adapter for under $10. Google "VGA to DVI adapter," and you should find lots of options. Less is more here. You don't need a $300 option; the sub-$10 unit will work just fine. |
Essentially, there are three steps. The first step, as you might expect, is to connect the necessary cables and power on the second monitor. The next step is to extend your Windows desktop to support both monitors, and finally modify the Premiere Pro desktop to take advantage of the additional real estate. We'll pick up the story right after you get your monitor connected and powered on. 1. | Right-click your desktop and choose Properties from the pop-up menu to bring up the Display Properties dialog box.
| 2. | Click the Settings tab.
| 3. | Choose the second monitor in the Display list box (Figure 5a).
Figure 5a. Set up your dual-monitor display by choosing the second monitor in the display list box. 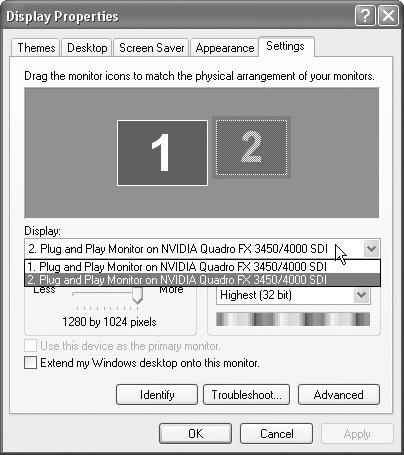
| 4. | Then select the Extend my Windows desktop checkbox, and Windows will do just that, blanking out your primary screen for a moment and then turning on both screens. Click OK to close the dialog and return to Premiere Pro.
| | | 5. | Now, working within the Premiere Pro interface, you can drag any Premiere Pro panel to the second monitor, perhaps pulling the Program Monitor over for a larger preview, or the Timeline for a larger editing surface. You can rearrange your configuration as you like and then save it as a workspace as discussed in step 4.
Buying a Dual-Head Graphics Card If your current graphics card doesn't have two outputs, you'll need to install one that does to take advantage of dual-monitor display in Premiere Pro. You should be able to find a suitable card for under $200. Remember that there are multiple video bus architectures out there, from PCI to AGP to PCI Express. Check your system documentation to determine which architecture your computer uses, and/or bring your current graphics card to the computer store when you make your purchase. |
| 6. | If you're editing DV video in 4:3 resolution, you can also display a full-screen preview on the second monitor. To accomplish this, click the small wing menu on the upper-right corner of the Program Monitor (see Figure 4a), and choose Playback settings to open the window shown in Figure 5b.
Figure 5b. Using the Playback Settings control, you can preview your video in full screen on your second monitor. 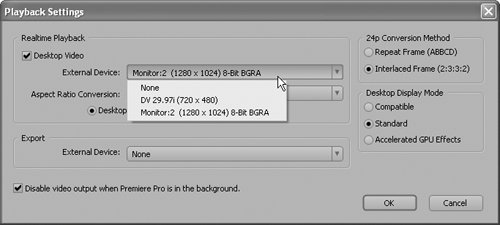
| 7. | Click the External Device list box, and choose Monitor:2 to display your full-screen preview on the second monitor.
|
If you have a DV camcorder connected, you can also choose that option and display the full-screen preview on an NTSC monitor or television attached to your camcorder. |