Deployment Method 3: Via Oracle JDeveloper 10g
| | ||
| |
Deployment Method #3: Via Oracle JDeveloper 10 g
If you are using Oracle JDeveloper 10 g to develop your Java-based applications, you can deploy them directly to Oracle Application Server 10 g without ever leaving the JDeveloper 10 g environment. As you will see, deploying an application is as simple as establishing a connection to the application server and specifying what OC4J container you want the application to be deployed to. Oracle has included a new framework in Oracle Application Server 10 g called the Application Development Framework (ADF) that simplifies J2EE development by minimizing the need to write code that implements design patterns and an application s infrastructure. Oracle ADF provides these implementations as part of the framework. Recognizing that having a set of run-time services is not enough, Oracle ADF is also focused on the development experience, providing a visual and declarative approach to J2EE development. Oracle ADF is an extension of frameworks that were included with previous versions of JDeveloper. When it comes time to deploy applications developed with the ADF, there are some extra steps you will need to take. These are discussed at the end of this chapter.
Establishing a Connection in JDeveloper 10g
Before we can deploy applications to an OC4J instance from within Oracle JDeveloper 10 g, there must be an EAR file, provided in the Oracle JDeveloper 10 g installation, deployed to that OC4J container already. On the Oracle Enterprise Manager Application Server Control web site, go to the mid- tier components page. Select the OC4J container you will be deploying to. Click the Applications tab and then the Deploy EAR file button on the top right of the page. Click the Browse button and navigate to the directory where you have installed Oracle JDeveloper 10 g. Now cd to the dcm\lib directory and select the oc4jdcmservlet.ear file. Continue through the other steps of the wizard to deploy this application.
Assuming you have deployed the oc4jdcmservlet.ear file successfully, have compiled and tested your application, and are ready to deploy it, select the Connections tab on the Oracle JDeveloper 10 g Navigator. Right-click Application Server and select New Application Server Connection. The second page of the wizard asks you to name the connection and specify a target (Figure 15-10). Give the connection a meaningful name and select Oracle Application Server 10 g in the connection type.
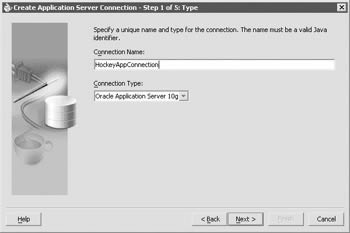
Figure 15-10: Specifying the Application Server connection type
Step 2 asks you to specify the ias_admin password for the middle-tier instance. The third step of the wizard (Figure 15-11) asks you to specify the following information:
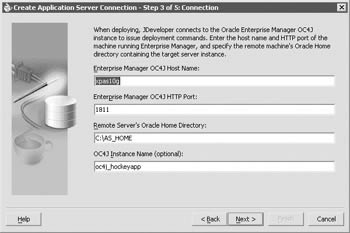
Figure 15-11: The third step of the Application Server Connection Wizard
-
Enterprise Manager OC4J Host Name This is the host where the Enterprise Manager Application Server Control web site is running.
-
Enterprise Manager OC4J HTTP Port This is the port the Enterprise Manager is listening on; it is usually 1810 unless you have both the infrastructure and the middle tier on the same machine; in that case, it is usually 1811.
-
Remote Server s Oracle Home Directory This is the home directory for the application server instance. If you have both the infrastructure and the middle tier on the same machine, make sure to specify the mid-tier Oracle home.
-
OC4J Instance Name (optional) This is the OC4J instance where the application is to be deployed.
The fourth page of the wizard asks you to specify the EJB Client information for the connection. Enter the URL of the Remote Method Invocation server from which methods published to the EJBs will be accessible. Enter a username that has RMI login privileges on the OC4J instance within the Oracle Application Server. Enter the password for the RMI username. The final page of the wizard allows you to test your connection. If any errors appear, click the Back button and fix the incorrect information.
Constructing the EJB JAR File
After the connection has been successfully established, we can begin the process of deploying our application. Click the Applications tab in the Oracle JDeveloper 10 g Navigator. Expand your application by clicking the plus sign to the left of the application name. Right-click the Model tree entry and select New. Select Deployment Profiles in the left-hand window and select EJB JAR file on the right-hand window. Click OK. Give the Deployment Profile Name a meaningful value and click OK. Under the General options on the next screen (Figure 15-12), give the Enterprise Application Name a meaningful value and click OK.
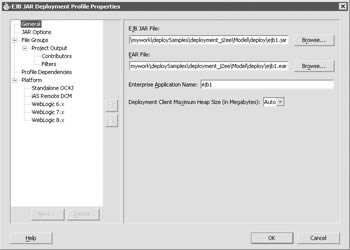
Figure 15-12: The EJB JAR Deployment Profile Properties screen
In the Oracle JDeveloper 10 g Navigator, you will now see a new entry under <application name>/Model/Resources given the name you specified when prompted for the deployment profile name with a .deploy appended to it. Right-click that file and select Deploy To JAR File from the drop-down menu (Figure 15-13).
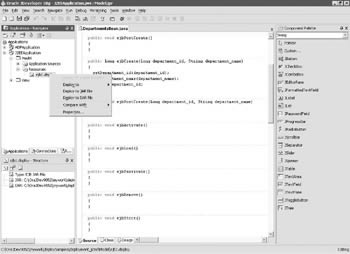
Figure 15-13: Creating the JAR file
A file will be created with whatever name you specified when prompted for the deployment profile name plus a .jar extension. It is not important to know or remember where this file is ”when it comes time to create your EAR file, the wizard will allow you to specify the resource files (the .JARs and .WARs) graphically.
Constructing the WAR File
Now, let s create the WAR file for our application. In the Navigator, right-click the View tree entry under your application. Select New and on the following page, make sure Deployment Profile is selected on the left and WAR File is selected on the right. Click OK. Give the Deployment Profile Name a meaningful value and click OK. Give the Enterprise Application Name a meaningful value and click the Specify J2EE Web Context Root: radio button. Specify a name here and remember it ”it is what will be used in your URL when it comes time to access the application. Click OK (Figure 15-14).
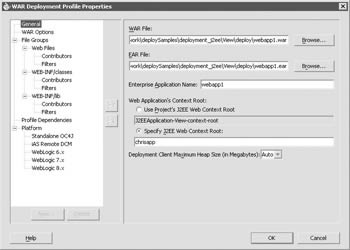
Figure 15-14: The WAR Deployment Profile Properties screen
Constructing the EAR File
Now that we have created both the EJB jar and the WAR files, we can continue by creating and deploying the EAR file. With your application selected and expanded in the Navigator window, right-click View and select New from the drop-down box. Make sure Deployment Profiles is selected on the left-hand side of the screen and EAR File is selected on the right. Click OK. Give the Development Profile Name a meaningful value and click OK. In the General category, give the Application Name a meaningful name. Remember this name, as it will be the one that shows up on the Applications page of the OC4J container on the Oracle Enterprise Manage Application Server Control web page. Click Application Assembly on the left-hand side of the screen (Figure 15-15). Click the check boxes next to the .deploy files that you want to include. Click OK.
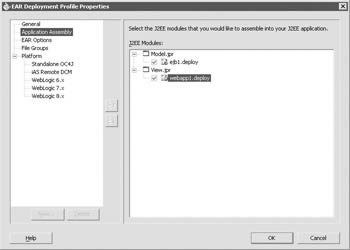
Figure 15-15: Selecting the deployment location
Final Step: Deploying the Application
The final step is to actually deploy our application. Right-click the <application name>.deploy file under Resources in the Navigator. Select the connection that you created earlier from the drop-down menu (Figure 15-16).
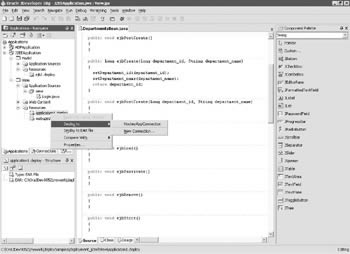
Figure 15-16: The Application Assembly screen
After a few minutes, you can test your deployment by opening up a new browser and going to the Oracle Enterprise Manager Application Server Control web page, clicking the middle tier, clicking the OC4J container, and clicking the Applications tab. You should see a new application deployed there with the name you specified as the application name when constructing the EAR file. You can then run your application by specifying the following URL in a new web browser:
http://<server>:<port>/<application>
where <application> is the name of the J2EE Web Context Root you specified when setting the WAR deployment profile properties for your application.
Deploying Applications That Use ADF
Before we can deploy Oracle JDeveloper 10 g applications that have been created using the ADF, we need to install the necessary run-time files by running the ADF Runtime Installer from within Oracle JDeveloper 10 g. Luckily, this is a relatively simple process. One of the steps of the wizard will ask you to specify what directory on the server you wish to install the Application Runtime Files to. If you are running Oracle JDeveloper 10 g on a Windows machine and your Oracle Application Server 10 g mid-tier instance is on a Windows machine, you will need to map a network drive from your client to the server and specify that drive when you are prompted for the server directory. If you are running Oracle JDeveloper 10 g on a Windows machine and your Oracle Application Server mid-tier instance is on a Unix or Linux machine, then things can get a little tricky. If this is your scenario, you basically have two options:
-
Install Oracle JDeveloper 10 g on your Unix/Linux box and perform the following steps that way.
-
Use a product like Hummingbird or Cygwin to map a drive from your Windows client to your Unix/Linux server.
Steps to Install the ADF Runtime Installer
The following steps need to be performed to install the ADF Runtime Installer.
-
Stop all of the mid-tier components by going to the Oracle Enterprise Manager Application Server Control web page at http://< servername >:1810 (1811 if both the middle tier and the infrastructure are on the same server).
-
Click the Stop All button on the top of the screen.
-
For Windows only:
Stop the ASControl and ProcessManager services for the middle tier. In the Windows Services applet, these will be called Oracle<Oracle_Home>ASControl and Oracle<Oracle_Home>ProcessManager (where Oracle_Home is the name of the Oracle home for the mid-tier instance you specified when installing the software).
-
For Unix/Linux only:
Stop all OPMN processes by cd ing to the $ORACLE_HOME/opmn/bin directory for your middle tier and issue the following command:
opmnctl stopall
-
In Oracle JDeveloper 10 g, select Tools ADF Runtime Installer Oracle Application Server.
-
On the first step of the wizard (Figure 15-17), specify the location of the ORACLE_HOME for your mid-tier instance. In the example on Figure 15-17, I have mapped a drive on my laptop (Z:) to the server and AS_HOME is the directory where the Oracle Application 10 g Server middle tier is installed (if you attempt to select a directory that is not a mid-tier home, the wizard will not let you continue but will display an error message when you click the Next button).
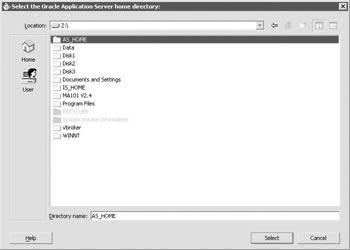
Figure 15-17: Specifying the home directory of the application server middle tier -
If this is the first time you are installing the ADF run time, the only option available to you is Install a new version of the ADF run time. If you have installed numerous versions of the ADF run time and need to return to an older version for whatever reason, the second radio button, Restore an archived version of the ADF run time, will be available to you. Click Next>, and then Finish.
-
The run-time installer will archive any existing run-time files, display its progress both in a dialog box at the center of the screen and in the log section of the Oracle JDeveloper 10 g desktop at the bottom of the screen (Figure 15-18). It will display the message ADF Runtime Installer finished successfully in the log window upon completion.
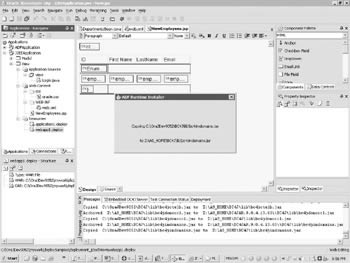
Figure 15-18: The ADF Runtime installer status window
| | ||
| |
EAN: 2147483647
Pages: 192