Formatting with Styles
You can work through a document applying formats to headings and other special paragraphs one by one, but Word provides an easier way: you can store custom combinations of formatting by defining the combination as a style . You can then apply that combination to a highlighted text selection or a paragraph simply by selecting the style from the Style drop- down list on the Formatting toolbar.
Information about: Templates, page 78
Every paragraph you write has a style. When you open a new blank document, it is based on the Normal template, and Word applies that template s Normal style to all paragraphs unless instructed otherwise . This Normal style formats characters as 12-point regular Times New Roman and paragraphs as left- aligned and single- spaced . When you base a document on a template other than Normal, the styles included as part of that template are available, and you can create documents simply by filling in paragraphs to which those types have already been applied.
It s well worth taking the time to learn how to use Word s predefined styles and how to define styles of your own. Later in this course, you ll see how to create your own templates.
Viewing the Style List
Microsoft Office Specialist : Apply paragraph styles
In Chapter 2, you created a new document based on the default Normal template. As you learned in Chapter 2, Word comes with nine predefined heading styles, one for each of the heading levels you can designate when outlining a document. The Normal template also has predefined paragraph styles for a number of other common document elements, such as normal text, index entries, headers, footers, and footnotes.
For a new document based on the Normal template, Word lists only the Heading 1, Heading 2, Heading 3, and Normal paragraph styles. Word does not list the other predefined styles unless you insert one of those elements in the document. Then Word both applies the corresponding style to the element and adds the style to the Style list. When Word applies one of its built-in styles to an element, it uses the formatting that has been predefined for that element. Once the style is available on the Style list, you can apply it to other paragraphs. You can also redefine the style to suit the document you are creating, and you can create new styles.
In the Style list, the styles are shown in their assigned formatting. There are four types of styles, each designated by a symbol at the right edge of the list:
-
Character styles are designated by an underlined a .
-
Paragraph styles are designated by a paragraph mark.
-
Table styles are designated by a four-square grid.
-
List styles are designated by a bulleted list.
The template attached to a document might contain one or more of these types of styles. You apply character styles by selecting the text you want to format and then clicking the style in the list. You apply the other types of styles by simply clicking the element you want to format and then clicking the style.
| |
Character styles affect only the selected text, and these styles are applied on top of any paragraph formats assigned to the selected text. Paragraph styles affect the entire paragraph containing the insertion point. For example, you can apply a paragraph style that makes the font and size of an entire paragraph 12-point regular Arial, and then you can select the first word and apply a character style that makes just that word bold, italic, and underlined. If you later apply a different paragraph style that makes the font and size of the entire paragraph 14-point regularTimes New Roman, the first word will remain bold, italic, and underlined.
| |
Earlier in this chapter, you created a memo based on one of Word s predefined templates and inserted it into the document you created in Chapter 2. The template attached to the resulting Flyer document incorporates the styles from both original files, and you can see these styles by looking at the Style list. Follow these steps to see what styles are available for the Flyer document:
-
Press Ctrl+Home to move to the top of the document, and then on the Formatting toolbar, click the Style box s down arrow to drop down a list of the styles in the document.
-
Scroll through the list.
The list includes the styles from both the memo template and the FAQ document, each displayed in its assigned formatting.
-
Click More at the bottom of the list.
Word displays the Styles and Formatting task pane shown in this graphic:

You can also display the Styles and Formatting task pane by clicking the Styles and Formatting button on the Formatting toolbar, or by clicking Task Pane on the View menu.
-
Point to one of the styles in the list to display a ScreenTip describing the formatting used with that style.
-
5. Click the Show box s down arrow, and click Available styles .
Now the list displays only the styles available for the current document.
Creating a Style from an Existing Paragraph
Microsoft Office Specialist : Create and apply character and paragraph styles
Although Word does a good job of anticipating the document elements for which you will need styles, you will often want to create additional styles of your own. Suppose you want to delete the space between the first two paragraphs of the flyer and then indent their first lines so that it s easy to tell at a glance where one paragraph ends and another begins. Follow these steps to create a style with this combination of formatting:
-
Delete the paragraph mark between the first and second paragraphs that came from the memo document.
-
Click the first text paragraph, and on the Format menu, click Paragraph .
-
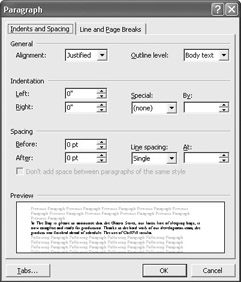
Click the Indents and Spacing tab.
Word displays the options shown in this graphic:
-
In the Indentation area, click the down arrow to the right of the Special box, and click First line in the drop-down list.
Word enters the default first-line indent in the By text box and shows in the Preview box how your text will look with this setting.
-
Change the setting in the By text box to 0.15" , change the After setting in the Spacing area to 6 pt , and click OK .
-
With the insertion point still located in the first paragraph, click the New Style button in the Styles and Formatting task pane.
The dialog box shown in this graphic appears:
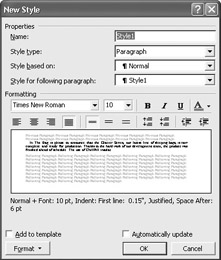
Notice that below the Preview box, Word lists the formatting applied to the paragraph. If you wanted to further adjust the formatting of this style, you could do so from this dialog box.
-
In the Name text box, type Indented Paragraph , and click OK .
Word creates the style and adds its name to the Style list so that you can then apply it to the current paragraph or any other paragraph.
| |
At times, you might want to adjust the line spacing in your document. For example, double-spaced text is easier to work with when you are drafting and editing a long document. To change the line spacing, on the Formatting toolbar, click the Line Spacing button s down arrow and click a predefined spacing option on the drop-down menu. If none of the options meets your needs, click More at the bottom of the list to display the Paragraph dialog box (also available by clicking Paragraph on the Format menu). On the Indents and Spacing tab, make your selection from the Line spacing drop-down list. If you adjust line spacing often, you can create double-spaced versions of your styles and quickly switch to the single-spaced versions when you ve finished drafting your document. In addition to the traditional single, 1 ½, and double-spaced options, you can specify that the line spacing be changed by at least a certain amount (which ensures that Word allows enough space for graphics or large font sizes), by exactly a certain amount, or by a certain percentage (the Multiple option). You can then refine the selection with the setting in the At box.
| |
Creating a Style from Scratch
Microsoft Office Specialist : Create and apply character and paragraph styles
Now turn your attention to the FAQ part of the flyer. Suppose you want to create a paragraph style in which the text is justified (aligns with both the left and right margins) and there is a little space before each paragraph. (Paragraphs with space before them are called open paragraphs .) Follow these steps to create this style:
-
Click a paragraph in the FAQ section, and in the Styles and Formatting task pane, click the New Style button to display the New Style dialog box.
-
Click the Format button in the lower-left corner, and then click Paragraph to display the Paragraph dialog box.
-
Click the down arrow at the right end of the Alignment box, and click Justified in the drop-down list.
This is the equivalent of clicking the Justify button on the Formatting toolbar.
-
In the Spacing area, change the Before setting to 3 pt , and click OK .
-
In the Formatting area of the New Style dialog box, change the font size to 11 .
Your new paragraph style will be based on the Normal style but with the specific differences you have specified, which are listed below the Preview box.
-
In the Name box, select Style1 , type Open Paragraph as this style s name, and click OK .
| |
To modify one of Word s default styles or one of your own, first display the Styles and Formatting task pane. Select the style you want to modify in the Pick formatting to apply list. Right-click the selection, and click Modify on the shortcut menu to display the Modify Style dialog box. Change the formatting options as necessary. Select the Automatically update check box if you want the style to be redefined whenever you make a change to any text that uses it. To use the modified style in new documents based on the same template, select the Add to template check box. Click OK to implement your choices. When you redefine a style, all text in the current document to which that style has been applied is updated.
| |
| |
If you go to a lot of trouble to set up a particular style and you know you want to create one that is slightly different, select the base style from the Style based on list before you begin.Then you ll have to specify only the differences, not the entire style.
| |
Applying a Style
Once you have created a style, you can apply it to any characters or paragraphs you want so that the formatting work you do in a document goes much faster. Follow these steps to apply the new Indented Paragraph and Open Paragraph styles to some paragraphs in the flyer:
-
Click the first paragraph of the flyer, and in the Pick formatting to apply list in the S tyles and Formatting task pane, click the Indented Paragraph style.
-
Click the second paragraph, and in the Pick formatting to apply list, click the Indented Paragraph style again.
Word changes the style of the second paragraph so that its formatting is consistent with the first paragraph.
-
Click the paragraph under the first heading of the FAQ part of the flyer, and apply the Open Paragraph style to it.
-
Click the paragraph under the second heading, and on the Edit menu, click Repeat Style.
Word repeats the previous formatting action, applying the Open Paragraph style to the second paragraph.
-
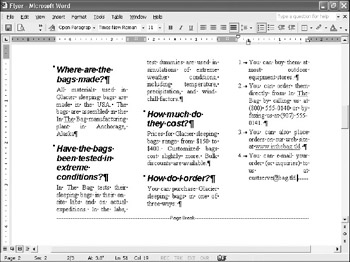
Apply the Open Paragraph style to the remaining paragraphs of the FAQ, including the numbered items.
-
Select part of the second, third, fourth, and fifth paragraphs under the How do I order? heading, and on the Formatting toolbar, click the Numbering button.
Word reapplies the numbered-list format on top of the Open Paragraph style.
-
Click the number 1 in the numbered list to select the entire list, and on the Format menu, click Bullets and Numbering .
-
Click the Customize button, and change the A ligned at setting to 0" , the Tab space after setting to 0.25" , and the Indent at setting to 0" . Then click OK twice.
-
Close the Styles and Formatting task pane by clicking its Close button.
The results are shown in this graphic:
EAN: N/A
Pages: 74