Using the Office Shortcut Bar
With the Office programs, you almost always have more than one way to accomplish the same task so that you can work with your computer the way that is most comfortable for you. The Office shortcut bar provides an alternative way of quickly getting started with whatever task you need to perform.
Displaying the Office Shortcut Bar
Follow these steps to display the Office shortcut bar and take it for a test drive:
-
Click the Start button, click All Programs , Microsoft Office Tools , and Microsoft Office Shortcut Bar . (Insert your installation CD-ROM if prompted.)
Office displays this dialog box:
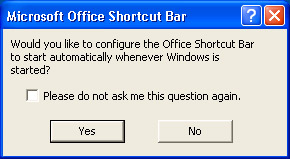
If you click the Yes button, a shortcut to the Microsoft Office Shortcut Bar program is created in your Startup folder. Windows runs the programs in this folder each time it starts.
-
Click No .
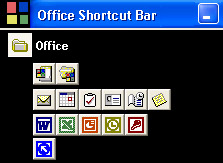
The shortcut bar appears and, just like a regular toolbar, docks itself along an edge of your screen.
-
If necessary, point to a blank area of the shortcut bar and drag it to the top of the screen, where it looks like this:

-
Use Screen Tips to familiarize yourself with the buttons on the bar.
By default, the Office shortcut bar consists of the following:
-
The Control menu icon. You can click this icon to display a menu of useful commands, including the Customize command used to tailor the Office shortcut bar to the way you work.
-
The Office button and name . By default, the shortcut bar displays the Office toolbar, but as you ll see in a moment, it can display other toolbars as well.
-
The New Office Document button. Click this button to start one of the Office programs with a new, blank document in its window.
-
The Open Office Document button. Click this button to open an existing Office document.
-
The New Message, New Appointment, New Task, New Contact, New Journal Entry, and New Note buttons. Click these buttons to start Outlook 2002 with the corresponding component displayed in the workspace.
Your toolbar might also display the Access, Excel, FrontPage, Outlook, PowerPoint, Publisher, or Word buttons. You can click these buttons to start the corresponding application with a new, blank document in its window.
Minimizing and Redisplaying the Office Shortcut Bar
When the shortcut bar is docked along an edge of the screen, it takes up screen space that might otherwise be available to an open application. You can keep the shortcut bar open but tuck it out of sight.
-
Point to a blank area of the shortcut bar and drag it to the middle of your screen.
It becomes a floating toolbar like this one:
The shape of the floating shortcut bar varies, depending on the number of buttons displayed.
-
Click the shortcut bar s Minimize button to shrink it to a button on the taskbar.
-
Click the Microsoft Office Shortcut Bar button on the taskbar to redisplay the floating toolbar, and then doubleclick its title bar to dock the toolbar at the top of the screen.
Displaying and Hiding an Office Shortcut Bar Item
You can customize the Office shortcut bar in several ways, some of which we ll show you here. If you like using the shortcut bar, you can explore other options on your own later. Let s experiment by altering which toolbars and buttons appear on the Office shortcut bar. Follow these steps:
-
Click the Control menu icon to display the Control menu, and then click Customize .
You see this dialog box:
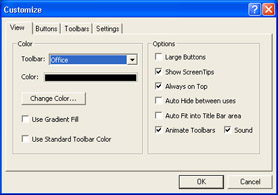
The options on the View tab control the way the Office shortcut bar looks and behaves on the screen. (You can experiment after you understand how the shortcut bar works.)
-
Click the Toolbars tab, select the Accessories check box, and then click OK .
The shortcut bar now looks like this:

-
Click the Office button.
The Accessories toolbar shrinks under its button at the right end of the shortcut bar, and the buttons on the Office toolbar are once again displayed.
Creating custom toolbars You can use the Accessories toolbar to start the programs that come with Windows with just the click of a button. However, if you use these programs only rarely, it s not worth cluttering up the shortcut bar with an entire toolbar. Instead, you can add buttons for the programs you use most often to the Office toolbar, and you can add folder buttons for direct access to the files you use most often. As a demonstration, let s add two buttons to the Office toolbar.
-
Turn off the Accessories toolbar by right-clicking the shortcut bar and deselecting Accessories on the shortcut menu.
-
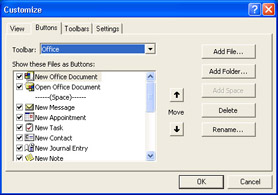
Click the Control menu , click Customize , and click the Buttons tab.
You see these options:
-
Click the Add File button to display the Add File dialog box.
-
Display the contents of the C:\Windows\System32 folder, and double-click calc .
A button for the Windows Calculator program is added to the Show these Files as Buttons list.
-
Click the Add Folder button to display the Add Folder dialog box.
-
Display the contents of your hard drive, click My Documents , and then click Add to add a button for that folder to the Show these Files as Buttons list. Then click OK .
As you can see in the following graphic, the Office toolbar now includes instant access to Calculator and the My Documents folder:

Now that you ve seen how to display a button, let s see how to hide one.
-
Click the Control menu icon, click Customize , and then click the Buttons tab.
-
Scroll the Show these Files as Buttons list, deselect the My Documents check box, and click OK .
This button no longer appears on the toolbar.
| |
To create a custom toolbar to add to the Office shortcut bar, start by clicking Customize on the Control menu. Then, when the Customize dialog box appears, click the Add Toolbar button on the Toolbars tab, select the Create a new, blank Toolbar option, enter a name for the toolbar, and click OK. Click the Buttons tab of the Customize dialog box. Be sure the name of the custom toolbar appears in the Toolbar box, and click the Add File or Add Folder button to add files or folders to the new toolbar. When you re ready, click OK to add your customized toolbar to the Office shortcut bar.
| |
Deleting an Office Shortcut Bar Item
Now suppose you decide you won t need the My Documents button again and you want to delete it. Follow these steps:
-
Click the Control menu icon, click Customize , and click the Buttons tab, and select My Documents by clicking its icon, not its check box.
-
Click the Delete button, click OK, and confirm that you want to remove the button from the Office shortcut bar.
Even though the message in the confirmation dialog box implies that you are deleting the contents of the My Documents folder, you are really only deleting all references to the My Documents button.
| |
A good rule of thumb to remember when you re working with the Office shortcut bar is to hide rather than remove the default toolbars and buttons so that you can easily restore them. To hide toolbars or buttons, simply click the Customize command on the Control menu, click the Toolbars or Buttons tab of the Customize dialog box, and deselect the toolbars or buttons by clicking their check boxes. (Before you can hide a button, you must use the Toolbar drop-down list on the Buttons tab to select the toolbar on which the button resides.) When you create custom toolbars or add custom buttons to the Office shortcut bar, you might want to use the Remove button on the Toolbars tab or the Delete button on the Buttons tab to remove toolbars or buttons that have become obsolete.
| |
Turning Off the Office Shortcut Bar
You can experiment later with setting up the Office shortcut bar to suit the way you work. For now, let s turn it off. Follow these steps:
-
Click the Control menu icon.
-
Click Exit on the Control menu to turn off the bar.
EAN: N/A
Pages: 116