Recycling Office Information
Throughout this course, we ve emphasized the efficiencies you can achieve by recycling information wherever you need it rather than retyping it. So far, however, we have concentrated on recycling within a single program. In this topic, we ll look at ways you can reuse the information from one program in another program.
Importing Information
When you want to take an entire file created in one program and use it in another program, the simplest way is to open the file in the receiving program. As an example, let s open an Excel worksheet in Word:
-
Start Word , and click the Open button on the Standard toolbar.
-
In the Open dialog box, change the Files of type setting to All Files , navigate to the folder containing the 2002 Jobs workbook, and double-click the name of the workbook.
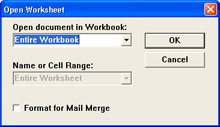
You might have to insert the installation CD-ROM to activate this feature. The dialog box shown in this graphic appears:
-
Click the Open document in Workbook box s down arrow, and click Invoices 2002 in the drop-down list.
-
Make sure that Entire Worksheet appears in the Name or Cell Range box, and click OK .
Here is the worksheet opened as a document in Word:
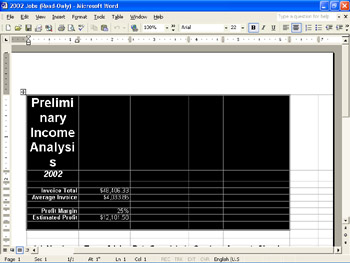
You will need to massage the table into shape with Word formatting techniques, but at least you won t have to enter the data from scratch.
-
Click the Save button to save the document.
-
Close Word.
Exporting Information
Let s try recycling information a different way. Suppose you want to export a table of Access data in a format you can use in Excel. Let s see how to do that now:
-
Click Open Office Document at the top of the Start menu, and double-click Roofs to start Access with the Roofs database open.
-
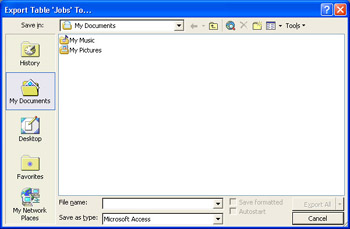
Display the Jobs table, and click Export on the File menu.
The dialog box shown in this graphic appears:
-
Change the Save as type setting to Microsoft Excel 97-2002, and click Export All to save the entire table in Excel format.
-
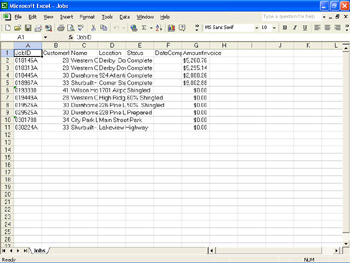
Click Open Office Document at the top of the Start menu, and double-click Jobs .
Excel starts with the Jobs workbook open, as shown in this graphic:
-
Close the Jobs workbook. Then close Access.
You can import and export documents or parts of documents in most programs, but the methods are not always this simple. When you want to work with a file created in another program, start by checking the Open command options, and then look for a Get External Data or Import command. Also check the source program for an Export command. Along the way, the Office Assistant might offer a tip that will tell you exactly how to proceed, or you can look in the program s Help feature for guidance.
Copying and Pasting Information
The simplest way to recycle part of a document is to copy and paste it via the Office Clipboard. Try this:
-
In Excel, open the 2002 Jobs workbook, select A12:E25 on the Invoices 2002 sheet, and click the Copy button on the Standard toolbar.
-
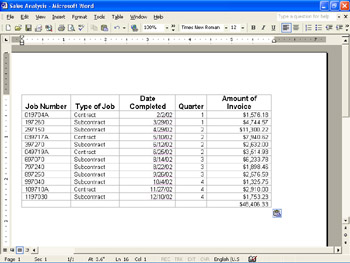
Open a new, blank document in Word, and click the Paste button on the toolbar.
Word inserts the copied range of the worksheet as a Word table.
-
Save the document as Sales Analysis .
The results are shown in this graphic:
Linking and Embedding Information
As you have just seen, when you simply paste information from a worksheet into a Word document, the information is translated into a Word table. You could create the information in Word and get the same result, but when the data already exists in another program, you can save yourself a lot of typing by recycling the information instead. However, the power of the Office program far exceeds this simple kind of copy-and-paste recycling. With Office you can create documents that are a patchwork of pieces created in different Office programs. These patchwork documents allow you to maintain information in files that can be manipulated by the program that created them, but also use that information in files created by other applications. For example, if you want to use an Excel worksheet that relies on a SUM function in a Word report, copying and pasting the worksheet would freeze the results of the function. If you later updated the worksheet so that the SUM function produced new results, you would have to copy and paste the worksheet again to update the Word report. With Office you can recycle the information in a way that ensures the report always reflects the latest results of the worksheet s SUM function. This type of recycling is made possible by OLE , which is pronounced olay . You don t have to be an OLE expert to recycle information, but understanding a bit about the concept of OLE helps you decide which of a couple of different recycling methods to use. So here is a quick rundown:
| |
You can use a Microsoft Graph to plot a graph of the data in a Word table that has text in the top row and left column and numbers in the other cells . Select the table, click Object on the Insert menu, and double-click Microsoft Graph Chart in the Object type list to open Graph. Graph displays the plotted data in a graph. Click outside the graph to close Graph and view the results.
| |
The O in OLE stands for object , and an object is an item or an element of a document. It can be a block of text, a graphic, a table, a graph, and so on. Each object consists of data that determines how the object is displayed and data that determines its content. The program that creates the object is called the server , while the program that receives the object is called the client . The server document in which the object was created is called the source document , and the client document in which the object is used is called the container document .
To create a patchwork document, you can link an object to the container document (the L in OLE ), or you can embed the object (the E ). When you link a container document to information stored in a source document, you need both the source document and the container document in order to display the object. When you embed information, the information becomes part of the container document, and you no longer need the source document.
So how does all this influence the way you go about recycling information? If the object you want to use in a container document is likely to change and you want to be sure that every instance of the object is consistent, consider linking. If the information is not going to change, embedding might be the best way to go because embedded information can be edited in the container document without the source document having to be present. Bear in mind, however, that documents that contain embedded objects can get very large.
| Information about | Clipboard task pane, page 22 |
So that s the scoop on OLE. Now let s see how you might use it. To learn a couple of ways to create container documents, you ll use the Sales Analysis document now on your screen and the Annual worksheet in the 2002 Jobs workbook. Follow these steps to link the Word document and the worksheet, and then to embed the worksheet in the document:
-
Click below the table in the Sales Analysis document, and then press Enter to add some space.
-
Maximize Excel, activate the Annual sheet of the 2002 Jobs workbook, select A1:F7, and click the Copy button.
If the Clipboard toolbar appears, close it.
-
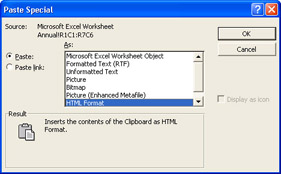
Maximize Word, and click Paste Special on the Edit menu.
The dialog box shown in this graphic appears:
-
Select the Paste link option, click Microsoft Excel Worksheet Object in the As list, and then click OK .
Word pastes a copy of the worksheet selection in the document, linking the copy to the original worksheet.
-
Save the document.
You ll test the worksheet in a moment. For now, let s embed a copy of the same range so that you can explore yet another technique. This technique will embed the entire active worksheet of the selected workbook. To avoid embedding the Annual worksheet s graph as well as the income statement, you ll first move the graph to a different sheet and save the workbook with the Annual sheet active.
-
Maximize Excel, and insert a new sheet in 2002 Jobs by clicking Worksheet on the Insert menu.
-
To move the graph to the new sheet, click the graph to select it, click the Cut button, click the Sheet1 tab, and then click the Paste button. Deselect the graph, and rename Sheet1 as Graph .
-
Move to cell A1 on the Annual sheet, and save the workbook.
-
Maximize Word, press Ctrl+End to move to the bottom of the document, and if necessary, press Enter to add some space.
-
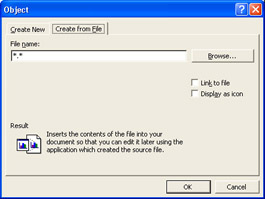
Click Object on the Insert menu, and then in the Object dialog box, click the Create from File tab.
Word displays the dialog box shown in this graphic:
-
Click the Browse button, double-click the 2002 Jobs Excel file in the Browse dialog box, and click OK to close the Object dialog box.
-
Save the Sales Analysis document.
In the next section, we ll see how linking and embedding make updating information fast and easy.
| Information about | Renaming sheets, page 136 |
| |
By default, when you open a document that contains a link to another file, the linked information gets updated. In addition, the information is updated if the source file changes while the linked document is open. The source file does not have to be open for this updating to happen, but it does have to be available to your computer and be stored exactly where it was when the link was established. Moving or renaming the source file breaks the link. To reestablish the link, click Links on the Edit menu, select the link, click Change Source, double-click the source file, and click OK.
| |
| |
Using the Display as icon option in the Object dialog box, you can embed an object as an icon. As an example, you might use this option if you want to include supporting information with a document without cluttering it with information that not everyone wants to read. If you select this option, the object appears as a small graphic, and double-clicking the graphic displays the actual object.
| |
Making a Change to Linked or Embedded Documents
To see the effects of the different types of objects, let s make a change to the worksheet:
-
Switch back to Excel, move to the Invoices 2002 sheet, and change the amount in cell E24 to $20,000.
-
Move back to the Annual sheet.
Because of the links you created back in Chapter 5, the Annual sheet has been updated to reflect the changed amount.
-
Save the 2002 Jobs workbook.
-
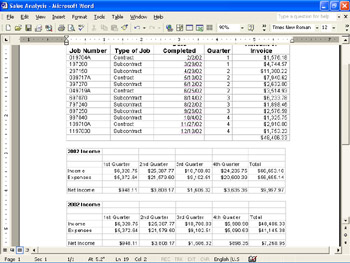
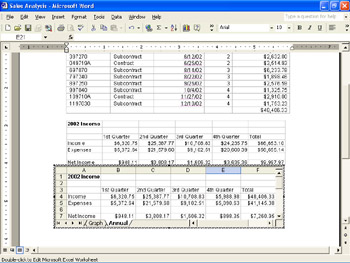
Switch back to Word, change the zoom setting to 90% , and scroll the Sales Analysis document until you can see the bottom line for each worksheet.
The worksheet s bottom line is shown in this graphic:
If you don t see all of the embedded worksheet, you might need to change the size of the frame that is surrounding the worksheet. When you embed a worksheet in a document, too many or too few cells might be displayed. To control what you see, double-click the embedded worksheet to activate Excel, and then increase or decrease the size of the frame that is surrounding the worksheet to display specific cells. (You can also select the rows or columns you don t want to display and click Row or Column and then Hide on Excel s Format menu.) Click outside the Excel frame to return to the document. This can be a tricky process, and you might need to play around to get it right.
Word has updated the linked table (the middle table) to reflect the invoice change in the source document. To update the first table, you can use regular Word editing techniques. To update the embedded table, you must work through Excel, the program that created the object.
-
Double-click the embedded table.
Excel s menus and toolbars replace Word s, and the table now appears as a worksheet with a grid of lettered columns and numbered rows, as shown in this graphic:
-
Type 24235.75 in cell E4 , and click the Enter button on the formula bar.
The values in the remaining cells in the 4th Quarter and Total columns are automatically updated because the formulas in those cells remained intact during the embedding procedure.
-
Click outside the worksheet s frame to return to the document, where the embedded table now matches the linked table.
-
Save and close the document, but leave Word open.
After working through these examples, you should have a basic understanding of the advantages and disadvantages of the various ways of recycling information among Office programs.
| |
You can embed a PowerPoint presentation just like any other object. For example, you could send a letter to clients about a new product and embed in your letter a presentation that reinforces your sales pitch. Click Object on the Insert menu, click the Create from File tab, select the filename of the presentation, and either click OK to insert the first slide of the presentation as a graphic. Or select the Display as icon option and click OK to embed the entire presentation as an icon. Then clients who have PowerPoint can double-click the icon to view the presentation.
| |
EAN: N/A
Pages: 116
- Chapter II Information Search on the Internet: A Causal Model
- Chapter IV How Consumers Think About Interactive Aspects of Web Advertising
- Chapter V Consumer Complaint Behavior in the Online Environment
- Chapter VI Web Site Quality and Usability in E-Commerce
- Chapter XIII Shopping Agent Web Sites: A Comparative Shopping Environment