Creating Contact Information
Storing contact information electronically can help you work more efficiently at the office or at home. You can look up stored addresses while you work, and your computer can dial phone numbers for you. Contacts also stores e-mail and web page addresses, allocates space for additional information about each contact, and tracks your activities in relation to each of your contacts for easy reference. In this topic, we ll take a look at the Contacts component and then leave you to explore how you might put it to work.
| |
If your messages are stored on a mail server, they are accessible to you when checking your e-mail from any computer, whereas if they are stored on your hard disk, you have access to them only when you are logged on to that particular machine. If your messages are stored on a mail server, you can work with them only when you are connected to the server, whereas you can work with the messages stored on your own computer at any time. With server-based e-mail, some ISPs (and some companies) limit your e-mail storage space and require that you purge your e-mail when your storage space is full. You can move the messages to your hard drive by creating a set of personal folders. To do so, click New on the File menu, click Outlook Data File, and then click OK. Click OK to accept the default file name and storage location in the Create or Open Outlook Data File dialog box, and then click OK to accept the default settings in the Create Microsoft Personal Folders dialog box. Outlook creates a set of personal folders and adds it to the folder list. You can now create new folders within the personal folders structure to fit your needs.
| |
| |
If you drag a message header from the Inbox s header pane to the Contacts icon on the Outlook bar, Outlook opens a new Contact window and fills in the name and e-mail fields. You can fill in the remaining information. If you are working in another Outlook component and want to add a new contact, you can click the arrow to the right of the New button at the left end of the Standard toolbar and select Contact from the drop-down list. You can also click New and then Contact on the File menu. If you prefer keyboard shortcuts, press Ctrl+N to enter a new contact from within the Contacts component or press Ctrl+Shift+C to enter a contact from another component.
| |
Creating an Address Card
Outlook s Contacts component stores contact information on address cards and serves as an electronic address book. Let s take a look at these address cards now.
To see how to add a few address cards to the workspace, follow these steps:
-
With Outlook open on your screen, click the Outlook Shortcuts button on the Outlook bar, and then click the Contacts icon.
Outlook displays the contents of the Contacts component in the workspace, as shown in this graphic:
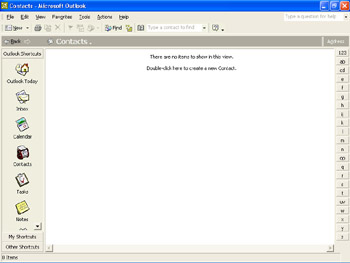
If you have not used Contacts before, your list is probably empty except for any address cards that have been created by Outlook. Down the right side of the workspace are alphabet buttons , similar to the tabs for pages in a standard address book.
-
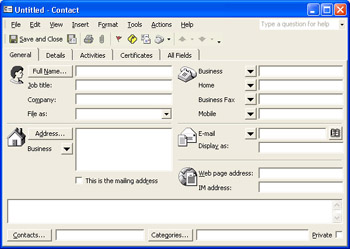
Click the New button on the toolbar.
The Contact window appears, as shown in this graphic:
-
Enter the information shown in the following graphic, pressing Tab to move between fields, and omitting parentheses and hyphens when entering phone numbers. ( Outlook adds them for you automatically.)

In the File as box, you can change Shakes, Emma to Emma Shakes by clicking the box s down arrow and then clicking that option.
You can click the arrow to the left of any of the boxes in the phone area to display a list of possible phone numbers, and you can reassign the boxes to match the ways you can get in touch with this contact. To close the drop-down list without reassigning any boxes, simply press Esc. If this is the first time you have entered a phone number in Outlook, the Location Information dialog box appears so that you can enter your country, area code and dialing information. If Outlook displays this dialog box, fill in your information, and click OK twice.
The address shown in the graphic above is the contact s business address. You could click the arrow below the Address button, select Home or Other from the drop-down list, and enter another address. Because you have entered only one address, Outlook assumes this is the contact s mailing address and selects that check box.
The e-mail addresses you enter for our examples are fictitious Internet e-mail addresses. The domain name we tell you to enter (.tld) is a bogus name; we don t want you to accidentally use a real domain name and risk sending your test messages to real people! You can enter up to three e-mail addresses per contact by clicking the arrow to the left of the box and assigning a new type. You can search for e-mail addresses in an existing address book by clicking the Address Book button to the right of the box.
In the Contact window, Outlook underlines phone numbers, e-mail addresses, and web page addresses. The underline tells you that Outlook has checked those entries for obvious errors and found none. In the case of the web page address, Outlook not only underlines it but also changes its text to blue to indicate that clicking the entry will start your web browser and access the web page. (You might be prompted to connect to the Internet first.)
-
Click the Categories button in the lower-left corner.
The Categories dialog box shown in this graphic appears.

-
Select the Business check box, and click OK .
-
Click the Save and New button.
Outlook saves the current address card and displays a blank Contact window.
-
Create address cards for the people listed at the top of the next page, assigning them all to the Business category, and clicking the Save and Close button after each one.
Name
Sandra Peters
Gilbert Perez
Nathan Chou
Art Synkrafts
Job Title
Director
Coordinator
Coordinator
President
Company
Northwest BEAT
Oregon BEAT
Washington BEAT
Creative GlassWorks
Bus. Phone
3605550177
5035550144
2065550110
2065550199
Bus. Fax
3605550178
5035550145
2065550111
2065550191
Address
10 Columbia Square
Olympia, WA 98567
444 Towne Center
Portland, OR 97208
1414 East 45th Street
Seattle, WA 98149
67 Artisans Road
Redmond, WA 98052
E-Mail
sandrap
gilbertp
nathanc
arts
Address
@nwbeat.tld
@orbeat.tld
@wabeat.tld
@glassworks.tld
Web Site
www.nwbeat.tld
www.orbeat.tld
www.wabeat.tld
www.glassworks.tld
| |
Using Outlook eliminates some of the need for paper printouts, but when you do want a printout of your contact list, click the Print button to display the Print dialog box. You can select from several layout choices in the Print style area, and you can click the Page Setup button to make adjustments on the Format, Paper, or Header/Footer tabs. On the Paper tab of the Page Setup dialog box, you can change the Type setting in the Paper area to Avery labels or FiloFax. In the Page area, you can change the Size setting to fit special formats for Franklin Planners, Day-Timers, or Day Runners. As you select settings, you can check what the printout will look like by clicking the Print Preview button. In Print Preview, the mouse pointer changes to a magnifying glass. Click the mouse button once to zoom in on the page, and click again to zoom back out. When you are ready to print, click OK in the Print dialog box.
| |
Editing and Adding Information
After you add an address card to your contact list, you can easily edit the information on the card by double-clicking the card in the workspace to redisplay the Contact window. You can change existing information and add new information, either on the General tab of the Contact window or on one of the tabs designed to hold specific types of information.
| |
You can set up an e-mail distribution list for a group by clicking the New button s down arrow and clicking Distribution List in the drop-down list. In the window that appears, type a name for the list, click Select Members, select the people you want to be part of the list, and click the Members button. When the list is complete, click OK. Click the Save and Close button to close the Distribution List window. Then you can address a message to the list just as you would to an individual.
| |
Looking over the address cards now in the workspace, suppose you discover an error in the Gilbert Perez card. Here s how to edit existing contact information:
-
Double-click Perez, Gilbert to display his address card.
-
Change 444 Towne Center to 4444 Towne Center , and then click the Save and Close button.
Adding Other Types of Information
If you want to add additional information about a contact, such as an assistant s name or a birthday, you can use the Details tab. Let s add some personal information for Nathan Chou, who is not only a colleague but also a friend. Follow these steps:
-
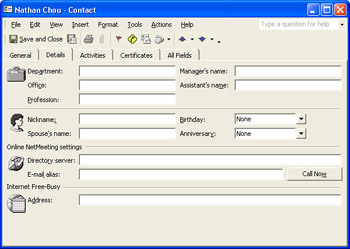
Double-click Chou, Nathan in the workspace, and then click the Details tab.
Outlook displays the information fields shown in this graphic:
-
Click the Birthday box s down arrow to display a small calendar.
-
Use the arrows on either side of the current month s name to navigate to December . Then click 28 .
-
Set the Anniversary box to August 7 using the same process.
-
In the Spouse s Name box, type Chris . Then click the Save and Close button.
-
Redisplay the address card for Chou, Nathan , and maximize the window.
The General tab now looks like the one shown here:
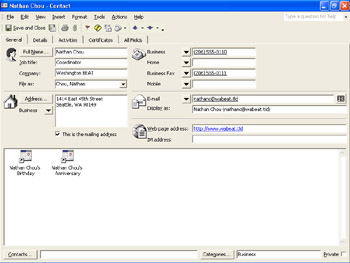
When you enter a contact s birthday or anniversary, Outlook creates a shortcut to the Calendar component, indicating that the date has been added to your schedule as a recurring event. (We haven t discussed Calendar yet, so you won t check out these shortcuts now, but you might notice them in certain views of your contact list as attachments to this address card.) Because of this feature, you ll no longer have to record special occasions in several places, and you ll never forget these important dates again!
-
Restore the Contact window to its former size, and then close it.
| Information about | Recurring events, page 318 |
| Information about | Outlook Calendar, page 310 |
EAN: N/A
Pages: 116