Finding and Arranging Records
In Chapter 9, we show you some fairly sophisticated ways of working with records. Here, we ll cover some simple methods of manipulating data so that you can locate information.
| |
Use the Format property to display data in a consistent manner. Use the Input Mask property to restrict what can be entered. You can use both properties for the same field: the Input Mask property is used when adding or editing data and the Format property determines how the data is displayed. If you use both properties, try to avoid conflicts. If there is a conflict, the Format property normally takes precedence.
| |
Finding a Field Value
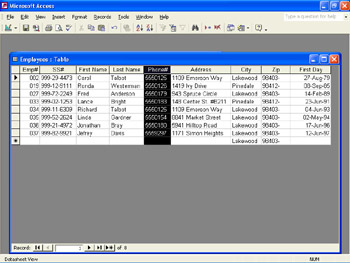
You often need to find either a particular record in a table or all the records that have something in common, so Access provides an easy way to locate records. To demonstrate , let s search the Employees table for a record that has Talbot in the Last Name field:
-
Select the Last Name field of any record by pointing to the left of the field value and when the pointer changes to a fat plus sign, clicking to highlight the field.
-
Click the Find button on the toolbar.
Whatever name you highlighted appears by default in the Find What text box. The dialog box shown in this graphic is displayed:

-
If necessary, point to the Find and Replace dialog box s title bar, and drag the dialog box downward so that you can see all the table s records.
-
In the Find What text box, type Talbot , click the Look In box s down arrow, select Employees : Table in the dropdown list, and then click Find Next .
Access highlights the first field value below your original selection that matches your specification.
Suppose this is not the employee record you need to examine, and you want to find another record with this field value.
-
Click Find Next to find the other record with Talbot in the Last Name field.
-
Click the Close button to close the dialog box.
| |
When dealing with a very large table, you can temporarily focus on a subset of the records in the table by using filters. For example, if you select Talbot and then click the Filter By Selection button, Access displays the subset of records that have the value Talbot in the Last Name field. (To redisplay all the records, click Remove Filter/ Sort on the Records menu.) Filters are closely related to queries, which you ll learn about in Chapter 9. Filter By Selection can be used in tables, forms, and queries. You can even use filters within filters by first using one criterion and then filtering the results using a second criterion.
| |
| Information about | Queries, page 257 |
Moving a Field
By default, the fields are displayed in the order in which they were entered when the table was created. If you want to permanently rearrange the fields, you can open the table in Design view and drag the field rows into the desired order. But if you want to change the field order only temporarily, you can select a field s column in Datasheet view, and drag it to a new position. For example, if you want to look up an employee s phone number, it might be useful to see the phone numbers next to the employee names in the Employees table. Follow these steps to move the Phone# field:
-
Click Phone# in the top row of the Employees table to select the entire column.
-
Point to the Phone# field name, hold down the right mouse button, and drag the field to the left.
As you move the field, Access highlights the dividing lines between columns to indicate the new position of the field.
-
When the dividing line to the right of the Last Name field is highlighted, release the mouse button.
The Phone# field is shown here in its new position:
-
For more practice, move the Phone# field back to its original position between the Zip and First Day fields.
| |
You can hide fields by selecting them and clicking Hide Columns on the Format menu. To redisplay the fields, click Unhide Columns on the Format menu, select the check boxes for the fields you want to redisplay, and then click Close to close the Unhide Columns dialog box and save your changes.
| |
| |
You can freeze a field in position while scrolling the other fields in a table. Click anywhere in the field, and then click Freeze Columns on the Format menu. The field moves to the left to become the first column in the table. You can then scroll the remaining fields. To freeze a set of fields, click the first field column in the set, hold down the Shift key, click the last field column, and then click Freeze Columns on the Format menu. To unfreeze one or more columns, click Unfreeze All Columns on the Format menu and then, if necessary, drag the column or columns to the desired location.
| |
Sorting Records
The Employees table is short enough that you can view all of its records on the screen at one time. But database tables, such as mailing lists, can contain several hundred or even several thousand records. When working with a large table, you will often want to sort the table by a particular field. Try this:
-
Click anywhere in the Last Name column, and then click the Sort Ascending button on the toolbar to sort the table by this field.
Access first sorts the table in ascending order numerically from the lowest digit, and then sorts from A to Z.
-
Click the Sort Descending button to sort the table by the same field in the reverse direction.
Access first sorts the table in descending order numerically from the highest digit, and then sorts from Z to A.
-
Restore the original order by clicking Remove Filter/Sort on the Records menu.
-
Close the Employees table, clicking Yes if asked whether to save your changes to the look of the table. Then close Access.
| |
To sort the records by more than one column, you must first arrange the columns so that they are side-by-side in the table in the order of the sort. For example, to sort a mailing list in ascending order by state and then by city, first move the State column to the left of the City column. Then select both columns, and click the Sort Ascending button. Access sorts the records first by state and then by city within each state. After the sort, you can move the State column back to its original location.
| |
EAN: N/A
Pages: 116