Creating and Using Slides
Three-dimensional graphics are often handy for presentations, and 3D AutoCAD images are frequently used for that purpose, as well as for producing drafted 2D drawings. You might want to show off some of your 3D work directly from the computer screen. However, if your drawings are complicated, your audience might get impatient waiting for the hidden lines to be removed. Fortunately, AutoCAD provides two commands that let you save a view from your screen in a form that will display quickly.
The Mslide and Vslide commands both save a view as a file on disk. Such a view is called a slide. You can display a slide any time you are in the AutoCAD drawing editor. Slides display at redraw speed, no matter how complex they are. This means you can save a slide of a hidden-line view of your 3D drawing and recall that view quickly at any time.
Slides can also be used for reference during editing sessions, instead of panning, zooming, or viewing. A slide cannot be edited, however; nor will it be updated when you edit the drawing.
Creating Slides
In the following exercise, you will make a few slides of the Unit file:
-
 Open the Unit file and click the Hide button on the Render toolbar or choose View Hide to get a hidden-line view of the unit.
 -
Type Mslide
 at the command prompt.
 -
In the File dialog box, click Save to accept the default filename, Unit.sld . (The default slide name is the same name as the current drawing, with the extension .sld.) The actual drawing file is not affected.
-
Zoom in to the bathroom, and use Mslide to save another view called Unitbath , this time without the hidden lines removed.
-
In the File dialog box, highlight the File input box at the bottom of the dialog box, enter Unitbath
, and click OK.
Viewing Slides
Now that you've saved two views, let's see how to view them:
-
Zoom back to the previous view and then type Vslide
. -
In the File dialog box, locate and select Unitbath.dwg and click Open to open the slide of the bathroom. You can move the cursor around the view and start commands in the normal way, but you cannot edit or obtain information from this slide.
-
Start Vslide again.
-
This time, click Open in the dialog box to accept the default slide filename, Unit . The 3D view of the unit appears with its hidden lines removed. Because slides display at redraw speed, you don't have to wait to view the unit without its hidden lines.
Tip Any command that performs a redraw also returns you to the current drawing.
-
Choose View Redraw to return to the drawing being edited.
-
Open the Plan file and use the Vslide command to view the Unitbath slide again. As you can see, you can call up the slide from any file, not just the one you were in when you created the slide.
-
Now create a slide of the Plan file and call it Plan1 .
Next , you'll get to see how you might automate a slide presentation using the slides you just created.
Automating a Slide Presentation
You can use Script (choose Tools Run Script) to run a sequence of commands automatically. Let's create a script file to automatically show the slides you made in the preceding exercise.
A script file is really nothing more than a list of "canned" AutoCAD commands and responses. In this example, you'll add the Delay command, whose sole function is to pause a script for a specific length of time:
-
Use a text editor such as Windows Notepad to create a file called Show.scr , and enter the following lines into this file, pressing
at the end of each line: vslide
unit
delay 3000
vslide
unitbath
delay 3000
vslide
Plan1These lines are a sequence of predetermined instructions to AutoCAD that can be played back later. When you later play this script file, each line is entered at the AutoCAD command prompt, just as you would enter it through the keyboard. Notice that the Vslide command is executed before each slide, which is then followed by the line delay 3000 , which tells Auto- CAD to pause roughly 3000 milliseconds after each Vslide command is issued (you can substitute another value if you like). If you don't specify a delay, the next slide displays as soon as the previous slide is completed.
-
Save this file in the same folder as your slide files.
-
Now try playing the script. Return to AutoCAD, and then choose Tools Run Script or enter Script
. -
In the Select Script File dialog box, highlight and pick the file you just created ( Show.scr ) from the file list, and then click OK.
The slides you saved will appear on the screen in the sequence in which you entered them in the Show.scr file.
You can also have the slides repeat continuously by adding the Rscript command at the very end of the Show.scr file. You might want to do this in a presentation intended for casual viewing, such as an exhibit in a display area with people passing through. To stop a repeating script, press the Backspace key.
Creating a Slide Library
You can group a set of related slide files together into one library file to help keep your slides organ- ized ”for example, by project or by drawing type. Slide libraries also save disk space, because they often require less space than the total consumed by the individual slide files.
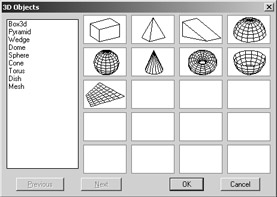
Slide files are also used to create custom dialog boxes that show sample views of objects. An example of such a dialog box is the 3D Objects dialog box, which is displayed when you choose Draw Surfaces 3D Surfaces.
The tool you use to create a slide library is the Slidelib.exe utility that comes with AutoCAD. This utility can be found in the AutoCAD 2005 folder. To create a slide library, follow these steps:
-
In a word processor, make a list of the slides you want to include in the library. For the slides you created earlier, this list would look like the following:
unit
unitbath
plan1Notice that you do not have to include the .sld extension in the filenames in your list.
-
Save this list as a plain-text file with an appropriate name. For this example, call it Slide1.lst . Be sure it is saved in the same folder as your slide files.
-
Locate the Slidelib.exe program; you should find it in the AutoCAD 2005 folder. Be sure your Slidelib.exe file is in the same folder as your slide list file and slide files.
-
Open a Windows command prompt window and go to your AutoCAD 2005 folder. You can open a Windows command prompt by selecting Start All Programs Accessories Command Prompt.
-
At the Windows command prompt, enter slidelib Myslides < slide1.lst
to create a file named Myslides.slb . The library name can be any legal DOS filename, but don't use filenames of more than eight characters , such as those allowed by Windows 95 and later versions. Also do not include the filename extension; the Slidelib utility program automatically adds the file extension .slb. For example, if you use Plans as the library name, a slide library file called Plans.slb is created. Warning LT users do not have access to Autolisp, so the method for viewing slide libraries described next will not work. You must instead use a script file.
ACAD only Now let's test your slide library. To view a slide from a slide library, you'll need to employ some Autolisp commmands. But don't worry, you just need to enter the Vslide command in a certain way at the command prompt:
-
At the AutoCAD command prompt, enter (command ² vslide ² )
. This is just a way of issuing the Vslide command through Autolisp. Enter it just as it is shown here, complete with parentheses and quotation marks. -
At the Enter Name of Slide File to view <C:\Documents and Settings\ User Name\ MyDocuments\Drawing1>: prompt, enter Myslides(plan1)
. (You might see a different filename and path listed between the angle brackets of the prompt.) Notice that the slide library name is specified followed by the individual slide name in parentheses. The slide appears in the drawing area.
The reason you issued the Vslide command through Autolisp is because it forces the Vslide command into a text-only mode. Otherwise, you would see the Vslide dialog box, which does not allow you to specify a slide from a slide library.
| Warning | If you placed the slide library file in a folder other than the current one, be sure to enter the folder name before the slide library name in step 2. |
To use slide libraries from a script, you use the Vslide command followed by the slide library and slide name, as in the following example:
vslide
myslides(unit)
delay 3000
vlside
myslides(unitbath)
delay 3000
vslide
myslides(plan1)
delay 3000
rscript
You've seen how to save and display 3D views quickly and how to automate a presentation of slides by using scripts. With these tools, you can create an impressive, fast-paced presentation.
EAN: 2147483647
Pages: 261