Selecting Exact Locations on Objects
One of the main reasons for using AutoCAD is to create accurate representations of your designs. And one of the most important tools you'll use to draw accurately is the object snap, or osnap. Osnaps allow you to select specific locations in your drawing as you draw or edit objects. For example, you can draw a new line from the exact endpoint of another using object snaps. Or you can quickly start or end a line from the exact center of an arc or circle.
These examples might sound trivial, but they reflect some of the most common activities you'll do in AutoCAD. Therefore, understanding osnaps is vital to using AutoCAD successfully.
Setting Up Osnap Locations
You can set up AutoCAD to automatically snap to endpoints, midpoints, and a variety of other locations on objects in your drawing. This exercise shows how this works:
-
Open a new AutoCAD drawing.
-
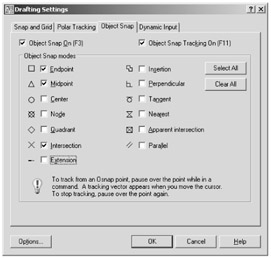
Choose Tools è Drafting Settings to open the Drafting Settings dialog box, and then select the Object Snap tab.
-
Click the Clear All button at the right of the dialog box to turn off any options that might be selected.
-
Click the Endpoint, Midpoint, and Intersection check boxes so that they contain a checkmark (see Figure 2.19).

Figure 2.19: Checking Endpoint, Midpoint, and Inter-section check boxes
Automatically Snapping to Locations
After setting up osnaps as in the previous example, you are ready to use them. You can turn on Osnap mode so that AutoCAD automatically selects the nearest osnap on an object as you approach the osnap location. This is called a running osnap. The following exercise shows how a running osnap works:
-
First turn on Osnap mode by clicking the Osnap button in the status bar.

-
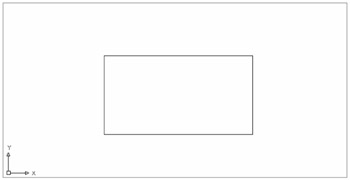
Click the Rectangle tool in the 2D Draw control panel, and then draw a rectangle in the drawing area about the size and location shown in Figure 2.20. You'll use this rectangle to test the osnap settings.
-
Start the Line command, and place the cursor at the lower-left corner of the rectangle, but don't click yet. Notice that the cursor snaps to the corner and that a square appears. Also, a ToolTip appears after a moment, showing you the name of the osnap that is active, Endpoint.
-
Click the mouse while the Endpoint osnap is displayed. The line is now fixed to the corner of the rectangle.
-
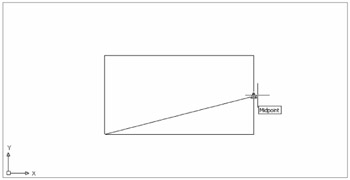
Move the cursor to the middle of the right side of the rectangle, as shown in Figure 2.21. The Midpoint osnap appears. This time you'll see a triangle that gives you immediate feedback as to which osnap is active. Leave the cursor there for a moment, and you'll see the Midpoint ToolTip.
-
Click the mouse while the Midpoint osnap is displayed. The line is now fixed between the lower-left corner and the midpoint of the right side.
-
Move the cursor to the upper-left corner, click when you see the Endpoint osnap marker, and then press ↲ to exit the Line command.

Figure 2.20: Draw this rectangle to practice using osnaps.

Figure 2.21: Using the Midpoint osnap
As you can see, osnaps let you quickly select a location on an object without too much intervention on your part.
When you see an Osnap marker on an object, press Tab to move to the next osnap point on the object. If you have several Running Osnap modes on (Endpoint, Midpoint, and Intersection, for example), pressing Tab cycles through those osnap points on the object. This feature can be especially useful in a crowded area of a drawing.
Selecting Osnaps on the Fly
As helpful as osnaps are, they can get in the way. In a crowded drawing, osnaps can cause you to accidentally select a point you don't want. In these situations, you can turn off Osnap mode. When you then need to select an osnap, you can do so from a Shift+right-click menu. This lets you be more selective in the osnap you choose. The following exercise shows how this method works:
-
If you don't already have a rectangle in the drawing, start a new drawing, and place a rectangle roughly in the middle of the drawing area.
-
Make sure the Osnap button in the status bar is in the off, or "up," position. If it isn't, click the Osnap button, or press F3.
-
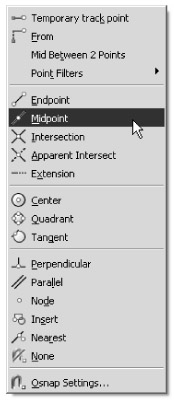
Click the Line tool, hold down the Shift key, and right-click. A menu appears at the cursor, displaying a list of osnap options (see Figure 2.22).
-
Select Midpoint, and then place the cursor near the midpoint of the line at the bottom of the rectangle. The Midpoint osnap marker appears.
-
Shift+right-click again, and select Endpoint from the shortcut menu.
-
Move the cursor to the upper-right endpoint of the rectangle. This time the Endpoint osnap marker appears.
-
Click the corner while the Endpoint osnap marker is still visible.
-
Press ↲ to exit the Line command.

Figure 2.22: Osnap options
If you accidentally select too many objects, you can remove them from your selection by holding down the Shift key and clicking the objects.
Understanding the Osnap Options
In the previous exercise, you made several of the osnap settings automatic so that they were available without having to select them from the Osnap shortcut menu. Another way to display the osnap options is to press their keyboard equivalents while selecting points or to Shift+right-click while selecting points to open the Osnap shortcut menu.
The following is a summary of all the Osnap options, including their keyboard shortcuts. You've already used many of these options in this chapter and in the previous chapter. Pay special attention to the options you haven't yet used in the exercises but might find useful to your style of work. The full name of each option is followed by its keyboard shortcut in brackets. To use these options, you can enter either the full name or the abbreviation at any point prompt. You can also select these options from the shortcut menu that is displayed when you Shift+right-click.
Sometimes you'll want one or more of these options available as the default selection. Remember that you can set running osnaps to be on at all times. Choose Tools è Drafting Settings to open the Drafting Settings dialog box, and then click the Object Snap tab. You can also right-click the Osnap button in the status bar and choose Settings from the shortcut menu.
Apparent Intersection [app] Selects the apparent intersection of two objects. This is useful when you want to select the intersection of two objects that do not actually intersect. You will be prompted to select the two objects.
Center [cen] Selects the center of an arc or a circle. You must click the arc or circle itself, not its apparent center.
Endpoint [end] Selects the endpoints of lines, polylines, arcs, curves, and 3D face vertices.
Extension [ext] Selects a point that is aligned with an imagined extension of a line. For example, you can select a point in space that is aligned with an existing line but is not actually on that line. To use that point, enter ext↲ during point selection or select Extension from the Osnap shortcut menu; then move the cursor to the line whose extension you want to use, and hold it there until you see a small, cross-shaped marker on the line. The cursor also displays a ToolTip with the word extension, letting you know that the Extension osnap is active.
From [fro] Selects a point relative to a selected point. For example, you can select a point that is 2 units to the left and 4 units above a circle's center. This option is usually used in conjunction with another osnap option, such as From Endpoint or From Midpoint.
Insertion [ins] Selects the insertion point of text, blocks, xrefs, and overlays.
Intersection [int] Selects the intersection of objects.
Midpoint [mid] Selects the midpoint of a line or an arc. In the case of a polyline, it selects the midpoint of the polyline segment.
Mid Between 2 Points [m2p] Selects a point midway between two points.
Nearest [nea] Selects a point on an object nearest the pick point.
Node [nod] Selects a point object.
None [non] Temporarily turns off running osnaps.
Osnap Settings [os] Opens the Object Snap tab of the Drafting Settings dialog box to allow you to make osnap setting changes.
Parallel [par] Lets you draw a line segment that is parallel to another existing line segment. To use this option, enter par↲ during point selection, or select Parallel from the Osnap shortcut menu; then move the cursor to the line that you want to be parallel to, and hold it there until you see the cross-shaped osnap marker on the line (you might have to move the cursor a bit to see the marker). The cursor also displays a ToolTip with the word Parallel, letting you know that the Parallel osnap is active.
Perpendicular [per] Lets you specify that an object should be perpendicular to another object. You can use this osnap for the start point of a line. The line will then be constrained to a perpendicular direction to the selected object.
Point Filters [.x, .y, .z, .xy, .xz, .yz] Opens an additional set of options that let you select just the X, Y, or Z coordinate of a point or a combination of any pair of these coordinates, such as X and Z or Y and Z. This feature is most useful when creating 3D models.
Quadrant [qua] Selects the nearest cardinal (north, south, east, or west) point on an arc or a circle.
Tangent [tan] Selects a point on an arc or a circle that represents the tangent from the last point selected.
Temporary Track Point [tt] Allows you to use the osnap tracking feature "on the fly." See "Using the Temporary Tracking Point Feature" later in this chapter.
Fine-Tuning the AutoSnap Feature
When you click the Options button on the Object Snap tab of the Drafting Settings dialog box, you'll see the Drafting tab of the Options dialog box. This tab provides options pertaining to the AutoSnap feature (see Table 2.4). AutoSnap looks at the location of your cursor during osnap selections and locates the osnap point nearest your cursor. AutoSnap then displays a graphic called a marker showing you the osnap point it has found. If it is the one you want, simply click to select it.
| OPTION | USE |
|---|---|
| | |
| Marker | Turns the graphic markers on or off |
| Magnet | Causes the Osnap cursor to "snap to" inferred osnap points |
| Display AutoSnap Tooltip | Turns the Osnap ToolTip on or off |
| Display AutoSnap Aperture Box | Turns the old-style osnap cursor box on or off |
| AutoSnap Marker Size | Controls the size of the graphic marker |
You can also get to this tab by choosing Tools è Options and then selecting the Drafting tab.