Assigning Named Plot Styles Directly to Layers and Objects
With color plot-style tables, you have to rely on the AutoCAD colors to control how objects are printed. But with named plot styles, you're not limited to object colors to control the way an object prints. Color plot styles are easier to manage for the beginning user, but if you're an advanced user or if you're used to a CAD program that allows you to control printing properties of each individual object, you'll want to know how to use named plot styles.
The instructions in the following sections require that your drawing is set up to use named plot styles. See "Choosing between Color and Named Plot-Style Tables" earlier in this chapter to learn how to set up new drawings for named plot styles. If you have an existing drawing that is set up for color plot styles, see "Converting a Drawing from Color Plot Styles to Named Plot Styles" later in this chapter to learn how to convert your drawing to use named plot styles.
Assigning Plot Styles to Objects
If you've set up AutoCAD to use named plot styles (see "Choosing between Color and Named Plot-Style Tables" earlier in this chapter), you can begin to assign plot styles to objects through the Properties palette. Here are the steps to take to assign plot styles to objects while in a layout tab:
-
Choose File è Page Setup Manager, and then click the Modify button.
-
In the Page Setup dialog box, select a named plot-style table from the drop-down list in the Plot Style Table group. Make sure the Display Plot Styles check box is selected, and then click OK.
-
Click Close to close the Page Setup Manager dialog box.
Once you've selected a named plot-style table, you can begin to apply plot styles to individual objects. Next make sure the plot styles will be displayed in the drawing:
-
Choose Format è Lineweight, make sure the Display Lineweight check box is selected, and click OK.
-
In the status bar at the bottom of the AutoCAD window, click the Paper button to switch to floating model space. This lets you select objects in the drawing while in a layout tab (see Figure 12.30).
-
Select the objects to which you want to assign a plot style, right-click, and choose Properties from the shortcut menu.
-
In the Properties palette, click the Plot Style option. The option turns into a drop-down list with a downward-pointing arrow to the far right (see Figure 12.31). Click the downward-pointing arrow, and then select Other from the list to open the Select Plot Style dialog box, as shown in Figure 12.32.
-
Select the name of the plot style you want to use, and click OK. Notice that the style you selected now appears as the value for the plot style in the Properties palette. Close the Properties palette.
-
Choose View è Regen All. If you have the line weight visibility turned on, you'll see the results in the drawing editor.
You can also assign a plot style to individual objects through the Plot Style Control drop-down list in the Properties palette.
-
Select the objects, and then select the plot style from the Plot Style Control drop-down list. If you're using a color plot-style table like the one you created in earlier exercises, the Plot Style Control drop-down list is unavailable.
![]()
Figure 12.30: The Model Or Paper Space button in the status bar
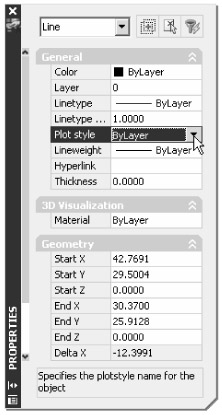
Figure 12.31: The Plot Style drop-down list in the Properties palette
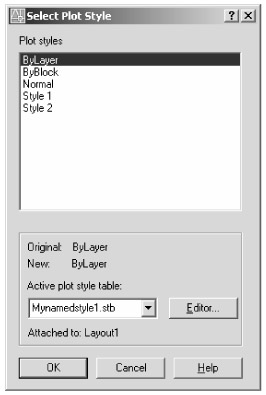
Figure 12.32: The Select Plot Style dialog box
Assigning Named Plot Style Tables to Layers
If you prefer, you can assign named plot styles to layers. This has a similar effect to using the color plot-style tables. The main difference is that with named plot-style tables, you assign the plot-style tables directly to the layer instead of assigning a plot style to the color of a layer. Here's how to assign a plot-style table to a layer:
-
Choose Format è Layer or click the Layer Properties Manager tool (shown in Figure 12.33) to open the Layer Properties Manager dialog box.
-
Select a layer or set of layers whose plot style you want to change.
-
Click Normal in the Plot Style column of the selected layers (see Figure 12.34). You might have to scroll to the right to see the Plot Style column. The Select Plot Style dialog box opens, as shown in Figure 12.35.
-
Select the plot style you want to assign to the layer or layers from the Plot Styles list, and then click OK. The Layer Properties Manager dialog box opens again.
-
Close the Layer Properties Manager dialog box, and then choose View è Regen All. Your view of the plan changes to reflect the new plot style assignment to the layers you modified.
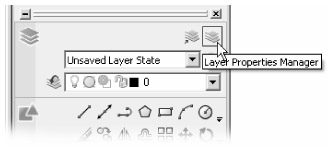
Figure 12.33: The Layer Properties Manager tool in the Layers control panel
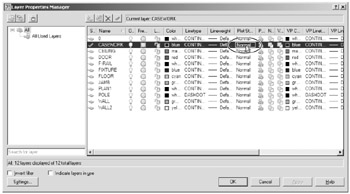
Figure 12.34: Click Normal in the Plot Style column of the selected layer.
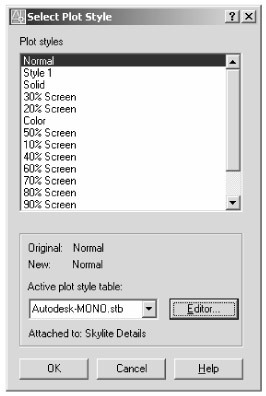
Figure 12.35: The Select Plot Style dialog box