| This section covers the steps needed to get your network up and running using an AP, and how to install a wireless network adapter. Note A wireless Access Point is a device that acts much like a switch in a wired network. Wireless clients send and receive data by sending it through the Access Point. The Access Point can also be connected to a wired network, and thus provide wireless clients to communicate with clients on the wired network. Contrast this with an ad-hoc network, where no Access Point is used. Instead, wireless clients in this type of small network simply establish direct links with each other.
Not all manufacturers use the same interface, or support the same functionality. However, this section will give you a good overview of a typical installation and configuration of an AP using the Linksys WRT54G Wi-Fi router. The steps are listed here: 1. | Turn off all devices that will be used in the wireless network, including your PC, and the cable or DSL modem. Do not connect the power cable to the Wireless-G router yet. Power off every device that will be connected to any of the four Ethernet ports on the router, as well as any PCs that are going to use a wireless network card.
| 2. | If you are going to use the router only for wireless data transfers, skip this step; otherwise you can connect any other PCs or network devices that are located near the router by connecting them to one of the four switch ports. Standard Category 5 UTP cabling is all that you need.
| 3. | Use the WAN port on the router to connect an Ethernet cable to your broadband connection (cable or DSL modem). Note that you should use only this port for connecting to the modem. The other four ports should be used only for connecting devices that do not make use of the router's wireless features.
| 4. | To configure the wireless router, you must use a wired connection because you have not yet configured the AP to use wireless networking, much less a client computer. This means you need to connect a computer to one of the four Ethernet ports to continue this configuration.
| 5. | Power on the devices in your network in the following order: first the cable or DSL modem, then the wireless router, and finally any PCs that are directly connected to the router.
| 6. | On the front panel of the router, check to see that the Internet Link and Activity LEDs are green. Note that when you first power up the router, the red Diag (diagnose) LED lights up for a short time while the router performs its diagnostic checks. If the red LED does not turn off, the router is experiencing some form of problem.
| | | 7. | Check the configuration for PCs that are connected to the wired switch ports to ensure that each is set up to automatically configure IP addressing information. This feature tells your computer to automatically obtain all necessary addressing information using DHCPthe Dynamic Host Configuration Protocol. For example, for Windows XP, select Start, Control Panel, and then in the Control Panel double-click on the Network Connections icon. In Figure 21.1 you can see an example of this showing a connection to a local area network (LAN). Remember that these steps, and those following, are for configuring the computers that connect via a cable to the switch ports that the wireless router provides. In the next section you will learn about how to use a wireless network adapter with the AP. One of the computers that uses a wired connection will also be used to configure the AP.
Figure 21.1. In Windows XP, the Network Connections window allows you to view and make modifications to your computer's network configuration. 
Note If you are using Windows 2000, use Start, Settings and then click on the Control Panel. Double-click on the Network and Dial-up Connections icon. Double-click on the LAN connection you want to use to connect to the router. Also, if you prefer the Category view of the Control Panel that is the default for Windows XP, you will have to use the menu this interface provides to get to the LAN connections window. From the Pick a Category menu, select Network and Internet Connections. The Pick a Task menu pops up, and you should select Network Connections, which appears at the bottom of the menu under the heading Or Pick a Control Panel Icon. Click on Network Connections. You then see the Network Connections window and can continue to configure your computer as described in these steps. | | | 8. | For Windows XP, right-click on the Local Area Connection icon to bring up the Properties dialog box for this connection. In Figure 21.2 you can see the General tab, which lists the protocols, services, and other network components used by this connection. If the Internet Protocol (TCP/IP) check box is not selected, click on the check box.
Figure 21.2. Make sure that the Internet Protocol (TCP/IP) check box is selected. 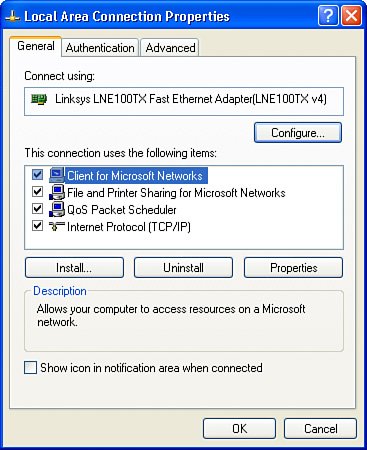
Tip If you have not yet set up a LAN connection, use the Create a New Connection option, located on the left side of the Network Connections window under the Network Tasks section for Windows XP. Windows 2000 users see an icon labeled Make a New Connection that can be used for the same purpose. A wizard walks you through the process step-by-step. | | | 9. | After the check box for TCP/IP has been selected, you can click once on the TCP/IP entry in the dialog box, and then click on the Properties button. The properties for the TCP/IP protocol pops up, as shown in Figure 21.3. If the radio button labeled Obtain an IP Address Automatically is not selected, click on it. Next click the OK button to dismiss the dialog box.
Figure 21.3. Select the radio button labeled Obtain an IP Address Automatically. 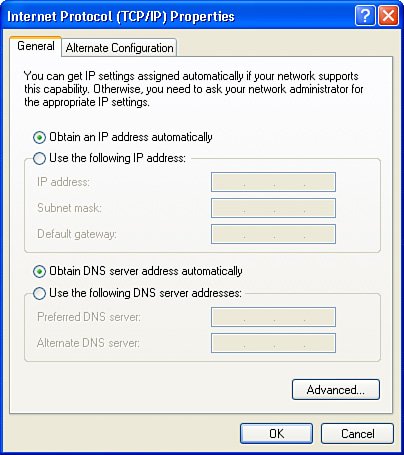
| | | 10. | If the TCP/IP properties dialog box has already been set up to use DHCP to automatically configure the IP information, simply click OK on the dialog boxes as you back out of the LAN configuration. This means your computer has already been set up to use DHCP. This is usually the case when you have a computer already connected directly to a cable/DSL modem. If you changed the configuration by choosing the automatic configuration option, any static addressing information entered previously is not used. Also, if you had to change the configuration to use DHCP, restart your computer.
|
After you have configured the PCs that are attached using cables to the ports on the router, you can configure the wireless access port. Keep in mind that you will need to use a wired connection in order to configure the AP because no wireless adapter has yet been configured! 1. | Using the PC that you just configured to use automatic addressing, launch an Internet browser (Internet Explorer, Netscape, Opera, and so on). Enter the URL necessary to work with your AP in your browser's Address field. (For example, the URL needed to work with my AP is http://192.16.0.1. Check the documentation of the AP you purchase to determine the addresses it uses.)
| 2. | A dialog box pops up asking you for a username and password. Because no username has yet been configured, use the default password. For this Linksys router, the username should be left blank, and the password is admin, in lowercase letters. Click the OK button.
| 3. | After you enter the default password, the PC establishes contact with the wireless router and displays a page similar to that shown in Figure 21.4.
Figure 21.4. The router sends an HTML page to the PC you are using to configure the wireless router. 
| | | 4. | If your ISP requires a hostname for your computer, enter it in the field shown in Figure 21.4. In many cases, you will not have to put anything in this field. However, the Domain Name field will probably need to be filled in. Note that the HTML page here is usually capable of obtaining the Domain Name information if you are connected to the Internet (via your ISP) during this configuration process. If you are not sure whether this info is required by your ISP, give them a call, or check any documentation they might have provided.
Tip You can get the hostname for your computer by entering the command hostname at the command prompt. Similarly, if the HTML page that the router displays on the computer you are using to configure the router does not display the domain name, use the ipconfig command from the command prompt to find out the hostname and domain name of your computer. Note that for many cable modems you can leave both of these fields blank. If you are not sure about these fields, check any documentation that was included when you established your broadband connection. As a last resort, you can always check with your ISP's technical support line. | 5. | The Internet Connection Type field shown in Figure 21.4 allows you to specify the method your ISP uses to connect you to the Internet. This information is based on protocols that your ISP uses. This field uses a drop-down menu to show you the options available. These are the most prominent:
- Automatic Configuration - DHCP This is most likely the case, as described previously, for most users.
- Static IP Although it is unlikely that an ISP will have enough IP addresses that are valid on the Internet to use static IP addresses for all customers, some business-class customers may be assigned a static address. If so, your ISP should give you the address, or as described in the preceding tip, you can use the ipconfig command to get this information.
- PPPoE This abbreviation stands for Point-to-Point Protocol over Ethernet. This protocol is generally used in buildings (such as hotels, office buildings, or apartment buildings) where more than one customer uses a broadband connection to connect to the Internet. Because an Internet connection is becoming more commonplace, and in many instances a necessary requirement for doing business, you can expect to see this protocol used more extensively over the next few years.
Tip PPP is a protocol that has traditionally been used for dial-up connections. Data that is usually sent through a PPP connection is instead placed into the data portion of an Ethernet frame. (See Chapter 13, "Ethernet: The Universal Standard.") PPPoE allows multiple users to use a LAN to access the broadband connection. PPP is just what it saysa point-to-point connection. That is, only two devices are part of the configuration: the dial-up modem and the modem at the ISP's end of the connection. Because Ethernet frames contain the IP address of the sender and recipient of the frame, this allows for multiple users to use the same connection, and the Ethernet frame is used to identify each individual user. The main reason this protocol is used is for identifying each individual using a single broadband connection. This allows the ISP to charge individual users according to their usage of the connection. - PPTP The Point-to-Point Tunneling Protocol provides the best of both worldsthe LAN and the WAN. Although this standard is mostly found in Europe at this time, it may become widely adopted in other parts of the world in a few years. This is because PPTP basically operates much like a VPN when it comes to a secure "tunnel" through the Internet. Companies that have more than one location can use PPTP (if offered by their ISPs at each location) to get a secure "tunnel" through the public Internet.
Recent firmware updates to the WR54T router add two additional connection options: L2TP (the Layer 2 Tunneling Protocol) provides support for VPN connections, and Telstra Cable supports unique features of the Telstra Cable broadband service available in Australia.
| | | 6. | Router IP/Local IP AddressThe router IP is the IP address your router uses on the local network. This information is provided automatically by your Internet connection if you selected Automatic Configuration-DHCP as the connection type in Step 5. You can also enter the IP address yourself if your connection uses a static IP address. In such cases, enter the IP address provided by your ISP.
| 7. | Network Address Server Settings/DHCPThis section of the dialog allows you to enable/disable the DHCP feature that the router provides. Unless you have a good reason to change this, do not change the default, which is to use DHCP to provide IP addresses to clients on the network. If you already have a DHCP server on your network such as those provided with Windows servers, Linux-based systems, and others, use this property sheet to disable the router's DHCP feature. It doesn't matter what device on your network is used for DHCP. If you are using another computer for this service, select the Disable option for DHCP Server. There are other features that can be configured here, such as the length of time a computer can use an IP address provided by DHCP before it has to be renewed, static DNS server names, and the IP address of the WINS server on your network (if any). Some systems also list a table of IP addresses that have already been leased to clients on this dialog. You can also configure the address range used by the router when it allocates addressing information to client computers.
The address ranges reserved for "private" networks by the Internet Engineering Task Force (IETF) are 10.0.0.0 to 10.255.255.255.255, 172.16.0.0 to 172.31.255.255, and 192.168.0.0 to 192.168.255.255.
These addresses are not valid on the Internet, but instead are used by Network Address Translation (NAT) to distinguish computers on your LAN from computers on the Internet that use valid IP addresses. You can specify a private address range here that the router-provided DHCP service will use. Keep in mind that it is a good idea to use an address range separate from the one used by your ISP. Although there is only a small chance that NAT will fail if you use the same address range, it's best to use one of the address ranges that the IETF has set aside for private networks. This particular router uses the 192.168.0.xxx range.
Tip If you have not configured a router before, you might prefer to save the changes you make on each screen before continuing. To save the current router configuration, click the Save Settings button shown on the bottom of Figure 21.4. Repeat on each screen after you make changes. If you only want to save your changes once, make sure you click Save Settings before you log out of your router configuration screen. Click Cancel Changes if you need to discard changes, or if you are merely viewing settings and have no intention of making any changes. | | | 8. | To continue configuring the router, click the Wireless tab shown in Figure 21.4. This displays the basic wireless network settings shown in Figure 21.5. The field labeled Mode enables you to select the bandwidth that the wireless router will use. You can select Mixed, which supports the earlier 802.11b protocol, or you can select G-Only as shown here, which gives you a faster network speed. G-only cannot be used if your wireless network contains both 802.11b and 802.11g clients. Or you can select Disabled to keep users from using the wireless AP. This is useful during maintenance times or if you want to shut off access for specific times, such as nighttime when no employees are using the network.
Figure 21.5. Configuring basic wireless network settings. 
| 9. | The SSID field is very important. This identifies your wireless network. You should change this from the default value to something that will not be easy to guess. Consider this a "password" that allows only the computers you want to use your network to establish a connection to the AP. Change this from the default or you will be subject to hackers (and they can usually pick up your signal from outside of your office/building). You should also be sure to select Disable for Wireless SSID Broadcast field because these signals can be picked up by hackers who use tools freely available on the Internet to locate wireless access zones. Record this information so you can use it to configure wireless clients.
| | | 10. | The Channel field allows you to use different frequencies. If you are having problems (such as a slow bandwidth), try changing this to a different channel. It may be that other APs are using the same channel, decreasing your bandwidth. Keep in mind that the only non-overlapping channels for 802.11g/b wireless networks are 1, 6, and 11.
Tip If you want to determine the channels used by nearby wireless networks, you can use the NetStumbler utility available from www.netstumbler.com. For best performance, choose a channel not used by other nearby networks. | | | 11. | To continue with wireless configuration, click the Wireless Security tab shown in Figure 21.5. This opens the Wireless Security dialog shown in Figure 21.6, which is used to configure how information being transmitted around the network is encrypted. If your router and adapters support WPA security, select WPA Pre-Shared Key from the Security Mode dialog. For best security, select TKIP (Key Integrity Protocol) as the WPA algorithm. This setting provides much greater security than the WEP security setting used on early Wi-Fi implementations.
Figure 21.6. Use this dialog box to configure the encryption security used by your wireless AP. 
Note WPA Pre-Shared Key with TKIP is also known as WPA2-Personal. If you use the less-secure AES encryption algorithm, this is also known as WPA-Personal. Use WPA-Personal only if some network adapters don't have support for WPA2-Personal. Use the older WEP encryption method only if some equipment doesn't support any level of WPA encryption. On a corporate network with a RADIUS authentication server, use WPA RADIUS. | 12. | In the WPA Shared Key dialog box you can specify the encryption key, which can be between 8 and 63 characters; longer keys, particularly if they are randomized alphanumeric text, are better. To avoid mistyping the key, type it into a text editor such as Notepad, copy it, and paste it into this field. The WPA Security Mode, WPA algorithm, and WPA Shared Key information need to be recorded so they can be used by each wireless client to connect to the router.
| 13. | To adjust how frequently the group key is re-encrypted, enter a time (in seconds) in the Group Key Renewal field. Various router versions have different defaults. A relatively short time (such as 900 seconds, shown here) can help enhance security. However, the length and randomness of the WPA Shared key (step 12) is more important than the Group Key Renewal time setting.
| 14. | After entering the WPA information, click Save Settings, and then close the browser window after the dialog box confirms your settings have been saved. That's all you need to do for a basic configuration.
|
Note In the preceding example, configuring the AP was done manually using a browser. With most APs there is a setup CD you can use to perform the same functions in a simpler manner. By using the manual method, however, you can see all the features you can configure. If you decide to make changes to the AP's configuration, you can use the manual method (via a browser) and use the appropriate property sheet to make changes.
There are other tabs on this properties sheet. Although it is not absolutely necessary to use the other tabs, it is important to know what you can accomplish using them. With the exception of the Security property sheet, in most circumstances you do not need to use these property sheets. The following list describes the functions that can be accomplished using the other property sheets: Setup This is the property sheet that has been described in the previous steps to initially set up the router. Administration This tab brings up the Management dialog box that allows you to configure several setup security items. For example, you can specify a password for the wireless router. This password is required in order to make changes to the router's configuration. It is not a password that is used for clients to connect to the AP. For this brand of router, the default password is admin. You should change this at once! Otherwise, someone familiar with this technology will probably have already obtained a list of default passwords for many types of wireless routers and other networking components. Change this password! You can also configure web and remote router access. Caution For any networking equipment (or any software) that requires a password for any type of access, you should always change the default password. Computer hackers can easily obtain default passwords for just about anything by searching the Internet. In addition, it is important to use passwords that are not easy to guess, such as words that can be found in a dictionary. Hackers can typically cross-reference standard terms found in a dictionary in a matter of minutes with programs available on the Internet. Ideally, you'll want to create passwords that are difficult to discover using a traditional dictionary attack. Chapter 42, "Basic Security Measures Every Network Administrator Needs to Know," can assist you in determining a password policy for your network.
Factory Defaults Click this tab in the Administration dialog to bring up an option to reset the router to its factory defaults. This will, of course, replace any other configuration information you have already set up. Use this if you are having problems and need to start over from scratch! Other Administration Options Other tabs in the Administration section of the router setup permit you to enable logging of incoming and outgoing traffic (Log), run network diagnostics such as Ping and Traceroute (Diagnostics), upgrade the firmware (Firmware Update), and backup or restore the configuration (Config Management). Tip It's a good idea to visit your router vendor's Web site (Linksys's site is located at www.linksys.com) to determine if you are running up-to-date firmware. However, you should update firmware only if necessary to add new features you really need or to fix bugs in the router's functionality. Linksys routers display the firmware version onscreen. For other routers, see the documentation to learn how to determine the firmware version.
Access Restrictions Use this dialog to control when the Internet will be available to users, which PCs on the network will be allowed (or denied) Internet access, which services will be denied or allowed, and what URLs or keywords will not be accessible (blocked). Applications and Gaming Use this dialog to forward traffic for particular games or other online applications to the correct PC (port forwarding), open a PC for complete access from the Internet (DMZ), configure Quality of Service (QoS) settings for various applications, or set up port triggering. Caution While time-consuming, it's much safer to use the Port Forwarding and Port Triggering dialogs to set up an online game or other application than it is to use the DMZ (demilitarized zone) option. Port Forwarding and Triggering allow only specified traffic to access the specified computer. The DMZ option, however, enables all Internet traffic to directly access the specified computer. When DMZ is enabled, the computer specified receives no protection against online threats from the router. Note that IP addresses are used to configure Port Forwarding, Port Triggering, and DMZ. To determine the IP address of a computer that needs these services, go to the computer and run a program such as IPConfig, WinIPCfg, or another utility that displays this information.
Status This property sheet lets the administrator view the current network configuration for the router. You can also use this property sheet to release or renew DHCP configuration data for the wireless router. This is not the IP address that the router can provide to clients on your network, but instead is the IP address the router may have obtained from your broadband provider. Help The router shown in Figures 21.46 displays help on the right side of each dialog. Click More to see more information. Some routers use a separate Help dialog instead. Tip You need Adobe Reader to view .PDF documents, such as the documentation provided on the setup CD supplied with many routers, or available online from the router vendor's Web site. Although the .PDF application that creates these documents is a product that must be purchased, the reader is free. You can download this application using the hyperlink in the Help tab, or visit the Web site www.adobe.com. This application is used for many vendors to produce documentation.
Note At this point you only need to configure one PC to use automatic IP addressing configuration. This PC will be used to configure the router, and you can then follow the instructions for wireless network interface cards. After you have configured the AP, you can proceed to configure the remaining client computers so that they can use the AP. This subject is discussed later in this chapter.
With your access point configured it's time to do the same for the client systems you want to use to access it. |