Testing JNDI Resource Configuration
Here you’ll work through an actual example and configure a DBCP data source with a Type IV JDBC driver. You’ll base your example on MySQL, as it’s easily available and widely used.
| Note | Installing and configuring MySQL is beyond the scope of this chapter, but see The Definitive Guide to MySQL, Second Edition (Apress, 2003), by Michael Kofler. |
This chapter will assume that you have MySQL already configured and tested and that you have an account with privileges to create tables and add records to create the test database. The latest version of MySQL is available for download from http://www.mysql.com.
The Type IV JDBC driver you’ll use is the Connector/J driver from MySQL. This driver is open source and is widely used by the MySQL community. You can download the latest version of the driver from http://dev.mysql.com/downloads/connector/j/3.0.html.
You must unzip the driver JAR from the download and use the binary JAR file. Place this file under CATALINA_HOME/common/lib so that the common class loader can make it available to Tomcat and all its Web applications.
Creating the MySQL Test Database
First, you’ll need to create the database you’ll use. This is a database of products available to buy online and will correspond to the database defined in Listings 10-2 previously.
Listing 10-3 shows a SQL script that will create and populate the catalog database. It’s unlikely you’ll have to create tables such as this normally, but it’s a useful instructional exercise.
Listing 10-3: The createCatalogDB.sql Script
DROP TABLE IF EXISTS product; CREATE TABLE product ( prodid int not null, prodname varchar(30), proddesc varchar(150), price double(7,2) ); INSERT INTO product VALUES ( 1, 'Yo-Yo', 'High-quality wooden yo-yo with your company name and logo imprinted on both sides.', 3.50 ); INSERT INTO product VALUES ( 2, 'Slinky', 'Plastic slinky in the color of your choice with your company logo imprinted on closed slinky.', 0.75 ); INSERT INTO product VALUES ( 3, 'Envelope Cutter', 'Small cutting tool for opening envelopes. Your company logo is imprinted on handle.', 1.25 ); INSERT INTO product VALUES ( 4, 'Padfolio', 'Synthetic leather padfolio with company name and logo imprinted on cover.', 9.50 ); INSERT INTO product VALUES ( 5, 'Fountain Pen', 'Attractive fountain pen sporting your company name on the cap.', 1.20 ); INSERT INTO product VALUES ( 6, 'Keychain', 'Rubber keychain with your company name and logo imprinted in a variety of colors.', 0.50 ); INSERT INTO product VALUES ( 7, 'Ruler', 'Wooden ruler with raised lettering containing your company name and logo.', 0.25 ); INSERT INTO product VALUES ( 8, 'Flashlight', 'Metal flashlight in a variety of colors. Your company name and logo is imprinted on the handle.', 5.0 );
Use createCatalogDB.sql to create the database as follows:
> mysql < createCatalogDB.sql
Now that you have the tables, you need to create a user that the developers will use to access the data in the database. Since your Web application functionality requires only read access to the data, you’ll create a read-only user for developer access. This will ensure that data can’t be accidentally or maliciously modified or altered.
Setting Up the Read-Only User
If you don’t have privilege as the database system administrator, you’ll need to seek help from the database administrator. To give a user read-only privilege on the catalog database, use the following:
mysql> GRANT SELECT ON catalog.* -> TO 'matthewm'@'localhost' -> IDENTIFIED BY 'm00die';
The developer may now use this user to access the data in the table, since in this example they won’t perform any modifications to the underlying data. This is the user you saw in Listings 10-2.
Adding the JDBC JNDI Resource to the Server
You saw the context XML file for this example in Listings 10-2, so now you have to configure the Web application’s settings. This is usually the developer’s job, but you’re filling both roles for this example. Remember that DBCP connection pooling is automatically set up. Now edit the tomcatBook Web application’s web.xml file, as shown in Listing 10-4.
Listing 10-4: A <resource-ref> in the tomcatBook Web Application’s web.xml
<!-- Describe a DataSource --> <resource-ref> <description> Resource reference to a factory for java.sql.Connection instances that may be used for talking to a particular database that is configured in the tomcatBook.xml file. </description> <res-ref-name> jdbc/CatalogDB </res-ref-name> <res-type> javax.sql.DataSource </res-type> <res-auth> SERVLET </res-auth> </resource-ref>
This <resource-ref> makes the jdbc/CatalogDB context, via JNDI APIs, available to the Web application.
Using JNDI to Look Up a Data Source
Finally, the developer will look up the data source and start querying the database. The JSP page in Listing 10-5, lookup.jsp, will do exactly that. Put it into the CATALINA_HOME/webapps/tomcatBook/ch10 directory. Pay special attention to the way JNDI is used to obtain the data source in the <sql:setDataSource> tag.
Listing 10-5: lookup.jsp Uses a Data Source to Obtain Data
<%@ taglib prefix="c" uri="http://java.sun.com/jstl/core_rt" %> <%@ taglib prefix="sql" uri="http://java.sun.com/jstl/sql_rt" %> <sql:setDataSource dataSource="jdbc/CatalogDB"/> <sql:query var="products"> SELECT * FROM product </sql:query> <html> <head> <title>Online Products</title> </head> <body> <center> <h1>Products</h1> </center> <table border="1" align="center"> <tr> <th>Name</th><th>Description</th><th>Price</th> </tr> <c:forEach items="${products.rows}" var="row"> <tr> <td><c:out value="${row.prodname}" /></td> <td><c:out value="${row.proddesc}" /></td> <td><c:out value="${row.price}" /></td> </tr> </c:forEach> </table> </body> </html> To run this example, you need to add the JSP standard tag library (from http://jakarta.apache.org/taglibs/) to the Web application’s classpath, either by placing jstl.jar and standard.jar in tomcatBook/WEB-INF/lib or in the common or shared class loader path.
The <sql:setDataSource> tag uses the jdbc/CatalogDB context to look up the JNDI resource and makes it available to the page. Behind the scenes, it’s used to create a connection (actually pooled through DBCP). The JSP page then performs a SELECT * on the product table and creates an HTML table containing all the table rows.
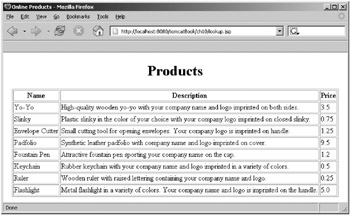
Connect to http://localhost:8080/tomcatBook/ch10/lookup.jsp. This will compile and execute the JSP code. If everything is configured correctly and working, you should see the page as shown in Figure 10-2.

Figure 10-2: A JSP page that uses a JDBC data source to obtain data
EAN: 2147483647
Pages: 94