Exposing a COM Object
|
|
When exposing an existing COM object as a Web service, we will encounter many of the same issues we did in exposing a Java class. We must determine which aspects we want to expose, what the interface for the Web service will be, and how to hand off the data between the listener and the responder. However, the platform and environment differences will present us with a few new options while eliminating others. The best way to address those is by going through the exercise of actually building a Web service.
| Note | This section is not just a rehash of the previous exercise using the Microsoft toolset. Even if you have a good understanding of all the concepts presented through that section, you should still read through this example because it addresses a few additional issues that concern the building of XML data and implementing security. |
The component we will be exposing is a weather component developed by SoftShell Solutions called S3Weather 2.0 (http://www.softshell.net/asp/cp/weather.asp). This component will accept a ZIP code and provide an assortment of weather information specific to that area. Although the details of how it works aren't important to us for this exercise, it retrieves data from the weather.com Web site.
Unlike the previous Web service, this will be a restricted-use service. We will allow only authorized consumers to access our service, which means that we will have to perform some type of authorization check on consumer requests in order to validate them. Otherwise, the service itself is very straightforward, and the effort will be very similar to the Java class.
As in the previous example, we need to go through a process of designing, building, and testing to implement our Web service. This will ensure that we have an end product that our consumers and ourselves are happy with.
Designing the Weather Web Service
Like our calculator Web service, the weather Web service will be very much a quick and direct exercise in exposing some functionality "as is." Just as we saw in our earlier example, though, this does not mean that the process is devoid of any design decisions. We must address these design concerns before moving on, or else we might end up having to redo work because we did not think through all of our issues.
The first design issue that we need to address before we can start building our Web service concerns the technologies that we will choose for exposing our Web service. The second is the interface we will define to communicate our service's functionality to consumers.
Choosing the Technology
The very nature of working with the Microsoft development platform makes many of our technology choices routine, if not predetermined. Although some people dislike the notion of a close-nit platform, it certainly lends itself to a consistent architecture and design. Nonetheless, some decisions need to be made or at least recognized.
Because we are again working with an existing component, I think it helps to provide a direction as to which decisions take the higher priority: development or infrastructure. Because we must run and maintain the existing COM object, our infrastructure must support that architecture.
Development Decisions
In the current Microsoft development environment, we can approach the interaction with this existing COM object in a few different ways. If we start at the listener and work our way back to the S3Weather component, we have two different approaches: ASP (Active Server Pages) and ISAPI (Internet Server Application Program Interface) extensions.
An ASP poses a quick solution to getting a listener for our Web service constructed very rapidly. However, the performance would not be the best. For optimum performance, we would need to develop an ISAPI extension because performance comes down to the multithreading capabilities of the extension versus ASP. This means that ISAPI extensions must be developed in C++, not Visual Basic. Using an ISAPI extension also places a restriction on what components you can expose as a Web service because it must also support ISAPI's threading model. Assuming both options are still available, the tradeoff here is that a more advanced skill set is necessary for ISAPI development than for ASP development.
| Note | If you are more familiar with the Java development platform, ASP is the equivalent of JSP and an ISAPI extension would be similar to a Java servlet. |
This does not mean that building an ASP listener for your Web services is not practical. In fact, because this Web service will have a restricted user base, our systems could have plenty of resources available for processing an ASP listener, so that is what I will choose. (Because I also want as many people as possible to follow along in the code and actually test these concepts, an ASP listener also makes sense!)
The next decision we need to make is what kind of middleware to use between our listener and the component. This middleware would essentially consist of the responder, with all the logic for extracting data from the request, making the call to S3Weather, and building the response. We could simply extend our ASP page to incorporate that functionality, or we could build a custom component that could serve as a wrapper to our object.
Because we don't have multiple instances of this service or plan on calling other services with this listener, we will simply extend the functionality within its page. This will make the listener and the responder one physical entity, but we will continue to treat them as separate logical entities to enforce our architecture.
Another option available to us is the language used within our ASP: we could choose either JScript or VBScript. VBScript is by far the more popular choice of ASP developers, so we will continue that trend here.
We will also use the Microsoft XML parser for our Web service. Several versions are available, which can be run side by side, so it is important to note the version you use. I want to take advantage of some of the newer functionality available, so we will utilize the parser available at this writing: version 4 technical preview. This will allow us to perform some validation against the very recent release of the final XML Schema specification. You can find all the available versions of the MSXML parser at http://msdn.microsoft.com/xml.
Infrastructure Decisions
As mentioned earlier, many of the infrastructure decisions are predetermined by the fact that we are using Microsoft's development platform. Of course, it all starts with Windows 2000 Advanced Server. We will also utilize IIS 5.0 as the Web server hosting our service. Likewise, any other services that we need will come from the Windows platform. I will mention other services as we walk through the design and identify a need for bringing them into the solution.
Defining the Security Model
Once the technology decisions are made, we need to define each of the three models for our Web service: presentation, interface, and security. This is done before the design because these high-level decisions will likely have an impact on our options and requirements. The first two are easy enough to resolve in this scenario because we will be providing no presentation information and our interface is a direct call. This was also true for our mortgage calculator service. However, unlike that Web service, we will need to define a security model.
Identifying the Pertinent Relationships
The security model for a Web service defines the relationship between the provider and their consumers and users. This means that the requirements for those relationships need to be well understood before a security model can even be discussed. For the purposes of this exercise, we have determined that we do not want an open, publicly available Web service. Thus, we must spend some time defining how we discern between those requests that are valid and those that are not. Given the fact that our user base is entirely dependent on the consumer, the identity of the user will have no significance.
After determining that we have a restricted consumer base for our Web service, the first thing we need to do is identify the criteria for legal consumers. Most applications will maintain qualification criteria based on the client's identity. When a request is made, that identity could be used to look up the status of the consumer or perhaps some financial accounts. Sometimes the identity itself is sufficient. This means that, if the consumer can be identified, they are considered legal and can make a request of the Web service. If there may be instances where consumers could be expired, this approach would likely not be appropriate.
For this scenario, we will want to identify consumers and be able to control their status. This means that some form of validation will need to occur with every request that is received. This validation ensures that the consumers have a current status that allows them to utilize the service. Keep in mind that this kind of functionality will have a performance cost against the service because every check will be an extra step that has to be performed. To help minimize this cost, we should try to utilize an efficient method for identifying the consumer.
Identifying the Consumer
The next issue, then, is how to identify the consumer. We could certainly use a cookie, URL, or HTML form data, but all of these things are not very well protected to ensure data integrity. If we are serious about this process, we need to choose a different method for verifying the identity of a consumer that cannot be compromised by the consumers themselves.
The most feasible solution currently available is certificates. This physical piece of code is supported by Internet standards to validate the identity of different systems and users. We use one component of this security infrastructure on a regular basis through the use of HTTPS. The secure sockets layer (SSL) uses server certificates to allow Web sites to identify themselves to users through their browser. This verification is taken one step further when organizations get their certificates through an independent, third-party organization like Verisign. With this validation, a user can trust that the provider is who they claim to be.
Our need of certificates further extends this usage by requiring that the clients provide proof of their identity to the provider. This is a less common implementation of certificates, but it is very appropriate for this particular case.
The follow-up decision that then needs to be made is what type of certificates to use. The certificates provided by third-party companies cost money, so we might scare consumers away if we require that they acquire them. Another option would be to set up our own CA (certificate authority). We could provide certificates to our consumers as needed free of charge. Of course, we are taking on more responsibility and maintenance of our Web service by doing this, so the decision should not be made lightly.
We will take this approach and host our own CA and service new consumers as they are brought on board. To support this, we will take advantage of Certificate Server, which is available with Windows 2000 Advanced Server. This will be a crucial component in the deployment of our Web service.
Designing the Interface
Now that we have defined the security model, we can move on to designing our interface. We now understand the effect our security model will have on our interface and logic (which is essentially none at all). It could have turned out that we needed to programmatically track the user as they use our service, but that was not the case. Nonetheless, it is much better for us to make that determination ahead of time to maximize our productivity in building our Web services.
| Note | It is important to realize that designing the interface is different from defining the interface model. Our model is actually predetermined by the fact that this is a static Web services call. The consumer will make a single request of us, and we will provide a single response.We would need to define an interface model if this was a workflow, as we will see in Chapter 8 ("Building a Web Service Workflow"), or a dynamic Web services call. |
The interface of our Web service will communicate with potential consumers what kind of information we are expecting and what information we will return to them. This consists of a couple of different steps because we are exposing an existing component. The first task is to analyze the component we are exposing as a Web service. Without this analysis, we have no idea what kind of information we could possible handle or deliver. We will then build the definition files for our interface which all interested parties can reference for communicating with us.
Analyzing the Existing Component
The existing S3Weather component will provide the outline for what our Web services interface will look like. We will not be adding any functionality to the component, so this will represent a maximum potential for what we can expose. Of course, we can always choose to not expose some functionality, and that determination will come from our analysis of the existing component.
The S3Weather component's class ID is S3Weather.Current. Its interface has only one method call, called GetWeather, which accepts a single string value representing the location. This service will be designed for U.S. use only, so we will use the most common location identifier, the postal ZIP code:
GetWeather(Location as String) as Integer
This call returns an integer with the value possibilities shown in Table 6-1.
| VALUE | DESCRIPTION |
|---|---|
| 0 | No error |
| 1 | No location entered |
| 2 | No content received from weather.com |
| 4 | Incorrect information entered (no match for code provided) |
| 64 | Internal error (check S3Debug property) |
The remaining portions of the public interface comprise a series of properties. Most of the pertinent properties are used only to retrieve the matching data, not to set it. This list of properties can be seen along with their type, access, and a brief description in Table 6-2. For a more complete understanding of this component, please reference the documentation provided on the SoftShell site.
| PROPERTY | DATA TYPE | ACCESS | DESCRIPTION |
|---|---|---|---|
| Barometer | String | Read-only | Current barometer information |
| BlockTracking | Boolean | Write-only | Allows SoftShell to track the component's usage |
| City | String | Read-Only | The city matching the ZIP code provided |
| Dewpoint | String | Read-only | Current dew point information |
| ErrorMessage | String | Read-only | Text message for troubleshooting external errors |
| FeelsLike | String | Read-only | Current temperature factoring wind, humidity, and so on |
| Forecast | String | Read-only | Current conditions information |
| Humidity | String | Read-only | Current humidity information |
| ImageID | String | Read-only | Image ID for map without the file extension |
| ImageSmall | String | Read-only | URL for small area map (277187) |
| ImageBig | String | Read-only | URL for large area map (720478) |
| ImageOldAnimated | String | Read-only | URL for animated icon showing current conditions |
| ImageOldTrans | String | Read-only | URL for daylight icon showing current conditions |
| ImageOldNight | String | Read-only | URL for night icon showing current conditions |
| NewVersion | String | Read-only | Will alert if a newer version exists (when tracking allowed) |
| Reported | String | Read-only | The time the conditions were last updated |
| S3Debug | String | Read-only | Text message for troubleshooting internal errors |
| State | String | Read-only | The state matching the ZIP code provided |
| Temperature | String | Read-only | Current temperature information |
| UserAgent | String | Write-only | User agent used in HTTP request |
| UVIndex | String | Read-only | Current UV index information |
| UVWarning | String | Read-only | Current UV warning information |
| Visibility | String | Read-only | Current visibility information |
| WeatherAlert | Boolean | Read-only | Returns TRUE when a weather alert for the area is in effect |
| Wind | String | Read-only | Current wind information |
Browsing through these properties, we obviously don't want to expose some to our consumers. We can probably determine right away that all the write-only values will be for our use only.
The next issue to determine is how to handle any errors that might occur. Certainly, we will want to provide a friendly message to the consumer when a failure does occur, but more than likely you will not want to expose the details to the consumer. Thus, we will not expose the S3Debug or ErrorMessage properties.
This leaves us with all the properties associated specifically to the weather information that consumers will be specifically interested in. Most of this is textual data, but five image paths can also be referenced. Two of them, ImageSmall and ImageBig, are maps showing the local weather patterns. The other three graphic paths (ImageOldAnimated, ImageOldTrans, and ImageOldNight) show graphical icons that represent the current weather conditions (for example, a cloud with a lightning bolt, a sun, and so on).
The documentation mentions that these icons might go away at some point. Regardless, a good case could be made for not using these graphics. You could argue that they are superfluous and that they don't provide any real value. At the very least, I would argue that, because such graphics aren't dynamic (like the weather maps are), a provider would be better off having their own icons to reference in conjunction with the conditions that are provided through the other properties. This is likely what the source site is doing, and this would give our Web service a little more control over the presentation data provided to our consumers.
Because we are trying to expose this functionality in a very quick and efficient manner, we will just omit those three graphic references entirely. This then leaves us with the following data elements we will expose through our Web service:
Barometer City Dewpoint FeelsLike Forecast Humidity ImageID ImageSmall ImageBig Reported State Temperature UVIndex UVWarning Visibility WeatherAlert Wind
This data would then consist of our response to the consumers. If we take into consideration the ZIP code information for our input, we have identified all the data that will be involved in our Web services interaction.
Building the Schema
Now that we know what kind of data our component will work with, we have an idea of what our options are. We still need to identify the elements outside of the component's own that we will want to either collect or expose from the consumer.
Although we have identified all the data we are passing to and receiving from the S3Weather component, we need to identify any other information that needs to be included. We have already mentioned an error message in case of failures. This would obviously be an optional element that is hopefully never used, but it needs to be accounted for nonetheless.
Another option for the response would be the inclusion of the parameter that was passed to us by the consumer. This is a good practice to use, especially when the request data is so minimal, as it is in this case. Including a parameter passed by the consumer effectively makes the request a subset of the response, which helps in streamlining our interaction schema.
However, the one distinction between this Web service interaction and the one for our mortgage calculator is that the data received and the data returned are distinctly different. For our calculator service, all values were treated as both input and output values. For this weather service, we are receiving one piece of information and returning potentially seventeen data elements. With the request and response being so different, it doesn't make sense to define one schema that defines the request and response as the same document.
This does not mean, however, that we necessarily need two different definition schemas. We could still have one schema that defines the entire interaction, but the request and the response could have different definitions within that schema. Let's first look at what the request schema might look at if that were all we had to concern ourselves with, as shown in Listing 6-15.
Listing 6-15: weatherCheck Request Schema
<xsd:schema xmlns:xsd=" http://www.w3.org/2000/10/XMLSchema" elementFormDefault=" qualified"> <xsd:element name=" weatherCheck"> <xsd:complexType> <xsd:sequence> <xsd:element name=" zipCode" type=" xsd:string"/> </xsd:sequence> </xsd:complexType> </xsd:element> </xsd:schema>
What we have done is create a root node called weatherCheck and placed within it the one node that is necessary for the request. Let's now take a look at the response (see Listing 6-16) as it would stand on its own as a valid document.
Listing 6-16: weatherCheck Response Schema
<xsd:schema xmlns:xsd=" http://www.w3.org/2000/10/XMLSchema" elementFormDefault=" qualified"> <xsd:element name=" weatherCheck"> <xsd:complexType> <xsd:sequence> <xsd:element name=" barometer" type=" xsd:string"/> <xsd:element name=" city" type=" xsd:string"/> <xsd:element name=" dewpoint" type=" xsd:decimal"/> <xsd:element name=" errorMessage" type=" xsd:string" minOccurs="0"/> <xsd:element name=" feelsLike" type=" xsd:string"/> <xsd:element name=" forecast" type=" xsd:string"/> <xsd:element name=" humidity" type=" xsd:string"/> <xsd:element name=" imageID" type=" xsd:string"/> <xsd:element name=" imageSmall" type=" xsd:uri"/> <xsd:element name=" imageBig" type=" xsd:uri"/> <xsd:element name=" reportedTime" type=" xsd:string"/> <xsd:element name=" state" type=" xsd:string"/> <xsd:element name=" temperature" type=" xsd:decimal"/> <xsd:element name=" uvIndex" type=" xsd:decimal"/> <xsd:element name=" uvWarning" type=" xsd:string"/> <xsd:element name=" visibility" type=" xsd:string"/> <xsd:element name=" weatherAlert" type=" xsd:boolean"/> <xsd:element name=" windDescription" type=" xsd:string"/> </xsd:sequence> </xsd:complexType> </xsd:element> </xsd:schema>
You see that, although the request has a very similar document structure to that of the response, there is a vast difference between their definitions. If all of the response elements were optional, we could easily turn this into a single document in which the request omits all the optional elements and the response utilizes them. However, if we want a more exact definition of the interaction, we would not want to take that approach.
A better approach in this case would be to take the response-specific data and place it in its own child element, and make that element optional—but all of the response data within it required. That way you have an "all or nothing" definition of the response data. To maintain this new approach, we will also separate the errorMessage element from the rest of the data so that it can be utilized independently. The assumption would be that you would have either an errorMessage or the data from the weather component, but that is not necessarily the case. This definition will allow us the flexibility to handle either situation regardless of the scenario.
If we call the response container node conditions, our interaction schema would look like Listing 6-17.
Listing 6-17: Weather Web service interaction schema
<xsd:schema xmlns:xsd=" http://www.w3.org/2000/10/XMLSchema" elementFormDefault=" qualified"> <xsd:element name=" weatherCheck"> <xsd:complexType> <xsd:sequence> <xsd:element name=" zipCode" type=" xsd:string"/> <xsd:element name=" errorMessage" type=" xsd:string" minOccurs="0"/> <xsd:element name=" conditions" minOccurs="0"> <xsd:complexType> <xsd:sequence> <xsd:element name=" barometer" type=" xsd: string"/> <xsd:element name=" city" type=" xsd:string"/> <xsd:element name=" dewpoint" type=" xsd: decimal"/> <xsd:element name=" feelsLike" type=" xsd: string"/> <xsd:element name=" forecast" type=" xsd: string"/> <xsd:element name=" humidity" type=" xsd: string"/> <xsd:element name=" imageID" type=" xsd:string"/> <xsd:element name=" imageSmall" type=" xsd:uri"/> <xsd:element name=" imageBig" type=" xsd:uri"/> <xsd:element name=" reportedTime" type=" xsd: string"/> <xsd:element name=" state" type=" xsd:string"/> <xsd:element name=" temperature" type=" xsd: decimal"/> <xsd:element name=" uvIndex" type=" xsd: decimal"/> <xsd:element name=" uvWarning" type=" xsd: string"/> <xsd:element name=" visibility" type=" xsd: string"/> <xsd:element name=" weatherAlert" type=" xsd: boolean"/> <xsd:element name=" windDescription" type=" xsd: string"/> </xsd:sequence> </xsd:complexType> </xsd:element> </xsd:sequence> </xsd:complexType> </xsd:element> </xsd:schema>
The nice thing about the sequence element is that it assumes by default that the maximum and minimum occurrences of a child element are one. This means that all we have to specify are the exceptions to that condition, which are the conditions and errorMessage elements.
Now that we have designed the interface for our Web service, we have completed the design process, which means that we've come to the build portion of the process.
Building the Web Service
As we saw in the previous example, the two key components to our Web service are the listener and the responder. Even though they will not be physically separate entities, we need to ensure that we have a clear distinction logically, so that we can be confident we are covering each of their responsibilities.
We will also consider each of these components a distinct milestone in the build process. After developing each, we will perform a unit test to make sure that the behavior follows our expectations.
Building the Listener
We will be building our listener as an ASP page hosted by our IIS service. Building ASP pages is simple, assuming that you are familiar with VBScript. (If not, you can pick up one of the many VBScript books available.) Writing an ASP page is not all that different from writing an HTML page, architecturally speaking, and the same development tools can often be used for both. For this example, I will be using Visual Interdev 6.0, a component of Microsoft's Visual Studio IDE. Just like HTML, though, an ASP page can be created using any text editor; you just won't have the assistance you get from a development tool.
Creating the Active Server Page
When you first open Visual Interdev, the New Project dialog box appears. I am not going to go into the details of the tool, so you can create a new project if you wish, but it is not necessary. Once you are ready, create a new ASP file by going to File|New File to display the New File dialog box, which gives you a few different file types to choose from. (See Figure 6-12.) Select the ASP Page and click on Open.
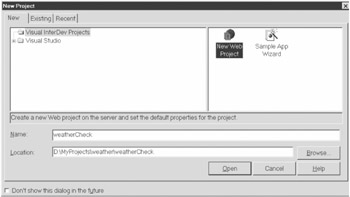
Figure 6-12: Visual Interdev New File dialog box
In creating a new ASP file, Visual Interdev will give you a shell for your page that should look like this:
<%@ Language=VBScript %> <HTML> <HEAD> <META NAME=" GENERATOR" Content=" Microsoft Visual Studio 6.0"> </HEAD> <BODY> <P> </P> </BODY> </HTML>
Because we will not be delivering HTML content through this page, go ahead and delete everything beneath the <%@ Language=VBScript %> tag. This then gives us the starting point we need for our listener.
Parsing the Request
The first task for our listener is to parse the request that comes in from the consumer. We will be using the MSXML 4.0 Technical Preview from Microsoft as our parser, so we will need to create an instance of it and load the request into it:
<% Dim objDOM set objDOM = server.createobject("msxml2.DOMDocument") objDOM.async = false objDOM.load(request) %> | Caution | Another ProgID that can be used for the MSXML parser is microsoft.xmldom, but this references an older version of the parser if installed in side-by-side mode. If you want to ensure on any system that you are using the latest version of the parser, you should use the msxml2.DOMDocument ProgID. |
As you can see, this is a fairly quick and easy process to perform using this parser. You see here that we are setting the async property of our DOM instance to False. This means that we are requiring that the DOM fully load the data before processing any other code. Without this setting, we might get a failure if code referencing the DOM executes before it is finished loading.
Validating the Data
The validation for the requests into this Web service can also be greatly simplified. Because we were potentially receiving a lot of data in our calculator service, we went with document-wide validation using the specified DTD. However, for this service, we are concerned with only a single data element within the request, the ZIP code. Anything else is entirely superficial and will be throwaway data to us.
This means we don't necessarily need to validate the entire request against a schema. Instead, we could try to reference just the node we are concerned with and handle any errors around our failure to do so. That means the request could contain a lot of other data making the request technically illegal, but we can save some processing resources by taking this approach. Keep in mind that, if we were dealing with even a handful of data, this manual validation approach would be much too inefficient to use.
To reference the appropriate node, we will utilize the selectsinglenode method of our DOM and specify the required path for the value. If that process fails, then we know we have an illegal request, and we will end the process right there with an error message and move on. Below is an example of the error handling for an invalid ZIP code value.
Dim strRequest strRequest = objDOM.selectsinglenode("weatherCheck/zipCode").text If strRequest = "" then errorText = "There was a problem with the data in your request. Please confirm the request against the XML Schema provided at http://www.fundamentalwebservices.com/interfaces/weather/ weatherCheck.xsd" response.Write("Error") Else response.Write("Success!") End If You'll see that we are setting the text for the error message, but we aren't actually writing it out at this point. That is the responsibility of the responder, so we will look at that process when we look at the responder in the next section. What I have done is add some debug output so that we can tell whether or not we were successfully able to reference the ZIP code data from the request.
Putting all of this together, we will end up with the entire listener for our Web service. (See Listing 6-18.) This file will need to be saved to a directory exposed by the IIS service so that it is accessible via HTTP. We will talk about this step in more detail in the "Deploying the Web Service" section.
Listing 6-18: Base Listener for Weather Web Service
<%@ Language=VBScript On Error Resume Next dim objDOM dim strRequest dim intResult dim errorText 'Create and load the DOM object for the request set objDOM = server.createobject("mxsml2.DOMDocument") objDOM.async = false objDOM.load(request) 'Extract the zipCode value from the DOM for the call strRequest = objDOM.selectsinglenode("weatherCheck/zipCode").text if strRequest = "" then errorText = "There was a problem with the data in your request. Please confirm the request against the XML Schema provided at http://www.fundamentalwebservices.com/interfaces/weather/ weatherCheck.xsd" response.Write("Error") else response.Write("Success!") End If %> This listener is suitable for receiving requests and confirming whether the request data is valid for your Web service. If you can host it via IIS already and have a test client available, this would be a good time to test the listener by sending it legal and illegal requests. (Again, we will discuss this whole process in more detail, including the building of a test client in the "Deploying the Web Service" section.)
We are now ready to move on to the building of the responder for our Web service. This is where the weather component is called and a response is built for the consumer.
Building the Responder
The responder takes the data from the request, calls any business logic, references any data sources, and builds the response document for the client. This may be an elaborate process or it may be a simple process, depending on the structure of the documents, the technology you are using, and the entities you are working with. In our Java Web service, our effort was redundant, but fairly simple. This service will be similar in scope, but it will require more of an effort to build the response (due to its slightly higher structure complexity) and less of an effort in extracting data from the request.
The first step within the responder is usually the extraction of the necessary data from the request. However, our listener already extracted the data for us through its validation process. The listener has captured this information in a local variable called strRequest, and so we will reference it directly in our call to S3Weather.
Calling the S3Weather Component
In calling our component, the only thing we need to be aware of is the value returned from its call. (See Listing 6-19.) If we are referencing the component correctly and it is properly installed on our system, any errors should be external to it, and it will communicate any such errors to us through this result code.
Listing 6-19: Calling the S3Weather Component
dim objS3W dim intResult intResult = objS3W.getWeather(strRequest) 'Check results to see if an error was generated from the call If intResult = 4 then errorText = "There was no data found for the code that was entered. Please check the code and try again." writeError(errorText) elseif intResult <> 0 then errorText = "There was a problem processing your request. Please try your request again later." writeError(errorText) else ...
The else condition from this code snippet triggers the building of the response based on the data available through the component's properties. We also see here the use of a writeError subprocedure. This will be used to write out any error that we might encounter during the process. Before we look at that, however, we need to discuss how we are going to generate the XML data returned to the consumer.
Building the Response
Once again, we can take one of a few different approaches in building the response for our Web service. These approaches vary widely from assembling a string from scratch to building a DOM from scratch to using a template to loading an entire data document. All these methods will achieve the exact same result, but the process for providing the actual data is very different, and each can have their own advantages and disadvantages.
The string assembly method is a straightforward approach of taking data and wrapping the appropriate strings around it to make the end result an XML document. If you are familiar with ASP, this approach is very similar to taking data from an ADO (ActiveX Data Objects) recordset and organizing it in an HTML table structure. You go about building the HTML to build the actual table and reference the appropriate data to fill in the cells. Building an XML string from scratch (using dynamic data) is very much the same approach. If we took that approach for this exercise, the building of our response would look much like Listing 6-20.
Listing 6-20: Writing the Response from Scratch
Response.ContentType = "text/xml" response.write "<?xml version=""1.0""?>" response.write "<weatherCheck>" response.write "<zipCode>" & strRequest & "</zipCode>" response.write "<conditions>" response.write "<barometer>" & objS3W.barometer & "</barometer>" response.write "<city>" & objS3W.city & "</city>" response.write "<dewpoint>" & objS3W.dewpoint & "</dewpoint>" response.write "<feelsLike>" & objS3W.feelslike & "</feelsLike>" response.write "<forecast>" & objS3W.forecast & "</forecast>" response.write "<humidity>" & objS3W.humidity & "</humidity>" response.write "<imageID>" & objS3W.imageid & "</imageID>" response.write "<imageSmall>" & objS3W.imagesmall & "</imageSmall>" response.write "<imageBig>" & objS3W.imagebig & "</imageBig>" response.write "<reportedTime>" & objS3W.reported & "</reportedTime>" response.write "<state>" & objS3W.state & "</state>" response.write "<temperature>" & objS3W.temperature & "</temperature>" response.write "<uvIndex>" & objS3W.uvindex & "</uvIndex>" response.write "<uvWarning>" & objS3W.uvwarning & "</uvWarning>" response.write "<visibility>" & objS3W.visibility & "</visibility>" response.write "<weatherAlert>" & objS3W.weatheralert & "</weatherAlert>" response.write "<windDescription>" & objS3W.wind & "</windDescription>" response.write "</conditions>" response.write "</weatherCheck>"
Although this gets the job done, it isn't the cleanest possible approach. It is actually impossible to programmatically verify that you are sending out valid XML. All you are creating is a string, so you have no validation methods available to you. Once you test the output to ensure it is legitimate, you should be fine as long as you don't have any changes, but getting there might be a little time consuming. I would recommend only using this method for building very small documents or document fragments. At the very least, you would want to leave yourself some extra time for testing if you took this approach.
Another approach that is somewhat similar is the building of a DOM from scratch or DOM assembly. This is actually the approach we took in building the calculator Web service; we used a validated structure to create the nodes and populated them with the appropriate data. The benefit to this approach is that we have a legitimate structure that we know can produce only well-formed XML. We could have even gone one step further by validating the data with our DTD, but that could be considered overkill given the circumstances.
The downside is that we are still creating the document structure over and over. It would be most appropriate to use this method when the response document is dynamic in nature. By building the document dynamically, you can account for only the data that needs to be returned.
The next approach we will look at is using a template. This is a great approach when defining the same document structure repeatedly, but with dynamic data elements. This template would serve as a skeleton that simply needs to be loaded into a DOM and the values populated. A template for the response for our weather Web service would look like Listing 6-21.
Listing 6-21: Response Template
<?xml version="1.0"?> <weatherCheck> <zipCode/> <conditions> <barometer/> <city/> <dewpoint/> <feelsLike/> <forecast/> <humidity/> <imageID/> <imageSmall/> <imageBig/> <reportedTime/> <state/> <temperature/> <uvIndex/> <uvWarning/> <visibility/> <weatherAlert/> <windDescription/> </conditions> </weatherCheck>
One of the benefits with this approach is that you don't have to spend the processing time to build each node independently. This saves cycles, which improves the overall performance of the service. The other benefit of this approach is that you can be guaranteed that you have the correct document structure for a valid response document. This just helps to ensure the integrity of your service without needing extra validation.
Like the string assembly method, the exercise of populating the data in the template is fairly simple. In fact, it is even more direct because we don't have to build all the filler information (start tags, end tags, and so on). For our weather service, we just identify the nodes and set their values to the appropriate data from our component's properties. (See Listing 6-22.)
Listing 6-22: Building the Response from a Template
objdom.selectsinglenode("weatherCheck/zipCode").text = strRequest objdom.selectsinglenode("weatherCheck/conditions/barometer").text = objS3W.Barometer objdom.selectsinglenode("weatherCheck/conditions/city").text = objS3W.City objdom.selectsinglenode("weatherCheck/conditions/dewpoint").text = objS3W.Dewpoint objdom.selectsinglenode("weatherCheck/conditions/feelsLike").text = objS3W.FeelsLike objdom.selectsinglenode("weatherCheck/conditions/forecast").text = objS3W.Forecast objdom.selectsinglenode("weatherCheck/conditions/humidity").text = objS3W.Humidity objdom.selectsinglenode("weatherCheck/conditions/imageID").text = objS3W.ImageID objdom.selectsinglenode("weatherCheck/conditions/imageSmall").text = objS3W.ImageSmall objdom.selectsinglenode("weatherCheck/conditions/imageBig").text = objS3W.ImageBig objdom.selectsinglenode("weatherCheck/conditions/reportedTime").text = objS3W.Reported objdom.selectsinglenode("weatherCheck/conditions/state").text = objS3W.State objdom.selectsinglenode("weatherCheck/conditions/temperature").text = objS3W.Temperature objdom.selectsinglenode("weatherCheck/conditions/uvIndex").text = objS3W.uvindex objdom.selectsinglenode("weatherCheck/conditions/uvWarning").text = objS3W.uvwarning objdom.selectsinglenode("weatherCheck/conditions/visibility").text = objS3W.Visibility objdom.selectsinglenode("weatherCheck/conditions/weatherAlert").text = objS3W.WeatherAlert objdom.selectsinglenode("weatherCheck/conditions/windDescription").text = objS3W.Wind response.write objdom.xml After setting all the values for the nodes in the document, we use the xml method to output the result string from the DOM structure. This method would gain even more efficiencies if the template were preloaded in a DOM structure so that the overhead of retrieving the document from an external data source isn't incurred on every request. This also would help to insulate the service from external problems with the data source that may keep the template from being available.
The last approach we will discuss is the direct document load. This is when an entire document is loaded from an external data source, perhaps a file, database, or in memory. This is a very effective method when working with the same document structure and static data. It can also be a very efficient process if the document is stored locally once it is referenced and has maximum reusability.
These four methods we have discussed, along with their high-level benefits and shortcomings, are captured for you in Table 6-3. As you can see, different approaches can be very useful and effective in different scenarios. In some situations, a blending of two or more of these approaches would also be appropriate. We will see examples of this in the next chapter.
| METHOD | BENEFITS | SHORTCOMINGS | APPROPRIATE FOR... |
|---|---|---|---|
| String Assembly | Easy to develop; very dynamic | Slower performance; prone to errors | Individual elements and very small dynamic documents |
| DOM Assembly | Guaranteed well-formedness; can be validated; very dynamic | Processor-intensive; low reusability | Larger documents of dynamic structure |
| Template | Very efficient; high reusability; high reliability | Dependency on external data source | Consistent data structures containing dynamic data |
| Direct Load | Maximum reusability; high dependability containing | Dependency on external data source | Consistent documents static data |
For our weather Web service, we will continue down the template approach for building our response. As I mentioned, this method would gain even more benefit if the template were preloaded into a DOM structure to reduce the input/output (I/O) overhead on every request.
This can be done very easily with a feature of the MSXML parser called a free-threaded document. This is an instance of the DOM that can support multiple simultaneous accesses, which would be necessary for a shared resource. We will use the FreeThreadedDOMDocument class from the parser to accomplish this.
As most ASP developers are aware, the Application_OnStart procedure in the global.asa file runs every time that a Web application starts for the first time on a system. It is in this routine that we will place the necessary code to load the template into the free-threaded DOM object and load it into an application variable. (See Listing 6-23.) Because the object is free-threaded and will never need to be written to, only read, it is safe to do this.
Listing 6-23: Global.asa Code for Caching the Response Template
Sub Application_OnStart Dim objRT set objRT = server.createobject("Msxml2.FreeThreadedDOMDocument") objRT.async = false objRT.load Server.MapPath("reponseTemplate.xml") Application("responseTemplate") = objRT End Sub If we now put the whole ASP page together, incorporating the listener and the responder, we should end up with the code in Listing 6-24.
Listing 6-24: Final ASP Page for Weather Web Service
<%@ Language=VBScript On Error Resume Next dim objS3W dim objDOM dim strRequest dim intResult dim errorText 'Create the Weather component set objS3W = Server.CreateObject("S3Weather.Current") 'Create and load the DOM object for the request set objDOM = server.createobject("mxsml2.DOMDocument") objDOM.async = false objDOM.load(request) 'Extract the zipCode value from the DOM for the call from the application 'variable strRequest = objDOM.selectsinglenode("weatherCheck/zipCode").text If strRequest = "" then errorText = "There was a problem with the data in your request. Please confirm the request against the XML Schema provided at http://www.fundamentalwebservices.com/interfaces/weather/ weatherCheck.xsd" writeError(errorText) else intResult = objS3W.getWeather(strRequest) 'Check results to see if an error was generated from the call If intResult = 4 then errorText = "There was no data found for the code that was entered. Please check the code and try again." writeError(errorText) ElseIf intResult <> 0 then errorText = "There was a problem processing your request. Please try your request again later." writeError(errorText) Else 'Load the template for the response DOM set objDOM = Application("responseTemplate") Response.ContentType = "text/xml" if err.number=0 then 'Build the response through a DOM instance objdom.selectsinglenode("weatherCheck/zipCode").text = strRequest objdom.selectsinglenode("weatherCheck/conditions/barometer").text = objS3W.Barometer objdom.selectsinglenode("weatherCheck/conditions/city").text = objS3W.City objdom.selectsinglenode("weatherCheck/conditions/dewpoint").text = objS3W.Dewpoint objdom.selectsinglenode("weatherCheck/conditions/feelsLike").text = objS3W.FeelsLike objdom.selectsinglenode("weatherCheck/conditions/forecast").text = objS3W.Forecast objdom.selectsinglenode("weatherCheck/conditions/humidity").text = objS3W.Humidity objdom.selectsinglenode("weatherCheck/conditions/imageID").text = objS3W.ImageID objdom.selectsinglenode("weatherCheck/conditions/imageSmall") .text = objS3W.ImageSmall objdom.selectsinglenode("weatherCheck/conditions/imageBig").text = objS3W.ImageBig objdom.selectsinglenode("weatherCheck/conditions/reportedTime") .text = objS3W.Reported objdom.selectsinglenode("weatherCheck/conditions/state").text = objS3W.State objdom.selectsinglenode("weatherCheck/conditions/temperature") .text = objS3W.Temperature objdom.selectsinglenode("weatherCheck/conditions/uvIndex").text = objS3W.UVIndex objdom.selectsinglenode("weatherCheck/conditions/uvWarning") .text = objS3W.UVWarning objdom.selectsinglenode("weatherCheck/conditions/visibility") .text = objS3W.Visibility objdom.selectsinglenode("weatherCheck/conditions/weatherAlert") .text = objS3W.WeatherAlert objdom.selectsinglenode("weatherCheck/conditions/windDescription") . text = objS3W.Wind 'Extract the string from the DOM to the Response Response.write objDOM.xml else errorText = "The service could not load the response template." WriteError(errorText) End If End If End If set objDOM = nothing set objS3W = nothing Sub writeError() Response.write "<?xml version=""1.0""?>" Response.write "<weatherCheck><zipCode>" & strRequest & "</zipCode><errorMessage>" & errorText & "</errorMessage></weatherCheck>" End Sub %>
Deploying the Web Service
Now that we have completed the coding for the Web service, we need to deploy it. The deployment of this service should be slightly less complex than the calculator Web service just because of the nature of the platform. However, we do have the additional responsibility of setting up the certificates to support our security model, so there will be approximately the same level of effort involved.
Along with the certificates, we need to establish the site for our service, deploy the S3Weather component, and test the service once it is integrated. This will require a test client, which we will build for just that purpose.
Deploying the S3Weather Component
For our Web service to work at all, we must, of course, have the component we are exposing available on the system. This component must be installed on the server using the regsvr32.exe utility that comes with the Windows 2000 operating system.
To use this utility, you must first copy the DLL file wherever you want it to be hosted from on your physical drive. Then, you can either use the Run dialog or open a Command Prompt window to type in the command with the full file path and the name of the DLL file. Following is an example of how the full command might look:
regsvr32 c:/windows/system32/s3weather.dll
The component also claims to support COM+, so you could deploy it ina package via the COM+ Explorer. This would be the equivalent to WebSphere for our Java class, except it is not a requirement on the Windows 2000 platform for COM objects.
Now that we have taken care of our component one way or another, we are ready to create the site that will host our Web service exposing this component.
Establishing the Site
The first step to deploying the Web service is designating a home for it. With IIS 5.0, this is a very easy step that shouldn't take too much effort. By now, you presumably have been saving your ASP page somewhere. If it isn't in the physical location where you want it to reside, you will want to move it there. It will be helpful to at least have the physical directory created for when we create our new virtual directory (so that it can be specified). We will also need to create the Web application where it will reside. This will provide our service with its own memory space and insulate it from other activities on the Web server.
To create the Web application, we need to first open the IIS administrator console by going to Start|Programs|Administrative Tools|Internet Services Manager on your Windows 2000 system. If this tool does not exist, you have not installed the IIS service on your system. You will need to go back and add that component through your Windows 2000 setup. Please refer to your system documentation for further details.
Once the Internet Services Manager starts, you should see your server listed in the left-hand pane. (See Figure 6-13.) In the tree underneath it, you will see a listing for the default Web site. Right-click on that item and select New|Virtual Directory.
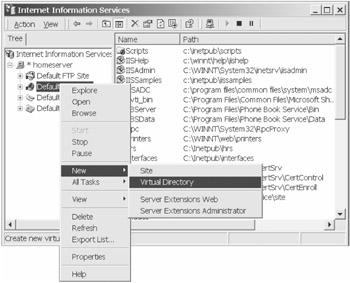
Figure 6-13: Internet Services Manager console
This starts the Virtual Directory Creation wizard. Click on Next on the initial splash screen to proceed to the Virtual Directory Alias screen. (See Figure 6-14.) This is where you enter the alias that you'll use to reference the path containing your Web service.

Figure 6-14: Virtual Directory Alias screen
After selecting Next, you come to the Web Site Content Directory screen (Figure 6-15), which is where you specify the physical directory path on your system where the files for your site will be contained. If the directory you want to use is not created yet, you will need to create it before continuing. Otherwise, you can select a different directory and change it later, once the virtual directory is created.
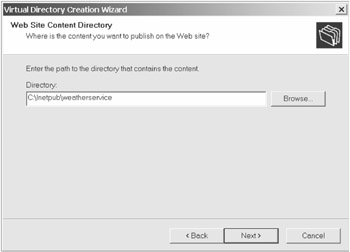
Figure 6-15: Web Site Content Directory screen
After entering the directory and clicking on Next, you come to the Access Permissions screen, which is where you specify the activities that a user can perform within this Web site. If we had used an ISAPI extension for our listener, we would need to add Execute permissions here. Because we are using an ASP script, we can leave this screen with its defaults and click on Next.
Doing so takes us to the final confirmation screen where we can click on Finish to complete the wizard and this process. By default, IIS 5.0 adds new virtual directories to a pool of applications outside of IIS's processes, making it a Web application.
| Note | For simplicity's sake, I chose to create a virtual directory to host this Web service, but we could have just as easily created a unique Web site, or hosted it directly under the default Web site. Feel free to select any of these options for your own implementations.You can find more information on each of these in your IIS documentation. |
If your ASP file doesn't reside in our application's directory path, you should move it there now. Once that is complete, we should be able to test our new application by opening a browser and entering the address of our local system, the alias we specified, and the name of our ASP file. If you followed along exactly, the path is http://localhost/weatherWS/default.asp. Otherwise, the path consists of whatever values you selected, which is perfectly acceptable.
Of course, calling the Web service from our browser should produce an error because we are not submitting a legal request. A legal request consists of an XML document containing the ZIP code we wish to look up. To do this, we will need a test client.
Testing the Web Service
To test our Web service, we need to have the Web service completed and running, but we also need to create a test client that can submit an XML document over an HTTP(S) request to our listener. The easiest way to do this is to throw together a VB application that can provide this functionality for us. (This will also give us a brief preview of how we could consume our Web service, which I will cover in Chapter 8.) Using VB, it will be quicker and easier than other alternatives, and we don't need to concern ourselves with design or performance issues.
This task is actually made even easier by the MSXML parser we used within our Web service. We will be able to utilize functionality within our client to also make the request of our Web service. Let's see how this is done.
First, we need to create a simple VB executable and create a form with a text box and a single button. We will use the text box to display the request results and the button to send the request. We also have to add the MSXML 4.0 reference to our application to utilize the parser.
Behind the button, we will have all the processing to make the request. First, we will reference an external document as the request to be made. We then load this in much the same manner that we loaded the template in our service, but we won't concern ourselves with caching it. Once the document is loaded, we need to create an instance of the ServerXMLHTTP40 class to serve as our communication link to the Web service. We will specify in its open method that we are making a POST request and the URL we want to send the request to. The send method will specify the data to send, which is the XML output of our DOM. Then, we capture the response in a local string variable using the responseText method and display it through our text box. All together, the code behind our button procedure should look similar to Listing 6-25.
Listing 6-25: Visual Basic Test Client for weatherWS
Private Sub Command1_Click() Dim objXMLDoc As MSXML2.DOMDocument40 Dim objXMLSend As MSXML2.ServerXMLHTTP40 Dim currNode As String Dim strServiceURL As String Set objXMLDoc = New DOMDocument40 Set objXMLSend = New MSXML2.ServerXMLHTTP40 strServiceURL = "http://localhost/weather/default.asp" objXMLDoc.async = False Text1.Text = "————————-Calling Weather Checker——————————" boolTest = objXMLDoc.Load("http://localhost/weather/sampleRequest.xml") If boolTest Then objXMLSend.open "POST", strServiceURL, False objXMLSend.send (objXMLDoc.xml) currNode = objXMLSend.responseText objXMLDoc.loadXML (currNode) Text13.Text = Text13.Text & currNode Else Text1.Text = "error in load" End If End Sub The sample request that we will want to send should look something like this:
<?xml version="1.0" encoding=" UTF-8"?> <weatherCheck> <zipCode>90210</zipCode> </weatherCheck>
Of course, the sample request can be altered to be invalid or to provide different data to thoroughly test your Web service's behavior. Doing so is critical to ensure that your consumers don't have difficulty in using your service. Just as with a Web site that is too slow or generates errors, users get turned off very quickly and are even more hesitant to ever come back, so make sure that, when you are ready to expose your Web service, you are truly ready.
Although we have a fully functional Web service at this point, we have failed to meet one very large requirement that we identified at the beginning of this chapter: we must restrict access to only valid consumers through the use of certificates.
Implementing Certificate Security
Although many Web developers are familiar with server certificates, client certificates are something that most applications have either not required or not exploited. Some of this is due to the unawareness of architects and developers in this area. Server certificates have always been treated as almost a black box and that hasn't helped develop an understanding of its inner workings by even its implementers. An administrator generates a key, sends off for a certificate, installs it when it arrives, and—presto!—the server now supports HTTPS. The latest version of Certificate Server by Microsoft may help in this area for at least the designers and administrators of that platform by making client certificates as easy to use and implement as server certificates.
With the Windows 2000 Advanced Server release has come a very slick enhancement of the original Certificate Server that came with Windows NT 4.0. It makes certificate management and deployment much easier. Keep in mind that we will be maintaining our own certificate authority so that consumers can simply come to us for the certificate, and that way we won't require consumers to spend money on the certificates.
To get started, you need to install the certificate authority on the Windows 2000 system that will be responsible for managing certificates. Its presence can be verified by checking Start|Programs|Administrative Tools|Certification Authority. If that management tool is present, then certificate server is installed. This service is a component of the Windows 2000 Advanced Server operating system, so you can go to the Add/Remove Programs utility on your system's control panel to install this feature. Please refer to your system documentation for further details.
Requesting Consumer Certificates
Once the Certification Authority is installed, your Web server will have a new site established at http://localhost/certsrv. This is the application that all of your consumers will use to make certificate requests of your certificate authority except they will need to use your domain name in lieu of "localhost." (See Figure 6-16.) It will be helpful if the consumer is actually on the system that he or she will use to connect to our Web service. Certificates can get very picky when they start moving across systems, and it makes this process much easier if it is run from the system with which they intend to access the Web service.

Figure 6-16: Certificate Authority Web site
Your consumers will start by selecting the Request a Certificate option and selecting Next. This brings up the Request Type screen in which the consumer specifies the Web Browser Certificate. (See Figure 6-17.) It is a little misleading calling it a "Web browser Certificate" because it is actually a client certificate that could be used by any client over HTTP/S.
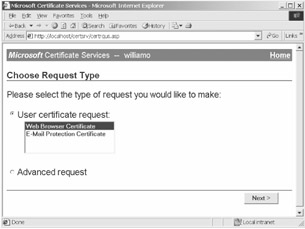
Figure 6-17: Request Certificate Type screen
Selecting Next then displays the Identifying Information screen (Figure 6-18). This is where the consumer will enter all the pertinent data about themselves to aid in establishing their identity.
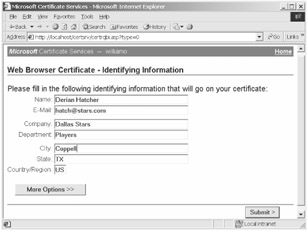
Figure 6-18: Identifying Information screen
Completing this information and submitting it will then bring the consumer to the pending window. (See Figure 6-19.) As the screen indicates, the consumer will need to come back after the authority makes a determination on their request. At this point, they have completed the process of requesting a certificate, and it is now up to the provider to disposition it.
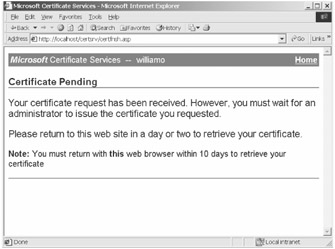
Figure 6-19: Pending Certificate Request screen
Managing Certificate Requests
The Certification Authority has an interface for helping the certificate manager to manage the authority's certificates. This is accessed by clicking on Start|Programs|Administrative Tools|Certification Authority, which opens the console for issuing, denying, and revoking certificates. For now, we are concerned with handling the certificate requests coming in, like the one we just submitted.
To see all of the pending requests, we need to simply click on the Pending Requests folder in the left-hand pane. We should then see in the right-hand pane any requests that have yet to be dispositioned (Figure 6-20). We can scroll horizontally to see all of the information that was entered by the requestor.
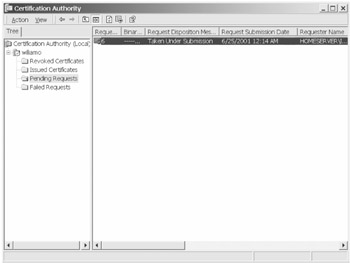
Figure 6-20: Viewing the pending certificate requests
If this were a production senario, we might need to contact the consumer to ensure the authenticity of the request and the person making it. We can then choose to either issue or deny the request by right-clicking on the particular request. (See Figure 6-21.)
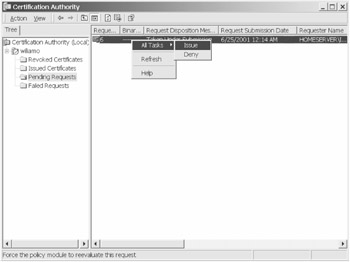
Figure 6-21: Issuing a certificate request
We will choose to issue this certificate, which should send it over to the Issued Certificates folder. (See Figure 6-22.) Once in this state, the only option available to us is to revoke the certificate. This might be done if a partnership expired or if a consumer was found to be negligent in their use of the Web service.
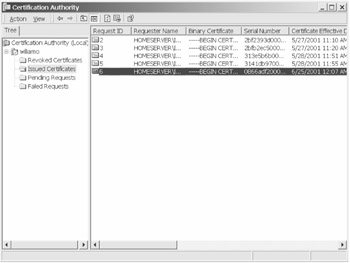
Figure 6-22: Viewing issued certificates
Now that the certificate has been issued, we only have to wait for the consumer to come back to our site to check their status and install the certificate.
Installing Issued Certificates
When we come back to the site as a consumer to check on the status of our certificate request, we are greeted with the same screen as before. This time, however, we will elect to check on a pending certificate. (See Figure 6-23.) This allows us to check the status, if nothing else.
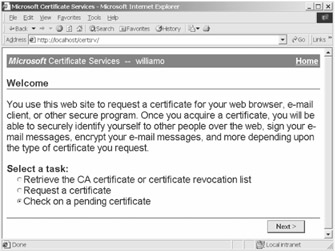
Figure 6-23: Checking on pending certificate requests
After selecting Next, the certificate site presents the list of certificate requests we have made. (See Figure 6-24.) This allows us to specify a specific certificate in case we have made multiple requests. More than likely, we will have made only one, so the default selection will be correct and we will click on Next.
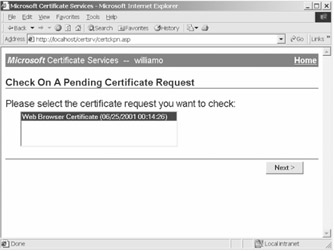
Figure 6-24: Specifying the certificate request
This then displays the status of the certificate request (Figure 6-25). Because we issued the certificate earlier, we see that the certificate has been issued, and we have the option to go ahead and install it on our browser's system.

Figure 6-25: Installing the issued certificate
Once the link is clicked on, the process to install the certificate has begun. Once the process has completed, a confirmation screen appears indicating whether it was successful. (See Figure 6-26.) The consumer can now utilize his or her client certificate when connecting to our Web service. This can be done in a number of ways, which we will specify in Chapter 8 ("Consuming Web Services").
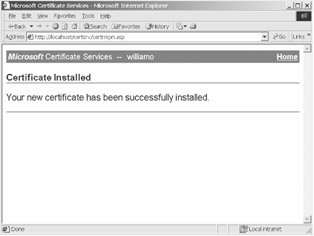
Figure 6-26: Successful certificate installation
Although the consumer is now ready to connect to us, we still haven't set up our Web service to require client certificates. As of right now, it accepts anonymous requests, so we need to configure our Web server to require valid certificates.
Adding Authentication to the Service
Although the consumer now has the client certificate, we aren't enforcing their usage through our Web site. We will have to make a few configuration changes to our site to do that.
To start, we need to go to the properties of the Web site containing our Web service. We can do this within the IIS console by right-clicking on the site and selecting Properties. Once this screen is open, we can select the Directory Security tab to specify our configuration information. (See Figure 6-27.)
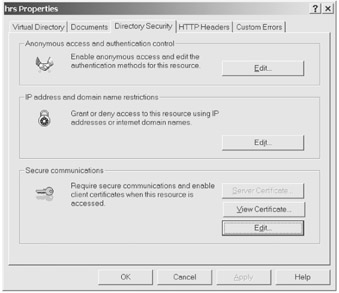
Figure 6-27: Web Site Directory Security properties
Once here, we can select Edit in the Secure Communications section to pull up the Secure Communications property sheet (Figure 6-28). It is here where we can choose to specify a certificate trust list. This is the means by which we define which certificate authorities we will trust.
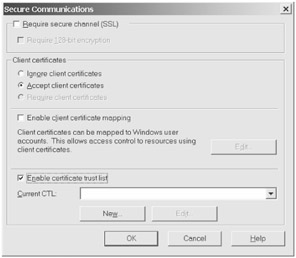
Figure 6-28: Web Site Secure Communications properties
When we select New, we start the Certificate Trust List wizard. (See Figure 6-29.) This shows all of the lists we currently have and allows us to define new ones. There are no lists by default, so we will select Add from Store to specify new certificate authorities to add to our list.
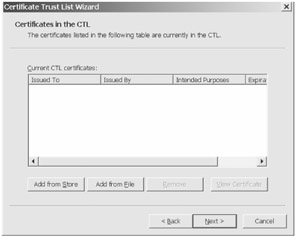
Figure 6-29: Certificate Trust List wizard
This sends us to a screen to specify which certificate authorities we want to trust (Figure 6-30). As an example, we could specify Verisign as a trusted authority, and we would then trust all client certificates granted by it. Because we are acting as our own certificate authority, we will only need to reference our local system as a trusted authority.
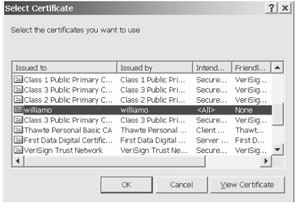
Figure 6-30: Selecting trusted certificate authorities
Once this is completed, we need to enter some information about this list of authorities. (See Figure 6-31.) This simply helps us to recall the common denominator between all entries and the purpose of this aggregation.

Figure 6-31: Entering certificate trust list information
We then click on Finish on the next screen to complete the process. We have now established our certificate authority as the only trusted authority, but we still aren't set up to require client certificates. We could choose to do it at the Web site level, thereby affecting all applications hosted on the site, but that is probably not acceptable unless this Web service was the only entity hosted by the site.
Instead, we should go to the properties of the Web application we made earlier, weatherWS. Like the site itself, we can get to its properties by right-clicking on the application in the left pane. This displays the properties for just this application. We want to go to the directory security panel, which looks the same as the Web site's in Figure 6-27. We also select Edit here to go to our application's secure communications properties, which looks slightly different from the site's. (See Figure 6-32.)
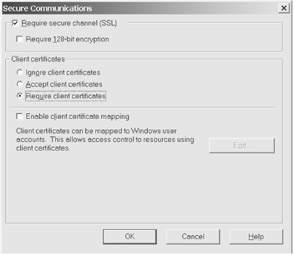
Figure 6-32: Specifying the Web application's secure communictions properties
You will notice that we are missing the extra function on the bottom concerning certificate trust lists. Lists can be maintained only at the site level. However, we can specify at this level that a client certificate is required, as shown in Figure 6-32. You have to select the Requires Secure Channel option before the Requires Client Certificates option is available. This means that you have to install a server certificate. Because this is no different from getting a server certificate for a Web site, I will spare you the details of that process. We could actually issue our own through our certificate authority, so the process could be hastened by using our own rather than waiting for a third-party processor.
Now we are requiring our consumers to use client certificates from our certificate authority to make requests of our weather Web service. We even have a fairly simple interface in place for them to request and install the client certificates, so they should not have too much difficulty. We will look at this process from the consumer's perspective a little more in Chapter 8.
In the meantime, we need to at least test our Web service with our test client. As of right now, it will fail because it is not using a client certificate or even SSL. The first step to remedying that is to change the URL to HTTPS instead of HTTP. We will also need to request a client certificate from our own authority. Once issued and installed using the process we just outlined, we will need to have our client reference it.
Once again, our MSXML parser comes to the rescue! Using a property called setOption, we can actually specify an installed certificate in communicating our request over HTTP(S). We need to specify the constant associated with the certificate property as well as the name of the client certificate. The full line would look something like:
objXMLSend.setOption SXH_OPTION_SELECT_CLIENT_SSL_CERT, "myCert"
With this additional line and the HTTPS reference in the URL, we should be ready to test our Web service, meeting its new requirement. In Chapter 7 ("Building a Web Services Workflow"), we will further extend this functionality by accessing the information from the client certificate programmatically. This will give us the ability to match up session-level data with identities that have the strong integrity of the certificates. It's a powerful combination that will allow us to build very robust and secure Web services.
Future Enhancements
At some point, you will want to make changes or enhancements to your Web service. Before you even start to think about these possibilities, make sure you have a good compatibility plan in place. Once you provide a Web service and consumers start using it, there will be applications depending on your service "as is." This is a critical area to be defined for Web services to be successful in the industry, and every provider will have a responsibility to err on the side of caution.
|
|
EAN: 2147483647
Pages: 77
- Chapter V Consumer Complaint Behavior in the Online Environment
- Chapter VI Web Site Quality and Usability in E-Commerce
- Chapter X Converting Browsers to Buyers: Key Considerations in Designing Business-to-Consumer Web Sites
- Chapter XV Customer Trust in Online Commerce
- Chapter XVI Turning Web Surfers into Loyal Customers: Cognitive Lock-In Through Interface Design and Web Site Usability