Exposing a Java Class
|
|
As any Java developer will tell you, Java was designed to be an object-oriented, scalable, and portable language. Although the portability of code is inherently much less of a benefit with Web services (because once the process is exposed from a central location, it no longer needs to be ported across systems), the object-oriented and scalable aspects of Java make its classes very suitable for extending as Web services.
The Web services we end up with will be a very straightforward implementation. We will not add any functionality or try to alter the method in any way. We might even limit its exposure slightly as we find it appropriate or convenient. Object-oriented objects tend to take their interfaces to great extremes, and our Web services will not warrant strict adherence to the native interface.
The requirements for this Web service will be relatively simple: we will build a loan calculator Web service based on IBM's Compound Interest class that ships with IBM's Visual Age for Java v3.5 development tool (com.ibm.ivj.examples.vc.mortgageamortizer package). You can download a trial version of this tool at http://www7.software.ibm.com/vad.nsf/Data/Document2005.
This class has a number of property values that we can set, providing information about the loan calculations we need (such as the loan amount, interest rate, number of years, and so on). The class then fills in the blanks by calculating those fields that remain. Our ultimate goal is to develop a Web service that exposes this functionality to anonymous consumers.
Building this service involves a few steps. First, we need to design the Web service. This won't be too complex, but some design decisions definitely need to be made up front. After that is complete, we will go ahead and build the Web service implementation. Finally, we will need to deploy and test the service in its target environment.
Designing the Mortgage Calculator Web Service
This will very much be the RAD (rapid application development) approach to building a Web service. There will be no presentation model, the interface model is a simple Web services call, and the security model will essentially be the same as any public Web site (anonymous access).
First, we need to make a few technology decisions. We know we are working with a Java class, which leaves the door wide open on infrastructure options, depending on where this class currently resides. After making these decisions, we then need to define the interface. As I said earlier, we aren't forced to follow the class interface and, in fact, it likely won't make sense to map the object directly to the Web service, so we will need to make a decision on what to support.
Choosing the Technologies
In choosing the technologies we want to build our Web service with, we have to consider a fairly vast range of areas that require a broad understanding of development and infrastructure architecture. It is never a bad idea to consult peers who are more knowledgeable in specific areas when you are uncertain of a technical decision. Backing out of a poor technology decision can be difficult and painful, regardless of your code's portability!
Whenever making technology choices, one area will always have priority over the other between the development and infrastructure architectures. Entire books are probably dedicated to these issues and ideologies, but our prioritization is made easier by the fact that we already have one decision made for us: we are exposing a Java class. This means that we would benefit from addressing our development issues first; otherwise, our infrastructure decisions might limit our options, even on the Java platform.
Development Decisions
The first decision to make is what technology method we want to use for exposing this Java class. We could plan an elaborate architecture with bridges and gateways that would allow us to wrap our class with a COM object, but that wouldn't be making things very easy for ourselves. Besides, we are looking for performance to turn these requests around as quickly as possible, and such an architecture would not help us in that area. Instead, we will make the decision to stick with the Java platform and expose our class through JSP (Java Server Pages) or Java servlet.
| Note | If you are more familiar with the Microsoft development platform, JSP is very similar to ASP (Active Server Pages), and a Java servlet is similar, architecturally, to an ISAPI extension. |
The next decision we need to make is what method we want to use for exposing our class. As I mentioned, we could use either a JSP or a servlet. Both are written in Java, and JSPs actually compile as a servlet, so the decision may seem somewhat semantic. However, JSP has some inherent limitations that keep it from being quite as robust as a true servlet. If you are serving up a fairly static page with some dynamic data contained within, JSP works great and is a more maintainable solution. However, our Web service will be entirely dynamic and could benefit from the modular nature of servlets by defining private methods. So, for these reasons, we will expose our class through a servlet, although JSP could be used effectively.
We also need to decide which XML parser to use. There are many to choose from, and all of them seem to differ at least slightly in their approach and/ or feature set, so this is something we could spend a lot of time researching and agonizing over. Instead, I will select one of the leading vendor's XML parser that works well with Java: IBM XML Parser for Java v.3.1.1 (http://alphaworks.ibm.com/aw.nsf/techmain/F62DB5F8684DCF6A8825671B00682F34). Typically, when developers have gained some experience with XML, they gravitate to one or two parsers that has worked well for them. As long as it supports the functionality required by the application, those parsers should also work just as well.
| Caution | This parser has some experimental features (DOM Level 2, SAX Level 2, partial Schema support), but I will stick with the public implementations just so I don't take advantage of something that changes in six months or so. |
Infrastructure Decisions
The next set of decisions to make relates to the infrastructure. The first of these is what platform to run on because the platform lays the groundwork for all other decisions. To maintain consistency across all the samples in this book, I will be hosting the Web service on a Windows 2000 Advanced Server. Despite the perceived Linux/Java union, many developers utilize Java on the Windows platform and swear by the combination. We also have plentiful choices in applications, tools, and services for Java on Windows, so we aren't limiting our implementation options either.
Because we will be developing a Web service, we need to decide what HTTP service to utilize. The easy answer on a Windows 2000 platform would be IIS 5.0, but I will buck that trend and select IBM's HTTP server. Like most HTTP services, it includes the basics and allows for fairly easy administration. Serving up HTTP is not a demanding process, and the operating system actually dictates most of that functionality, regardless of which actual service you utilize. However, this choice will lend itself much easier to my next decision, that of the application server.
Because of the popularity it currently has in the market, I will select IBM's WebSphere Application Server v3.5. You can also get a trial development copy of it from IBM's Web site: http://www7b.boulder.ibm.com/wsdd/downloads.
Given the class we are exposing, it should come as no surprise that our development tool is IBM's Visual Age for Java for Windows v3.5. This will complete our development environment, which will provide some synergy within the suite of IBM tools and services. It would be a stretch to say we have set up a completely integrated environment, but they should all "play well" together, and any experienced developer will always want and strive for that.
Designing the Interface
The next component of our design requires some decision-making, but it also gives us our first opportunity to get our hands a little dirty. Designing the interface for the wrapper of an existing object may not sound too exciting, but it does allow us the opportunity to be a little creative.
Analyzing the Existing Class
The first thing we should do is look at the existing class that we are building the Web service to expose. (See Listing 6-1.) The CompoundInterest interface has 23 methods available to us, so we need to see which we would be interested in.
Listing 6-1: CompoundInterest Interface
public class CompoundInterest { public synchronized void addPropertyChangeListener (java.beans.PropertyChangeListener listener) public void firePropertyChange (String propertyName, Object oldValue, Object newValue) public double getAmortizationPeriod() public double getEffectiveAnnualRate() public double getInterestRate() public double getInterestRatePerPayment() public double getPaymentAmount() public double getPaymentsPerYear() public double getPrincipalAmount() protected java.beans.PropertyChangeSupport getPropertyChange() public double getTimesPerYear() public double getTotalInterestCost() protected synchronized void recalculate() public synchronized void removePropertyChangeListener (java.beans.PropertyChangeListener listener) public void setAmortizationPeriod(double amortizationPeriod) public void setEffectiveAnnualRate(double effectiveAnnualRate) public void setInterestRate(double interestRate) public void setInterestRatePerPayment(double interestRatePerPayment) public void setPaymentAmount(double paymentAmount) public void setPaymentsPerYear(double paymentsPerYear) public void setPrincipalAmount(double principalAmount) public void setTimesPerYear(double timesPerYear) public void setTotalInterestCost(double totalInterestCost) } Only a portion of this interface is useful to us for various reasons. For instance, the recalculate method is necessary only in a stateful environment. Our Web service will instantiate this class, set the available values, and extract all the resulting values. This means that the only methods we need to touch are the gets and sets listed. This whittles down the list of method calls we need to expose as the 18 related to the following nine values:
-
Amortization period
-
Effective annual rate
-
Interest rate
-
Interest rate per payment
-
Payment amount
-
Payments per year
-
Principal amount
-
Times per year
-
Total interest cost
In fact, the only methods we need to expose are the nine sets that relate to each of these data properties. The gets will make up the response data we send back to the consumer.
To maintain this Web service as a stateless entity, handling these nine methods separately (as the class does) is not an option. Nine separate methods would require nine different calls to the service. Maintaining state within a Web service essentially turns it into a Web services workflow, which adds greatly to its complexity. We will look at Web services workflows in Chapter 7.
It would be pointless to make this function a Web services workflow because even though these methods are separate, they are interdependent for our purposes. We are interested in only the final result, and not the state of the values between each value that we set. This means that we need to set all available properties before extracting any results. Fortunately, under these circumstances, setting the interest rate prior to the principal amount is no different from setting the principal amount first and then the interest rate. There is no sequence we need to follow.
Therefore, we can design the Web service to collect all the data from the consumer within a single request and provide the result through a single response. That leads us back to a Web services call, which makes the interaction very clean and minimizes the complexity.
Building Efficient Interfaces
For this scenario, we also have a design decision to make regarding the data we send back to the consumer. If the consumer submits the interest rate, principal amount, and the amortization period, should we respond with just the other six data elements? Although this might seem like an efficient approach, I would argue that it is not worth the tradeoff. Instead, I would recommend responding with all nine data elements in this and other similar situations.
Your Web service interface will not always benefit from the smallest possible data set. Don't get me wrong, size is important, but, in this case, the benefits do not outweigh the negatives. The tradeoff here is three elements, but for what?
First, by responding to the consumer with all data, it can help them to confirm the data they sent in the request. This could help them during development as well as troubleshooting once developed. Also, don't overlook the overhead necessary on our part to discern which data to return and which to not. By sending all nine elements back, it makes our responder logic consistent and much more simple.
Building the Schema
Whether we send all or part of the result data, this type of a call does allow us to have the same definition for the request and the response for our Web service. Because this class allows us to define and retrieve each of these elements, the request and response are virtually mirrors of each other. Other than an error message, there is no need to pass any other data between the consumer and the Web service.
Let's go ahead and define the schema for our interaction. (See Listing 6-2.) Because there is no relevant relationship between each of the nine elements, they will be defined as siblings. However, we need to define a root node to contain these elements to make it a valid XML document. To tie it to the service, I will name it calcInteraction.
Listing 6-2: calcInteraction.xsd
<xsd:schema xmlns:xsd=" http://www.w3.org/2001/XMLSchema"> <xsd:element name=" calcInteraction"> <xsd:complexType> <xsd:sequence> <xsd:element name=" amortizationPeriod" type=" xsd:decimal" minOccurs="0" maxOccurs="1"/> <xsd:element name=" effectiveAnnualRate" type=" xsd:decimal" minOccurs="0" maxOccurs="1"/> <xsd:element name=" interestRate" type=" xsd:decimal" minOccurs="0" maxOccurs="1"/> <xsd:element name=" interestRatePerPayment" type=" xsd:decimal" minOccurs="0" maxOccurs="1"/> <xsd:element name=" paymentAmount" type=" xsd:decimal" minOccurs="0" maxOccurs="1"/> <xsd:element name=" paymentsPerYear" type=" xsd:decimal" minOccurs="0" maxOccurs="1"/> <xsd:element name=" principalAmount" type=" xsd:decimal" minOccurs="0" maxOccurs="1"/> <xsd:element name=" timesPerYear" type=" xsd:decimal" minOccurs="0" maxOccurs="1"/> <xsd:element name=" totalInterestCost" type=" xsd:decimal" minOccurs="0" maxOccurs="1"/> </xsd:sequence> </xsd:complexType> </xsd:element> </xsd:schema>
Besides the naming convention, the most important thing enforced by this schema is the frequency of occurrence for each element. By limiting each element to a maximum occurrence of one, our code can be more trusting of the data coming in. We will see this when we build our responder logic in the next section, "Building the Listener."
Unfortunately, we need to go ahead and define this document in a DTD (see Listing 6-3) as well as a schema. I say unfortunately because, as we saw in Chapter 3, the DTD offers little support for some of the rules we need enforced, like data typing. The reason we need to use a DTD is because the IBM parser does not yet support schemas. (The 3.1.1 version does support a draft revision of the XML Schema recommendation, but the final recommendation of May 2001 is not supported.)
Listing 6-3: calcInteraction.dtd
<!ELEMENT amortizationPeriod (#PCDATA)> <!ELEMENT effectiveAnnualRate (#PCDATA)> <!ELEMENT interestRate (#PCDATA)> <!ELEMENT interestRatePerPayment (#PCDATA)> <!ELEMENT paymentsPerYear (#PCDATA)> <!ELEMENT paymentAmount (#PCDATA)> <!ELEMENT principalAmount (#PCDATA)> <!ELEMENT timesPerYear (#PCDATA)> <!ELEMENT totalInterestCost (#PCDATA)> <!ELEMENT calcInteraction (amortizationPeriod?, effectiveAnnualRate?, interestRate?, interestRatePerPayment?, paymentAmount?, paymentsPerYear?, principalAmount?, timesPerYear?, totalInterestCost?)>
This is a good example of reality, however. As I said in Chapter 3, DTDs are not going away anytime soon. It will take a couple of years or more for the newer technology to displace the older one. Until that time, there will be instances in which we need to support (or should support) DTDs.
With our Web service interaction defined by physical definition documents, we are ready to move on to building the Web service.
Building the Web Service
Looking at our implementation effort, we need to keep in mind the two key components that will compose our Web service: the listener and the responder. The listener is responsible for receiving the request from the consumer, and the responder performs the necessary actions to provide the response. Although this might just be a logical separation within our Web service, we can work on each separately to structure our development process.
Developing each of these components separately allows for some efficiencies, especially depending on the complexity of the Web service in question. In Chapter 7, we will see an example of how we can design a Web service to support different versions through multiple listeners and a single responder. Even in the most basic of Web services, however, it allows us to test each separately, which can help speed the development process. Testing the listener requires a client that communicates over HTTP, so why burden the testing of your responder logic with that overhead? Taking on the responder logic and the listener all at once means jumping through a lot of hoops, so I would recommend avoiding that. I'll show you how you can develop each separately and integrate them once they are complete.
Building the Listener
As we stated in our design, we will build our listener as a servlet. A servlet is simply a special class that supports a couple key methods. Visual Age makes this fairly painless by including a wizard that sets it up for you very easily. This wizard walks through several steps to generate a servlet, but I will be breaking this process down in this section so that you have at least a high level understanding of how it works.
| Note | Although I am using Visual Age for Java as my development tool, you can use any of the available Java IDEs to actually build this Web service. This exercise will not divert into a tutorial on how to use Visual Age, so use whichever tool you are most comfortable with. |
Creating the Servlet
The servlet class, which extends the javax.servlet.http.HttpServlet class, will contain our entire Web service. This class is what will be called by the HTTP service when the consumer makes a request of the appropriate URL. (We will look at this in greater detail in the next section, "Deploying the Web Service.")
Because our Web service is handling requests for the CompoundInterest class, I will call the class CompoundInterestWS. Because we do want it to receive external requests, we will make it public. The resulting class definition is
public class CompoundInterestWS extends javax.servlet.http.HttpServlet
Although this technically makes the class a servlet, it cannot function as a servlet without implementing one of the two methods that can actually respond to a request: doPost and doGet. These two methods (see Listings 6-4 and 6-5) handle the HTTP POST and GET requests that can be made to the servlet class. Only one of these needs to be overridden for it to be functional, but you can handle both occurrences for the class.
Listing 6-4: Standard doPost Method in Visual Age
/** * Process incoming HTTP POST requests * * @param request Object that encapsulates the request to the servlet * @param response Object that encapsulates the response from the servlet */ public void doPost(HttpServletRequest request, HttpServletResponse response) throws ServletException, IOException { performTask(request, response); } Listing 6-5: Standard doGet Method in Visual Age
/** * Process incoming HTTP GET requests * * @param request Object that encapsulates the request to the servlet * @param response Object that encapsulates the response from the servlet */ public void doGet(HttpServletRequest request, HttpServletResponse response) throws ServletException, IOException { performTask(request, response); } | Tip | When you use the Visual Age servlet wizard, the doGet and doPost methods call the fabricated method performTask by default. This is an empty routine that the tool creates to encourage developers to externalize their logic from these two methods.You will likely want to name this method something different. If so, rename it right away because it is easier to make this adjustment before you begin coding. |
The keys to these methods are the HTTPServletRequest and HTTPServletResponse objects. These also come from the javax.servlet.http package and are used to pass the request from the caller to the receiver, as well as the response back.
A few other methods can also be generated as part of your servlet (such as getServletInfo and init), but these are extraneous to this discussion. Instead, let's focus on the changes we need to make to our doGet and doPost methods.
Following Visual Age's lead, let's offload our logic to another method. However, we will call it stagingTask instead of performTask. It will accept the request and response objects as parameters, so our call will look virtually the same. We could call stagingTask from both the doPost and doGet methods, but you may opt to do something a little different.
If you don't want users to easily access your Web service through a browser, you will want to disable the doGet method. The HTTP GET request relies on the querystring to pass data to the provider, and this does a couple of things. A querystring is the portion of a URL that follows a question mark. For instance, in the address ">http://www.fundamentalwebservices.com/listener.asp?<root></myQuestion></root>, the querystring is <root></myQuestion></root>.
Accepting data through the querystring allows for someone to manually call the service through the address bar of a browser. If we want to share our calculator with only applications, we don't want to allow this type of request. Although it is easier to test, it is also easier for individuals to use, and to use incorrectly.
This gets to the second issue with the querystring. GET requests are more likely to be invalid requests because the access is so direct. To submit data through the POST action means that some application had to touch it, which means that special characters are already handled, and that there is more likely to be some structure to the data. A querystring could easily contain pure garbage typed into the address bar of a browser, and accepting it means trying to work with it and handling the exceptions. Although this service will be able to handle those scenarios, opening up your service to GET requests will likely mean more wasted cycles for your Web service.
Thus, we will reject any HTTP GET request. However, this doesn't mean we can't be nice about it! If we didn't care, we simply wouldn't implement the doGet method. Instead, I want to override it and respond with a nice error message. (See Listing 6-6.) We will even contain this message in an XML document because that is the response that the consumer will be expecting.
Listing 6-6: Alternative doGet Method
public void doGet(HttpServletRequest request, HttpServletResponse response) throws ServletException, IOException { //Get method is not accepted by this service try { response.setContentType("text/xml"); PrintWriter os = response.getWriter(); os.println("<?xml version='1.0'?>"); os.println("<calcInteraction><error>You must use the HTTP POST action to Interact with this Web service.</error></calcInteraction>"); } catch(Throwable theException) { // add code here when necessary to debug unexpected exceptions //theException.printStackTrace(System.err); } } To contain the message in the response, I am using the getWriter method of the response object. This allows us to write to the response document just like we would the console. Also note how I am setting the content type to XML so that the browser will handle the data accordingly.
The other thing this does is provide an easy way to unit test our servlet. All we need to do is connect to it through a browser, and we should get back the message we are responding with from the doGet method. We get the doGet response because we are not posting anything to the address. By default, a Web browser uses the HTTP GET to retrieve data from an address unless we are submitting a change to POST.
| Tip | To test this servlet in Visual Age, you need to install the WebSphere Test Environment. This is done, somewhat cryptically, by selecting File|Quick Start. In the dialog box that appears, select Features on the left and Add Feature on the right; then select OK. In the next box that appears, select WebSphere Test Environment and select OK. Once this is installed, you can bring it up by selecting Workspace|Tools|WebSphere Test Environment... from the menu. It can take a while to start up, but, once it appears, select the Servlet Engine in the left pane and select the Edit Class Path button on the right to add the project(s) you want to test. Once that is done, click on the Start Servlet Engine button to activate the test environment. You can now access any classes contained in the Class Path through the HTTP site. The address will have the following structure: http://<server name>:8080/servlet/<package name>.<class name>. |
Parsing the Request
Now that we have our POST and GET handlers built, we need to build our stagingTask method. This is what the doPost handed off the request and response objects to. The listener is responsible for validating the data before handing it off to the responder. It's always better if the responder can trust the data that it is given, so the listener needs to try to ensure that.
By trusting the data, I mean trusting that it is valid and well formed. The listener will not, and should not, contain all the logic to validate the request on a data element level. The responder still needs to be able to handle those issues if present. Ideally, the responder should not have to handle XML errors and should be able to count on the required elements to exist when it tries to reference them.
The first thing we need to do is define our stagingTask method. (See Listing 6-7.) As we saw from the request in doPost, it will accept an HTTPServletRequest and an HTTPServletResponse object.
Listing 6-7: stagingTask Method
/** * Process incoming requests for information * * @param request Object that encapsulates the request to the servlet * @param response Object that encapsulates the response from the servlet */ private void stagingTask(HttpServletRequest request, HttpServletResponse response) { return; } Next, we need to create an instance of our XML parser. We could create one of a few different instances, such as DOMParser, NonValidatingParser, and NonValidatingDOMParser. You usually have a couple of options available given your scenario, so there isn't always a necessarily right or wrong answer.
One of the biggest differences between the features of these parsers is whether they implement the DOM. If you want to work with the data in a DOM tree structure, you should select one of the DOM-based parsers; otherwise, one of the other parsers will meet your needs with a little less overhead. However, the DOM is very useful if you want to work with all the data or with portions of it multiple times. Because we are working with the entire request document and I want to be able to validate it, I will use the TXRevalidatingDOMParser instance, which allows you to revalidate the document at any point. This can be helpful if you are adding or modifying data in a document. Although we won't likely need it for this aspect, we do want to validate the document, so it will work just as well and allow for that possibility.
Now that we have chosen our parser, we need to put it to work. We will start by declaring it and then submitting the request to it. To submit the request, we use the ImportSource object, which allows us to stream the request in through the getReader method. (See Listing 6-8.) Because we have defined the POST as just a single block of information, this is the easiest way to handle the incoming data. If this were a form with several fields of data, we would use a different method for accessing each of the fields independently.
Listing 6-8: Parsing and Capturing the Request Data
try { //Parsing the request and capturing it in the request document RevalidatingDOMParser parser = new RevalidatingDOMParser(); parser.parse(new InputSource(request.getReader())); reqDocument = parser.getDocument(); } catch(Exception e) { os.println ("<?xml version='1.0'?>"); os.println("<calcInteraction><error>The data submitted is not valid. Please validate it against the DTD or schema provided.</error></calcInteraction>"); } Once the data has been parsed, we will use the getDocument method to store it into a document object. Doing this allows us to continue working with the data beyond the scope of the parser itself and to send it to other methods.
We are also handling the exception. Because this exception would be caused by the validity of the document, we should be able to make a response to the consumer, informing them of what the problem was. Again, anything we can do to help the consumer troubleshoot the implementation of our Web service will be paid back through quicker adoptions and fewer phone calls to our technical staff.
Validating the Data
Now that we know we are working with a valid XML document, we need to ensure that it is well formed. If it is, we know that the data contained within the document has the structure we need for the request to be legal.
Performing this function will be the validate method of our parser. (See Listing 6-9.) Like the loading of the request, we will need to handle the cases in which this step does not succeed. We will again provide an explanatory message to help them troubleshoot whatever problem was encountered.
Listing 6-9: Validating the Request Document
//Validate the document if (parser.validate(reqDocument.getDocumentElement()) != null) { os.println("<?xml version='1.0'?>"); os.println("<calcInteraction><error>The data submitted is not valid. Please validate it against the DTD or schema provided. </error></calcInteraction>"); } else { //Calling the getRate method resDocument = getRate(reqDocument); //Transfer the results from the document to the HTTPServletResponse } Unfortunately, this is where some of the parser's limitations become a hindrance. The first limitation is that the current parser does not support the XML Schema recommendation. This means that we have to resort to working with DTDs, which means that we may not be able to define the interaction as tightly as we would like. As we saw in Chapter 3, we do not have as much control over defining datatypes and the occurrences of elements as we do with XML Schema. Fortunately, in this situation, every element occurs either once or not at all, so our DTD can support our structure.
The other limitation comes from our inability to specify an external DTD reference. This is because we can neither edit a DOCTYPE element (as the specification dictates for compliance with the standard) nor reference an external DTD within the parser. The first reason can be justified, but the second reason is rather disappointing.
As a result, we have to trust the consumer to reference the correct DTD within their request documents. Although any abuses of this trust could allow potentially invalid data into our Web service, the consequences are dire for only the consumer and their user, and not our service.
However, if we wanted to make the extra effort, we could potentially validate the DTD reference independently before doing anything else, so that we could more gracefully handle the situation. Parsing the attributes of the DOCTYPE element would capture the DTD reference.
To do this, we would need to require that the consumers explicitly reference the DTD on our system. Then we could use the parser to view the path referenced for their DTD and compare it with the path we have defined. Anything that does not match our path would simply be rejected, even if it were a copy of the appropriate DTD in another location. We will not need to go into this effort for this example, and I will not go through the exercise to show the details of implementing it here. I suspect that, if you find yourself going to this extreme to ensure the legitimacy of a request, you will likely need to use a parser that supports schemas or at least allows you to define DTD references externally.
Now that we have all of our validation process defined, we need to integrate it into our stagingTask method as shown in Listing 6-10.
Listing 6-10: Updated stagingTask Method
private void stagingTask(HttpServletRequest request, HttpServletResponse response){ //Objects for the request and response documents Document reqDocument; Document resDocument; try { //Staging the response object for the results response.setContentType("text/xml"); PrintWriter os = response.getWriter(); try { //Parsing the request and capturing it in the request document RevalidatingDOMParser parser = new RevalidatingDOMParser(); parser.parse(new InputSource(request.getReader())); reqDocument = parser.getDocument(); //Validate the document if (parser.validate(reqDocument.getDocumentElement()) != null) { os.println("<?xml version='1.0'?>"); os.println("<calcInteraction><error>The data submitted is not valid. Please validate it against the DTD or schema provided. </error></calcInteraction>"); } else { //Calling the getRate method resDocument = getRate(reqDocument); //Transfer the results from the document to the HTTPServletResponse } } catch(Exception e) { os.println("<?xml version='1.0'?>"); os.println("<calcInteraction><error>The data submitted is not valid. Please validate it against the DTD or schema provided.</error> </calcInteraction>"); } } catch (Exception e) { //If there is an error here, we aren't able to respond to the caller //e.printStackTrace(System.err); } return; } Once we have built and tested the listener, we can start working on the responder logic for our mortgage calculator Web service.
Building the Responder
The responder is typically responsible for all the real work in a Web service, and this one is no different. In fact, this is the area in which your Web services will be differentiated from each other. Up until now, we have been working with data in only a very generic sense, capturing it, validating it against the appropriate external definitions, and handing it off. This is when we start performing the tasks that are specific to the Web service.
We have already defined the main method for our service as getRate, and we will be passing it a document object that has been loaded and validated. Getting the data at this stage should keep any consumer-related issues from affecting the execution of our Web service. Another way of looking at it is that we should take responsibility for any issues that might occur at this point in the process.
| Tip | This clear, logical, separation of listener and responder is a very purist approach that, if upheld, will help with your Web service implementation and the development of future enhancements. To maintain this approach, any data issues encountered at this point that might have been overlooked should not cause a change in the responder, but in either the definition file or the parsing process. |
Let's start by looking at the skeleton definition of getRate in Listing 6-11. The only thing going on here, besides the method definition, is the declaration of a document object and its return from the call. TXDocument is a class that implements the DOM document object within IBM's parser. This object will contain the response that we eventually build in this routine.
Listing 6-11: Skeleton of the getRate method
/** * getRate takes the XML document passed to it, extracts the property data, * calls the CompoundInterest() method and builds the XML document * for the response. * * @param document contains the XML document sent through the POST method * from the consumer * * Returns the properties from the CompoundInterest() method through an * XML document */ static private Document getRate(Document document) { Document response; response = new TXDocument(); return response; } At this point, we have defined all of our methods for our servlet. You can see how this will all look within Visual Age if you have followed along with the process up to this point. (See Figure 6-1.)
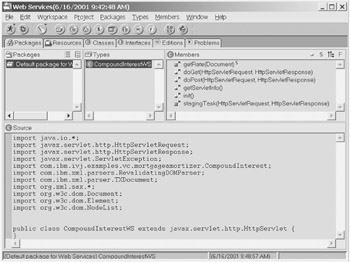
Figure 6-1: Visual Age workspace view of the CompoundInterestWS class
Now that we have declared the method, let's look at what we need to accomplish. We need to:
-
Extract the information out of the submitted request document.
-
Set the properties of CompoundInterest.
-
Retrieve the properties of CompoundInterest.
-
Add the data to an XML data structure.
-
Return the document to the calling routine.
Extracting the Data
Because we have a very flat document structure, extracting the data from it will be a fairly simple and direct process. The only potential "gotcha" in the process is that we don't know which properties were provided because many are optional. We do, however, know that there can be only a maximum of one legal node for each value, which helps to limit some of the uncertainties.
Before we start, we need to set up a couple of variables. The first is the root of the document itself. This will provide a reference point for the document that will allow us to fetch any value we need:
Element docRoot = document.getDocumentElement();
Now that we have the root node, we could take a couple of different approaches in parsing the data. Because of the unknown existence of most elements, the safest way is to create a node list of each element based on its name. We know that there will be a maximum of one instance for each element, so we will have a list of only one or none. The fact that a node list can support an empty state obviously helps our cause.
Once we have the list, we can check its length to determine if any action is required. If the length is greater than zero, we know we have a value to work with. Let's look at this process for the amortizationPeriod node:
NodeList elements = docRoot.getElementsByTagName("amortizationPeriod"); if (elements.getLength() > 0) { } We are using the getElementsByTagName to match all the appropriate elements. Notice that, even if the document is not validated, the existence of more than one element matching the name will not create an error. Multiple instances beyond the first will simply never be referenced.
We need to perform this step for each of our parameters, so we will have nine in total (this could be component-ized through a helper function, but I am choosing to handle these explicitly for demonstration purposes.) Now we need to define the actions that we need to perform once we have met these conditions and have some data to work with.
Setting the Properties
Each parameter has a corresponding method within the CompoundInterest class that allows you to set the value. As we identify the data in the request, we need to call these methods to pass this data on.
One decision that usually needs to be made when working with XML documents is whether to store the data in variables or to call the methods using the data stored in our document structure. Using variables versus direct references has advantages and disadvantages that any developer has likely encountered for different applications. In this particular situation, the debatable nature of the decision is somewhat circumvented because of our uncertainty in the document's optional nodes.
| Tip | Whenever working with request documents that can be validated only by DTDs, it is always a good idea to store the data in a typed variable before passing it on to other processes to help with type validation. This will keep you from passing inappropriate data to other objects, which may be harder to catch and handle. |
A minimal amount of information needs to be provided for our service to calculate the different properties. We don't know which values are set, but we can assume for various reasons that the primary concerns for a user are the interest rate, the principal, the life of the loan, and the payment amount. However, two other properties are equally important to our class: payments per year and times per year.
The first property deals with the number of payments that will be made each year, which most users will likely assume to be once a month, for a total of 12 payments a year. The second property sets the number of times per year that interest is calculated. Again, in most cases, this number will be 12, as users will also likely assume.
If we left this requirement, we would probably return some uncalculated values because the information was not complete. However, we could predefine some values to help minimize this occurrence. Doing this efficiently requires us to maintain variables for these parameters. To maintain consistency then, we will use variables to store all of our parameters before referencing the CompoundInterest class, as seen here:
double amortizationPeriod = 30; //Defaulting to 30 years double effectiveAnnualRate; double interestRate; double interestRatePerPayment; double paymentAmount; double paymentsPerYear = 12; //Defaulting to 12 payments/year double principalAmount; double timesPerYear = 12; //Defaulting to 12 times/year double totalInterestCost;
We are also defaulting the amortization period to 30 years as a benefit to any home loan applications using our service. Keep in mind that we are also returning every value in the response, so all defaulted values will also be provided back to the user so that they know how the calculations were performed.
Now that we have all of our variables defined, let's go ahead and look at setting the value for one of our parameters, amortizationPeriod.
amortizationPeriod = Double.parseDouble(elements.item(0).getFirstChild().getNodeValue()); calculator.setAmortizationPeriod(amortizationPeriod);
This process will then be called for each value that is provided to us, so we will need to add it to each of the nine extraction routines we have. Once this is done, we need to turn around and reference each property of CompoundInterest.
Retrieving the Properties
The only decision we need to make when retrieving the values from the CompoundInterest class is how to store them. We could save them off in the variables that we used to set the same values, which might make sense if we have to do some work with the data (such as perform calculations or filter the data).
Because we want to pass the data back "as is" and the data will end up in an XML structure, it makes sense to go ahead and store these values directly to Element objects. Then, we can later add them to the document that is our response. Let's look at this step for the amortization period value:
Element elem = response.createElement("amortizationPeriod"); elem.appendChild(response.createTextNode(String.valueOf (calculator.getAmortizationPeriod()))); Here, we are using a temporary Element object called elem to create an element named amortizationPeriod and then saving the value from the appropriate method of our instance of the CompoundInterest class, called calculator. Pay special attention to two things here. First, notice how we are creating a text node consisting of our amortizationPeriod value and appending it to the amortizationPeriod element. Although in the XML world we are dealing with a single element, in this strict definition of the DOM we are creating two nodes and relating them: the value node as a child of the element node. This can be a difficult concept to grasp if you aren't used to it, and some parsers will mask this from you by allowing you to interface this as a single entity.
Second, notice that, even though we are converting this value to a string, it has no bearing on the actual node data type. One of the paradoxes of working with XML is that, even if data types are declared for your elements, the data is inherently typed as a string. In other words, there is no integerNode type, just textNodes that contain string values that represent integers. It is the validation process that then checks to see if those strings can be converted to the appropriate types.
Now that we have our data, we need to go about adding it to our response document.
Adding the Data to Our Document
In our response, we will be returning an XML document that will contain all the information from our CompoundInterest class. Now that we have the data, we need to build that document. We have already taken the first step by storing the data in element objects. This keeps us from having to touch that data directly.
In our skeleton class, we have defined the document already, so that step has been achieved. What we must do next is define the root element for our document. As we have discussed, every XML document must have a single root node, so we can't just add the elements we have to the document directly. The root node for our document is calcInteraction, so let's go ahead and create that:
Element root = response.createElement("calcInteraction"); Keep in mind that this is a standalone entity. No relationship is established with our response document at this point. You can think of this as the root of our working document for the purpose of building the response. Once we are done, we will "move" this root node over to our actual response document, like this:
response.appendChild(root);
Before we can do this, however, we need to finish building our working document by adding all of our values. We saw in the previous section where we extracted the data from CompoundInterest into an element called elem. We also need to "move" the element over to our root with an appendChild call, just like we will do for moving the root over to our response document:
root.appendChild(elem);
Now we have an entire document that contains the result values from the CompoundInterest class. This actually completes the getRate method, so let's take a look at the entire routine, which puts all of these tasks together. (See Listing 6-12.)
Listing 6-12: The getRate Method
/** * getRate takes the XML document passed to it, extracts the property data, * calls the CompoundInterest() method and builds the XML document * for the response. * * @param document contains the XML document sent through the POST method * from the consumer * * Returns the properties from the CompoundInterest() method through an * XML document */ static private Document getRate(Document document) { NodeList elements; Element elem, root; Document response; //Declaring the variables for the CompoundInterest properties double amortizationPeriod = 30; //Defaulting to 30 years double effectiveAnnualRate; double interestRate; double interestRatePerPayment; double paymentAmount; double paymentsPerYear = 12; //Defaulting to 12 payments/year double principalAmount; double timesPerYear = 12; //Defaulting to 12 times/year double totalInterestCost; CompoundInterest calculator = new CompoundInterest(); //Defaulting the baseline data values calculator.setAmortizationPeriod(amortizationPeriod); calculator.setPaymentsPerYear(paymentsPerYear); calculator.setTimesPerYear(timesPerYear); //Referencing the submitted document object Element docRoot = document.getDocumentElement(); //Each property is handled in the same manner: // if a value was provided, the property is set elements = docRoot.getElementsByTagName("amortizationPeriod"); if (elements.getLength() > 0) { amortizationPeriod = Double.parseDouble(elements.item(0).getFirstChild().getNodeValue()); calculator.setAmortizationPeriod(amortizationPeriod); } elements = docRoot.getElementsByTagName("effectiveAnnualRate"); if (elements.getLength() > 0) { effectiveAnnualRate = Double.parseDouble(elements.item(0).getFirstChild().getNodeValue()); calculator.setEffectiveAnnualRate(effectiveAnnualRate); } elements = docRoot.getElementsByTagName("interestRate"); if (elements.getLength() > 0) { interestRate = Double.parseDouble(elements.item(0).getFirstChild().getNodeValue()); calculator.setInterestRate(interestRate); } elements = docRoot.getElementsByTagName("interestRatePerPayment"); if (elements.getLength() > 0) { interestRatePerPayment = Double.parseDouble(elements.item(0).getFirstChild().getNodeValue()); calculator.setInterestRatePerPayment(interestRatePerPayment); } elements = docRoot.getElementsByTagName("paymentAmount"); if (elements.getLength() > 0) { paymentAmount = Double.parseDouble(elements.item(0).getFirstChild().getNodeValue()); calculator.setPaymentAmount(paymentAmount); } elements = docRoot.getElementsByTagName("paymentsPerYear"); if (elements.getLength() > 0) { paymentsPerYear = Double.parseDouble(elements.item(0).getFirstChild().getNodeValue()); calculator.setPaymentsPerYear(paymentsPerYear); } elements = docRoot.getElementsByTagName("principalAmount"); if (elements.getLength() > 0) { principalAmount = Double.parseDouble(elements.item(0).getFirstChild().getNodeValue()); calculator.setPrincipalAmount(principalAmount); } elements = docRoot.getElementsByTagName("timesPerYear"); if (elements.getLength() > 0) { timesPerYear = Double.parseDouble(elements.item(0).getFirstChild().getNodeValue()); calculator.setTimesPerYear(timesPerYear); } elements = docRoot.getElementsByTagName("totalInterestCost"); if (elements.getLength() > 0) { totalInterestCost = Double.parseDouble(elements.item(0).getFirstChild().getNodeValue()); calculator.setTotalInterestCost(totalInterestCost); } //Staging the response document response = new TXDocument(); //Staging the working node: root root = response.createElement("calcInteraction"); //Extracting all the properties - if call was successful, all properties are // available all elements are created and added to our root node elem = response.createElement("amortizationPeriod"); elem.appendChild(response.createTextNode(String.valueOf (calculator.getAmortizationPeriod()))); root.appendChild(elem); elem = response.createElement("effectiveAnnualRate"); elem.appendChild(response.createTextNode(String.valueOf (calculator.getEffectiveAnnualRate()))); root.appendChild(elem); elem = response.createElement("interestRate"); elem.appendChild(response.createTextNode(String.valueOf (calculator.getInterestRate()))); root.appendChild(elem); elem = response.createElement("interestRatePerPayment"); elem.appendChild(response.createTextNode(String.valueOf (calculator.getInterestRatePerPayment()))); root.appendChild(elem); elem = response.createElement("paymentAmount"); elem.appendChild(response.createTextNode(String.valueOf (calculator.getPaymentAmount()))); root.appendChild(elem); elem = response.createElement("paymentsPerYear"); elem.appendChild(response.createTextNode(String.valueOf (calculator.getPaymentsPerYear()))); root.appendChild(elem); elem = response.createElement("principalAmount"); elem.appendChild(response.createTextNode(String.valueOf (calculator.getPrincipalAmount()))); root.appendChild(elem); elem = response.createElement("timesPerYear"); elem.appendChild(response.createTextNode(String.valueOf (calculator.getTimesPerYear()))); root.appendChild(elem); elem = response.createElement("totalInterestCost"); elem.appendChild(response.createTextNode(String.valueOf (calculator.getTotalInterestCost()))); root.appendChild(elem); //Appending the root node to the response document response.appendChild(root); return response; }
Returning the Document
The only thing we have left to do now is return the XML document to the consumer. Because getRate has returned it to stagingTask, it now needs to transfer the document to the HTTPServletResponse object that was passed by the doPost routine. Using the same PrintWriter object that we used to return the error messages for validation or parsing errors, we can write out our document object. The difference with this response is that we are working with a document, and not text that we can pass through a println command.
To handle the conversion for the document object, we will use its printWithFormat routine. This essentially presents the data in the document object with the format appropriate for an XML document. Prior to actually writing the document, it is a good practice to set the version for your XML header.
((TXDocument)resDocument).setVersion("1.0"); ((TXDocument)resDocument).printWithFormat(os); Now that we have returned the response document, we have built our Web service. However, because it is still in a code form, we need to deploy the Web service through an HTTP server and test it all the way through.
Deploying the Web Service
The deployment of a Web service will closely follow the deployment of an n-tier application. Of course, which platform you deploy the application on will cause the exact process to vary. As we indicated at the beginning of the chapter, this deployment will be based on the Windows 2000 platform, IBM HTTP Server, and IBM WebSphere Application Server.
Exporting the Servlet
If we start at the back and work our way up, the first step is to deploy the CompoundInterestWS servlet. This is done within our Visual Age using the export option. First, we must select the CompoundInterestWS class in our workspace. Then, select File|Export from the menu. (See Figure 6-2.)
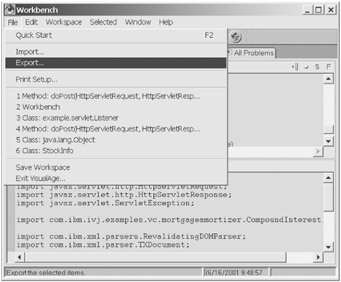
Figure 6-2: Selecting the export function in Visual Age
You are now presented with the export options, from which you should select Directory. (See Figure 6-3.)
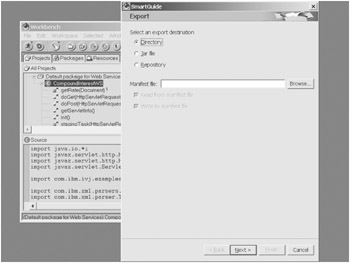
Figure 6-3: Export options of Visual Age
Doing so displays the options screen for executing the export to a directory structure. (See Figure 6-4.) The first value to set (or at least confirm) is the directory to which you want to export the class. Although you can select any directory, the default directory for your WebSphere Application Server is a good choice (if WebSphere is installed locally, that is). However, these files can be moved to wherever your final destination may be, whether local or on another system. This path is where you can locate the file(s) once the export is complete.
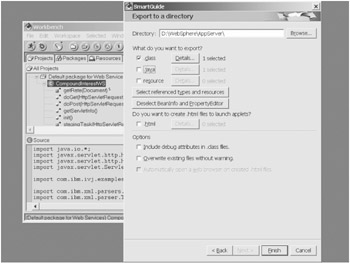
Figure 6-4: Directory export options of Visual Age
The next option is what files to export to your directory. Although you might want to export the other two files for various reasons (which we will not get into here), the only file type required is the class file itself.
If you are deploying to a new system without any Java classes already installed, the next option is very important. This is where we can have Visual Age automatically grab all dependencies for our class. Once you select the "Select referenced types and resources" option, you should end up with a total of 190 files for this servlet. You can select details to view all the files that were collected. (See Figure 6-5.) This is where you can also deselect any classes or references that are already present on the system you are deploying to.
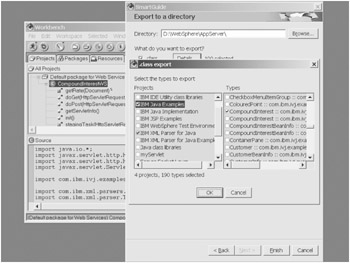
Figure 6-5: Viewing the referenced dependencies in Visual Age
At this point, all we have to do is click on Finish, and we are done. The appropriate files will be exported to the directory you designated. However, these files have no relationship to an application server, much less an HTTP server, so we have some more configuring to do.
Configuring WebSphere Application Server
It is now appropriate to configure WebSphere to support our servlet for our Web service. Without having an application server to "host" our servlet, there will be no way for us to run it. Contrary to its significance, this is a relatively simple step.
| Note | This is not a book on WebSphere, and I will assume that you are familiar with this product if you are trying to follow along. Otherwise, I would recommend that you use whichever Java application server you are familiar with. If this is the case, you should be able to follow this process within that environment. |
Once you have opened the WebSphere Administrative Console (see Figure 6-6), you can configure the servlet within WebSphere. This starts by either creating or designating a servlet engine. A default engine is created by default, but you can generate a new one if you prefer.
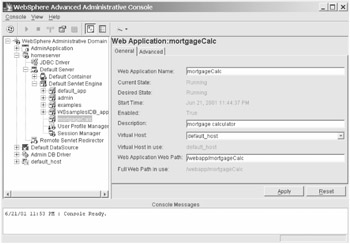
Figure 6-6: The WebSphere administrative console
Once you have selected the servlet engine, you can right-click on it and select Create...|Web Application to define a "home" for your servlet. (See Figure 6-7.)
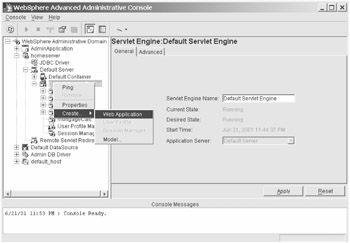
Figure 6-7: Creating a new web application in WebSphere
When you start the new Web application process, you need to define three values: Web application name, virtual host, and Web application Web path. You can also use an optional description field. (See Figure 6-8.) The Web application name will be used by default to help define the Web path. The Web path is probably the most important value to note because this is how you will reference your Web service.
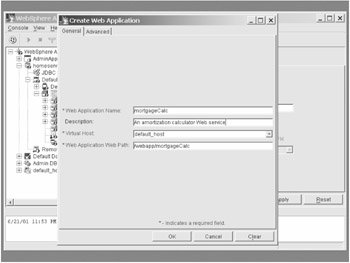
Figure 6-8: The WebSphere new web application dialog box
Selecting the Advanced tab will take you to the dialog box where you can specify the document and class path for your application. Once you have set up your Web application, you need to define the servlet in your application. This is similar to creating a new Web application: you right-click on the application and select Create...|Servlet. (See Figure 6-9.)
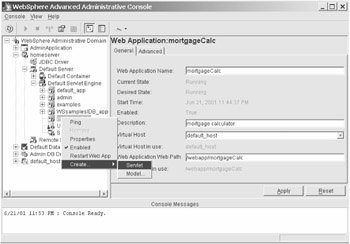
Figure 6-9: Creating a new servlet in WebSphere
Now you're presented with the servlet dialog box, which allows you to specify the name and class name for your servlet. (See Figure 6-10.)
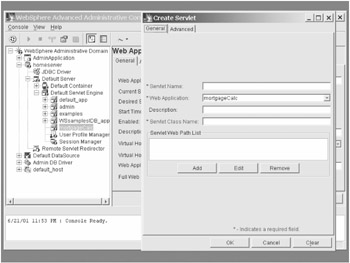
Figure 6-10: WebSphere's new servlet dialog box
You also need to specify the Web path for your servlet. (See Figure 6-11.) This is the address at which the servlet will be found, and the entire URL will consist of this path and the name for your class, which we just specified. WebSphere can support multiple addresses for your servlet, and this capability can be helpful in situations in which you need to host the same servlet with different identities.
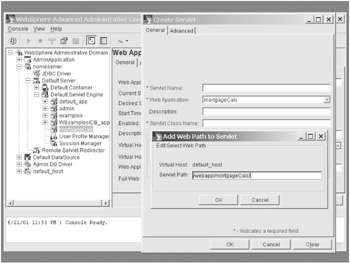
Figure 6-11: Specifying a servlet's web path(s) in WebSphere
You should have a servlet that is ready to receive requests at the path(s) we specified. However, we need to make sure that our HTTP server is ready to receive requests.
Configuring IBM HTTP Server
Because WebSphere handles the servlet directly, no additional configuration is needed for the HTTP server. The only thing that needs to be made certain is that the HTTP server is actually running. Without this service running, no Web services will work!
Testing the Web Service
Now that we have our Web service deployed, we need to test it. Just as in an application, we need to focus on two areas in the testing of our Web services: accuracy and performance. Although testing a Web service carries many similarities to testing a Web application, special considerations need to be made for Web services testing as we will see.
Accuracy Testing
In testing the accuracy of a Web service, we are looking to reproduce the desired result from every situation that can occur. In the case of our mortgage calculator Web service, the questions would specifically be: Is the data correct? Do the appropriate messages get returned if there is an error? Are all errors handled gracefully when possible?
To answer these questions, we must have some type of client to act as a consumer of our Web service. An actual application will do, but it is possible to utilize a simple browser, depending on how the Web service was developed. In our mortgage calculator, we decided to deny consumer requests using an HTTP GET request. Accepting only HTTP POST requests means that we must build a client application.
| Note | Some of you are no doubt aware that we could generate a POST request from a static HTML page with a Form element. Although this would generate the POST request that the service requires, submitting the data in an XML format would be problematic, if not impossible. |
We will focus on building test clients more in the next two examples, so, for our purposes, we will simply assume its existence. You can download a generic test client from the supporting site for this book at http://www.architectingwebservices.com/testclient. This test client takes a request document, submits it to our Web service, and displays the response—which means that we need to come up with some request documents for our Web service. An example of a valid request is shown in Listing 6-13. This should produce an error-free response from the Web service.
Listing 6-13: Sample calcInteraction Request
<?xml version="1.0" encoding=" UTF-8"?> <calcInteraction> <amortizationPeriod>30</amortizationPeriod> <interestRate>.0725</interestRate> <paymentsPerYear>12</paymentsPerYear> <principalAmount>150000</principalAmount> </calcInteraction>
When the request is made, the response that should be returned will look like Listing 6-14.
Listing 6-14: calcInteraction Response
<?xml version="1.0"?> <calcInteraction> <amortizationPeriod>30.0</amortizationPeriod> <effectiveAnnualRate>0.07495829742132853</effectiveAnnualRate> <interestRate>0.0725</interestRate> <interestRatePerPayment>0.07228912470025328 </interestRatePerPayment> <paymentAmount>1021.1198323383267</paymentAmount> <paymentsPerYear>12.0</paymentsPerYear> <principalAmount>150000.0</principalAmount> <timesPerYear>12.0</timesPerYear> <totalInterestCost>217603.13964179758</totalInterestCost> </calcInteraction>
Sending invalid or incomplete data through the request of our Web service can help us to test the error handling. This can range from sending no data, to sending invalid data types within the elements, to sending unnecessary data.
Performance Testing
Testing the performance of a Web service is a little different from testing other applications because you have to consider the impact on the consumers' implementations. It would be a mistake to assume that the overall performance of your Web services is based on the processing that you are providing. You could build the fastest possible Web service, but, if you are simply pushing off processing duties to the consumer, the overall performance could suffer.
This is the tradeoff we identified in Chapter 5 when we looked at the possibility of transforming the resulting data on the provider's system versus the consumer's system. Because the provider already has the XML document loaded into a DOM, they would take a minimal hit in manipulating the data compared to the consumer, if they never intended or otherwise needed to load it into a DOM structure.
As with any application, the first thing that needs to be realized in performance testing is that an application will always have a bottleneck. So, the objective is not to eliminate all bottlenecks, because that is impossible. We simply want to address the bottlenecks that keep our Web service from performing as quickly and efficiently as we would like. Of course, metrics are necessary to identify where that limit lies. Resources addressing software testing can also be very helpful in your approach to testing Web services.
In our performance testing, we will simulate a large user base accessing the Web service directly and through a consumer. To do this with any accuracy or dependability, we will need a testing tool. There are many to choose from, ranging in a variety of price ranges and functionality, but, if you or your organization does not already own one, I would recommend looking at a free tool provided from Microsoft called Web Application Stress Tool (WAST). You can get more information on WAST, as well as download it, from Microsoft's site at http://msdn.microsoft.com/library/default.asp?url=/library/en-us/dnduwon/html/d5wast_2.asp.
Once we have selected the testing tool(s), we will then need to test the Web service both directly (essentially the responder) and through a consumer application (through the listener). If we use a tool like WAST that can monitor the system's status (for Windows platforms), we should be able to identify the largest delay in both processes. If this bottleneck exists for both, then we know that the Web service itself will require our attention and that our model is likely sound. If the biggest bottleneck occurs within the consumer and it is built fairly efficiently, it may take a design change to address the problem. Hopefully, we can address it through system tuning, logic changes, or both. Regardless of the changes we made, we should afterwards retest both processes. This retesting will confirm how much improvement was made through our changes, and it may identify the next-largest bottleneck.
Once your testing has been completed and the results are to your satisfaction, you will have a working Web service based on a Java class ready to release. We will get into more robust Web service consumers in Chapter 8. Until then, we have some more work to do in designing and building Web services. We will now turn our attention towards taking another type of object and extending it as a Web service—a COM object.
|
|
EAN: 2147483647
Pages: 77
- Key #1: Delight Your Customers with Speed and Quality
- Key #2: Improve Your Processes
- When Companies Start Using Lean Six Sigma
- Making Improvements That Last: An Illustrated Guide to DMAIC and the Lean Six Sigma Toolkit
- The Experience of Making Improvements: What Its Like to Work on Lean Six Sigma Projects