Hardware Troubleshooting
| The operating system software that runs on a Cisco router or switch is called the Internetwork Operating System or IOS . Before we move on to troubleshooting problems using the Cisco Set/Clear IOS and the Cisco CLI IOS, we will first look at the hardware. Troubleshooting hardware requires a working knowledge of power failure issues, the information you can get from the Power-On Self Test (POST), switch cables, and what each light emitting diode (LED) light on the switch or its modules indicates. Power FailureA power failure is a very apparent sign of trouble. If there's no power to the switch, the fans fail to turn on, no indicator lights appear lit on the front or back of the switch, and no prompt appears on the console port.
Follow these steps in troubleshooting a power failure:
Power-On Self Test (POST)The POST can be a powerful tool in solving hardware issues. The POST is displayed on the screen when the switch powers up and performs a systematic check of the IOS running on the switch, the configuration files, and a comprehensive hardware test. Each LED on the switch becomes lit one at a time indicating that a different test is being performed. The POST tests the following components:
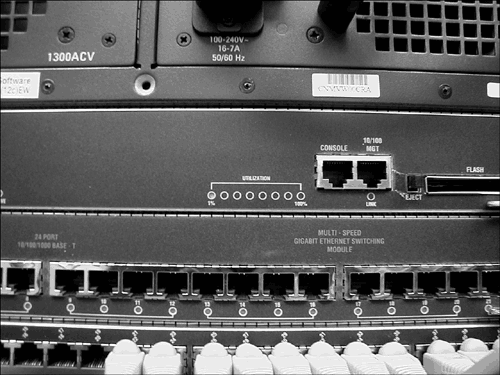
Switch Indicator LightsBoth the Catalyst 5000 and 4500 families of switches use quite a few LEDs that can indicate a problem or the current utilization of the switch. The Supervisor Engine has five different LEDs that indicate the system, fan, power supplies , load utilization, and whether or not the Supervisor Engine is active. The Cisco 4500 Series uses Supervisor Engine IV. On this module, a series of round LEDs indicates loads from 1% to 100%, as shown in Figure 8.1. Figure 8.1. The Cisco Supervisor Engine IV load bar. The load bar indicates the current load on the switch. If the local bar is more than 80 percent, either a network problem exists, such as a broadcast storm , or an upgrade in the switching devices is needed. The load bar on a Supervisor III, shown in Figure 8.2, uses a different set of LEDs to indicate system load and status. The System Status light indicates the following, depending on the color :
Figure 8.2. The Cisco Supervisor Engine III load bar. The fan LED indicates the following:
The Supervisor III Power supply 1 (PS1) and Power Supply 2 (PS2) LEDs indicate the following:
The Active LED indicates the following:
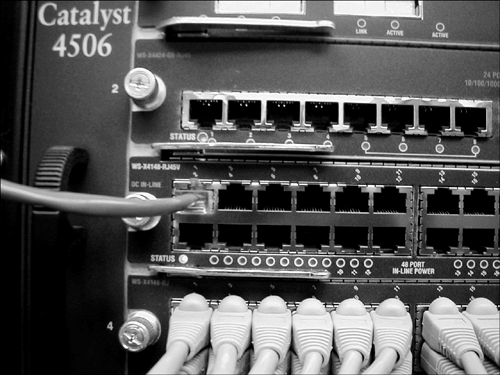
LEDs also exist on each individual line module such as the Ethernet modules. Each module has a Status LED that displays green to indicate the module is functioning. On the newer modules, such as the 24- or 48-port 10/100 Ethernet modules, there is a single LED for each port. When the LED is green, the port is in use and there is an established link with the device connected to the port. A portion of a 48-port module on a Cisco 4506 is shown in Figure 8.3. Figure 8.3. LEDs on a Cisco 10/100 Ethernet module on a Cisco 4506. On older line modules, such as those used in the Cisco 5000 series, the green light indicates that a good established link exists. An orange or amber light indicates that a problem exists with the link. A red light indicates a nonport test has failed. On these modules there is sometimes a second LED called the Speed (SP) LED. A green switch port (SP) LED indicates the port is operating at 100BaseT and functioning. When the SP light is off, it is operating in 10BaseT. Troubleshooting CablesData can move around today's networks at greater speeds than ever. These high speeds add network complexities. Early implementations allowed cable lengths to have greater distances and flexibility. In today's high-speed networks, the distance limitations should be strictly adhered to. Many times, administrators will upgrade the network interface cards on both ends of a former 10Mbps link and find that the 100Mbps link begins to receive an excessive number of errors, forcing the link to become unusable. Going over on the 10BaseT cable distance limits didn't have the detrimental effects that it does with 100BaseT or 1000BaseT. You may also have a noncompatible cable type. For instance, 10BaseT will work over Category 3, 4, 5, or 6 twisted-pair cable, whereas 100BaseT or 1000BaseT requires Category 5 or 6. Table 8.1 examines the common cable limits for cabling in today's networks. Table 8.1. The Common Network Cabling Limitations
Cable problems can appear suddenly or as an intermittent problem. Intermittent errors are sometimes hard to troubleshoot and can appear as problems unrelated to cabling. As an administrator, you have to be aware that almost any connectivity issue can be cable- related , and to resolve connectivity issues, you must replace a cable with a cable that you know works. As discussed in Chapter 7, "Troubleshooting the Physical Layer," you can also use multimeters, time domain reflectometers (TDRs), cable analyzers, or breakout boxes to test for cable connectivity errors.
Use the Correct Ethernet CableYou need to use the correct cable for the equipment you are using. A connection to a network node from a switch or hub uses a straight-through cable . A crossover cable is used to connect two network devices, such as a hub to a hub, a switch to a switch, a switch to a router, and so on. When trying to configure switches or routers, you will fail to get a connection between the devices if you use a straight-through cable when you should be using a crossover cable. |

EAN: 2147483647
Pages: 213
- Key #1: Delight Your Customers with Speed and Quality
- Key #3: Work Together for Maximum Gain
- When Companies Start Using Lean Six Sigma
- Making Improvements That Last: An Illustrated Guide to DMAIC and the Lean Six Sigma Toolkit
- The Experience of Making Improvements: What Its Like to Work on Lean Six Sigma Projects