Flylib.com

Books Software


Viewing the Tasks Window


Viewing the Tasks Window

graphics/07inf02.jpg

graphics/one_icon.jpg

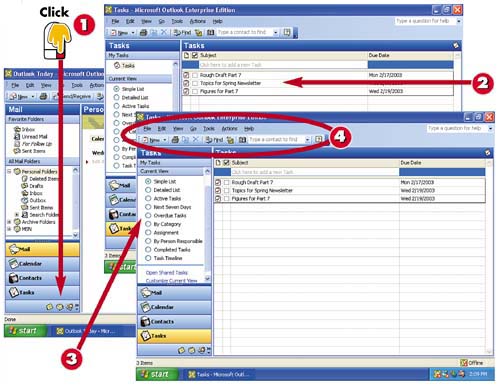
After starting Outlook, click Tasks in the Outlook Bar.

graphics/tow_icon.jpg

Scheduled tasks are listed in the main area of the Tasks window.

graphics/three_icon.jpg

The task pane enables you to select different views of your Tasks list. (You learn more about using categories, marking tasks as complete, and other options later in this part.)

graphics/foure_icon.jpg

The toolbar includes buttons for creating and managing tasks.

INTRODUCTION

As with other Outlook components , you can switch to the Tasks window and then view any scheduled tasks. You can also get an idea of what you can do with Tasks by viewing the task pane and toolbar.

TIP

Switching to the Tasks Window

You can also switch to the Tasks window by opening the Go menu and choosing Tasks . Alternatively, press Ctrl+4 .


Changing the View of the Tasks List

graphics/07inf03.jpg

graphics/one_icon.jpg

The current view is indicated in the task pane by a selected option button (in this case, Simple List , the default view).

graphics/tow_icon.jpg

Click the Detailed List option button in the task pane to change to this view. In Detailed List view, you see columns for subject, status, due date, percent complete, and any assigned category.

graphics/three_icon.jpg

To view a graphical timeline of scheduled tasks, click Task Timeline .

INTRODUCTION

To help you manage your Tasks list, you can change how it is displayed, or its view . Outlook provides several predesigned views. Some options, such as Detailed List, change what appears in the list. Some filter the list to include only a range of entries.

TIP

Checking the Header Bar

You can tell when Outlook is displaying only a subset of tasks by looking at the Header bar. You'll see (Filter Applied) when only some of the tasks are displayed.


Entering a New Task

graphics/07inf04.jpg

graphics/one_icon.jpg

With the Tasks window open , click the New button on the Outlook toolbar.

graphics/tow_icon.jpg

An Untitled Task dialog box opens. Type a descriptive subject in the Subject field; what you type here is the heading that is used for the task in the Tasks list.

graphics/three_icon.jpg

Type a due date for the task in the Due Date field or click the down-arrow button next to the field and choose a date from the minicalendar that appears.

graphics/foure_icon.jpg

If desired, enter a start date for the task by typing a date into the Due Date field or by selecting a date from the minicalendar.

INTRODUCTION

To use Outlook to keep track of tasks, you must first enter information about each task you need to perform. When creating a new task, you can enter a task name , a start date, a due date, the priority, and other details.

TIP

Other Ways to Create New Tasks

If you prefer, you can type a task directly into the Tasks list in the area that says Click Here to Add a New Task . You can also create a new task by opening the Actions menu and choosing New Task .

TIP

Priority and the Percent Age

You can use the Priority drop-down list to select a priority for the task ( Low, Normal , or High ) . You also can enter information about the progress using the % Complete spin box.

graphics/07inf05.jpg

graphics/five_icon.jpg

Click the down-arrow button to the right of the Status field to display the status options, and select the option that describes the task's current status.

graphics/six_icon.jpg

Type any descriptive information about the task into the Notes area.

graphics/seven_icon.jpg

Click the Save and Close button in the Tasks window.

graphics/eight_icon.jpg

The task is added to the Tasks list.

TIP

Sorting the List

You can click any of the column headings to sort the Tasks list by that item. For example, click Subject to sort in alphabetical order based on the tasks' subjects.

TIP

Expanding and Collapsing the List

Outlook groups tasks scheduled within the same timeframe in some views. You can display more (or less) information for the selected tasks in that category. Click the plus sign ( + ) next to an item to expand the item and display more information. Click the minus sign ( ) to hide the details.