802.1x Port-Based Authentication
As we saw in Chapter 8 when we talked about wireless LANs (WLANs), 802.1x can be used to authenticate users attempting to connect to the WAP. 802.1x actually predates WLANs, however, and was originally designed for function in a wired network environment.
802.1x functions by requiring the client to authenticate before being able to access any network resources. Until authentication has occurred, the switch will only allow Extended Authentication Protocol over LAN (EAPOL) traffic to pass. Once the client has been authenticated, however, normal traffic can pass through the switch.
802.1x port-based authentication on your access switches can prevent anyone who can not be authenticated from being able to connect to your network. This is a paradigm shift from many LAN technologies, however. For example, DHCP and auto-negotiation has created an environment where we almost take for granted that we can connect a computer to the network and gain access to resources. This is a double-edged sword, however, because as easy as it is for that consultant to plug into your network and start helping you with network management issues, he can just as easily plug his laptop that is infected with a worm into your environment and begin infecting your systems.
802.1x Network Device Roles
Before we can configure 802.1x port-based authentication, we have to take a look at the network devices and their roles in an 802.1x deployment. Figure 9-1 shows the 802.1x device roles.
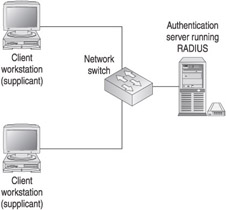
Figure 9-1: 802.1x network device roles
-
Client The client workstation, also known as the supplicant, is the device that requests access to the LAN. The client also responds to any requests from the switch. In order for the client to participate in 802.1x authentication, it must be running an 802.1x-compliant operating system or client software. Windows XP is 802.1x compliant.
| |
Microsoft Windows XP uses display balloons to notify the user that she needs to log on for 802.1x authentication. If you experience problems with Microsoft Windows XP not properly displaying the 802.1x notifications, refer to the following Microsoft Knowledge Base article for a potential resolution: http://support.microsoft.com/default.aspx?scid=kb;en-us;303597.
| |
-
Switch The switch can be either a LAN access switch or a wireless access point and is responsible for controlling the client access to the network. The switch effectively acts as an intermediary or proxy for the client by receiving the client authentication request via EAP and passing that information to the authentication server via RADIUS.
-
Authentication server The authentication server is running RADIUS and is responsible for the actual client authentication. The authentication server is responsible for validating the client and informing the switch that the client is authorized to access the network.
Configuring 802.1x Authentication for IOS-Based Switches
By default, 802.1x authentication is not enabled. For your IOS-based switches, configuring 802.1x requires the implementation of AAA to facilitate the authentication of the client workstations. You should be aware of some important caveats before you do this, however:
-
When you enable 802.1x, the ports must be authenticated before any other layer 2 features will be enabled.
-
802.1x is not supported on the following port types:
-
Trunk ports
-
Dynamic ports
-
Dynamic-access ports
-
EtherChannel ports
-
Secure ports
-
Switch Port Analyzer (SPAN) destination ports
-
-
It is imperative that only one client be connected to any switch port that is configured with 802.1x. The command dot1x multiple hosts run on an interface will allow multiple hosts to connect; however, only one of the hosts is actually authenticated, while all of the rest of the hosts will be permitted to access the network. This creates a security hole that allows unauthenticated access to your network.
Enable 802.1x Authentication
802.1x authentication is configured on a per-interface basis. Before you can do this, however, you must enable AAA on the switch. The following steps detail the process of enabling 802.1x authentication on a Cisco 2950 switch running software version 12.1(20)EA1.
-
Enable AAA on the switch by running the following command at the global configuration mode:
switch02(config)#aaa new-model
-
Enable AAA authentication using dot1x and RADIUS:
switch02(config)#aaa authentication dot1x default group radius
-
Globally enable 802.1x on the switch by running the following command:
switch02(config)#dot1x system-auth-control
-
Enter the interface configuration mode that you want to configure (in this case fastethernet 0/4 ):
switch02(config)#interface fastethernet 0/4
-
The next command is optional; however, since by default most IOS-based switches configure all ports to be dynamic ports, I recommend that you run it just to be safe. This will configure the port as an access port only.
switch02(config-if)#switchport mode access
-
The final step is to configure the 802.1x port control. There are three options: auto, force-authorized (default), and force-unauthorized. Auto enables 802.1x. Force-authorized is the default setting and forces the port to operate in an authorized mode without exchanging any 802.1x authentication data ( essentially it disables 802.1x). Force-unauthorized prevents the port from authorizing a user under any circumstances. The following command will enable 802.1x:
switch02(config-if)#dot1x port-control auto
Note Make sure that you save your configuration when you are done.
At this point, the switch and interface have been configured to use 802.1x authentication.
Configuring the Switch to Communicate with the RADIUS Server
Once 802.1x has been enabled and configured, the next step is to configure the switch to communicate with the RADIUS server. The following command can be run at the global configuration mode to do this:
switch02(config)#radius-server host 192.168.173.100 auth-port 1812 acct-port 1813 key radiuskey
In this case, I have configured the switch to communicate with a RADIUS server running at 192.168.173.100 with a key of radiuskey .
Configure the Microsoft IAS Server and Windows Domain
Once you have configured the switch properly, the next step is to configure the IAS server and the Microsoft Windows domain information to allow the client to connect.
First you must add a new IAS client on your IAS server using the same credentials that you specified on the switch. Next you want to create a new remote access policy to be used for 802.1x authentication. The following steps detail policy creation:
-
Open the IAS MMC, right-click Remote Access Policies, and select New Remote Access Policy. Enter an appropriate name and click Next.
-
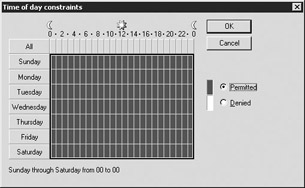
At the Conditions screen, click Add to add a new condition. I recommend the Day-And-Time-Restriction, specifying the appropriate days and times. When you are finished, click OK and then Next.
-
At the Permissions screen, select to grant remote access permission and click Next.
-
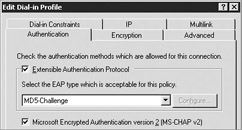
At the User Profile screen, click Edit Profile. Select the Authentication tab and check Enable Authentication Protocol; then select MD5-Challenge from the drop-down menu, as shown here:
-
Select the IP tab and check Client May Request An IP Address To Support The Use Of DHCP. When you are finished, click OK and then Finish.
-
The next step is to configure Active Directory to support reversible encryption format for EAP-MD5. Two methods can be used to accomplish this, however both introduce a significant security vulnerability to your Microsoft Windows servers. Steps 7 and 8 detail the process of enabling reversible encryption on your entire domain. If you do this, you do not need to perform step 9. Likewise, if you decide to do step 9, you do not need to perform steps 7 and 8.
-
Open the Active Directory Users And Computers administrative tool, right-click the domain name, and select Properties. From the Properties screen, select the Group Policy tab. Highlight the Default Domain Policy and click Edit. This will open the Group Policy administrative tool.
-
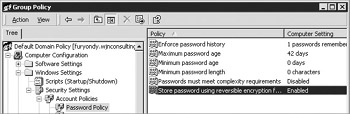
Navigate to Computer Configuration\Windows Settings\Security Settings\Account Policies\Password Policy, double-click Store Password Using Reversible Encryption, and select Enable, as shown next. When you are finished, close the Group Policy administrative tool. You do not need to perform step 9 if you have performed steps 7 and 8.
-
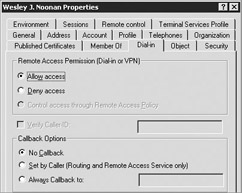
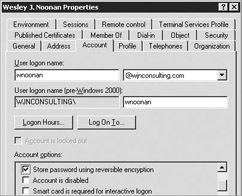
If you decided not to perform steps 7 and 8, the final step is to enable Dial-In access and Password Reversible Encryption for all of your user accounts. This can be done by selecting Allow Access on the Dial-in tab of the user account and checking the value Store Password Using Reversible Encryption on the Account tab, as shown here:
| |
Enabling reversible encryption is a huge security risk on your Microsoft server. It significantly weakens the security of the user accounts passwords, allowing them to be easily compromised by anyone who gains access to your server. As a result, it is highly unlikely that your server administrators will allow this change to be made. If that is the case, the only alternative is to use TACACS+ or a third-party RADIUS server instead of Microsoft IAS.
| |
| Note | If you are changing existing user accounts, you need to reset or have the user change his password to enable the reversible encrypted password format. |
Configure the Microsoft Windows XP Client Now that the switch, IAS server, and Active Directory have been configured properly, it is time to configure the Microsoft Windows XP Client. Open the properties of the network connection that you want to configure and select the Authentication tab. Check the value Enable Network Access Control Using IEEE 802.1X and select MD5-Challenge for the EAP Type, as shown next. Select the General tab and check the value Show Icon In Taskbar When Connected. This will allow the pop-up bubble that will prompt the user for the authentication credentials. When you are finished, click OK.

At this point, the user will be prompted for a username and password for network authentication.
Configure the Cisco Secure ACS Server (RADIUS)
A much simpler process for using 802.1x with Cisco switches is to use a Cisco Secure ACS server as the RADIUS server. The first step is to add a new client on your Cisco Secure ACS server using the same credentials that you specified on the switch.
The second step is to ensure that you have users defined in the Cisco Secure ACS database that have been granted network access using any of the previously mentioned methods. That s it!
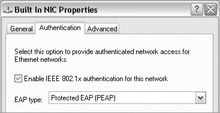
Configure the Microsoft Windows XP Client The last step is to configure the Microsoft Windows XP Client. The real beauty of this method is that you can configure the Microsoft Windows XP Client to use transparent authentication. To do this, edit the properties of the network connection and select the Authentication tab. Check Enable IEEE 802.1x Authentication For This Network and select Protected EAP (PEAP) for the EAP Type:
Click Properties and verify that Secured Password (EAP-MSCHAP v2) is the selected authentication method:
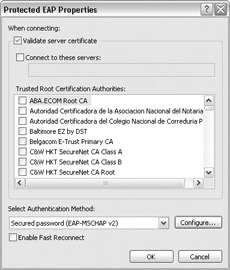
Click Configure and make sure that Automatically Use My Windows Logon Name And Password (And Domain If Any) is checked, as shown next. Click OK three times to close the network properties. The system will automatically authenticate using the current user s logon credentials without prompting the user.

| |
You should be aware of the fact that 802.1x authentication can make it difficult to manage systems, because until the client is authenticated, it will not be able to obtain an IP address via DHCP, since the switch will not allow traffic other than EAPOL, Cisco Discovery Protocol, and Spanning-Tree Protocol in Cisco switches. This can also prevent login scripts from running and group policy updates, since the client system may authenticate the user using cached credentials. Be aware of these caveats before you deploy 802.1x through your environment.
| |
EAN: N/A
Pages: 125