Game Screens
The racing game features many different game screens, which are all managed by the RacingGame class by the gameScreens stack variable. This section describes most game screens used in the game and exactly what they do. Most game screen classes are fairly simple, but others are a little bit more complex and feature a unit test, which can be used to learn more about the class. For example, the Credits screen is fairly simple and just displays a background texture, but the Main Menu is more complex and has all the buttons to get to the other game screens. The Options screen introduces many new controls, which had to be tested, and there is obviously a unit test in this class to help you out with that process.
All game screen classes are derived from the interface IGameScreen (see Figure 14-6), which you probably will remember from the Rocket Commander game in Chapter 8. It is pretty much the same class, but it was made a little bit simpler. You now only have one method left called Render, which takes no parameters and returns a Boolean value. The code is actually the same as you used in the XNA Shooter game. If a game screen Render method call returns true it means you are done with this class and can return to the previous game screen until you run out of game screens and exit the game. Usually game screens return false because the user does not immediately quit them again after joining a game screen.

Figure 14-6
Because of this simple interface all the game screen classes in the class diagram view look just the same; they all just have a Render method and not much else. Some classes have some private helper methods, but they are mostly very simple. Some of the more complex game screens have unit tests for testing if all elements are aligned correctly and function they way the should. Not even the GameScreen class, which handles the complete game, is that complex. Unlike XNA Shooter or Rocket Commander all the game code is handled and rendered in the landscape and model classes. The game logic is handled in the Player class, which is a little bit more complex, but you already learned all about the underlying physics of the CarPhysics class and the ChaseCamera class in the last chapter.
Take a look at Figure 14-7 for a basic overview of all the game screens used in this version of the racing game. The most complex class is obviously the Mission class, which handles the game play and game logic. It does not contain all the game code, however; some of it is handled in the player classes and the RacingGame main class also handles a bit of the general game content.
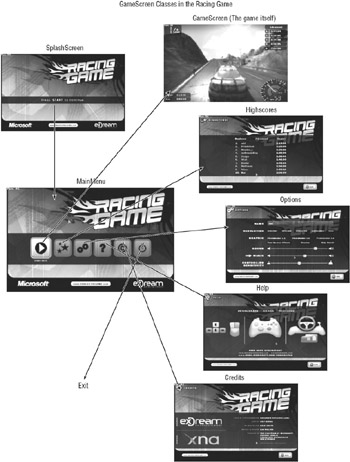
Figure 14-7
Splash Screen
The splash screen (see Figure 14-8) is one of the easier classes; it basically just sits around and waits for the user to press start on his gamepad. Space or Esc on the keyboard or the left mouse button will let the player also continue if he does not have a game pad. The only thing for this class that is even remotely interesting is the code to let the “Press start to continue” text blink.
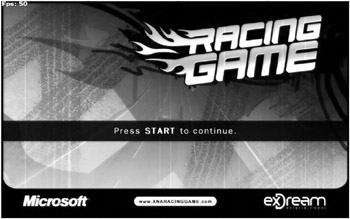
Figure 14-8
/// <summary> /// Render splash screen /// </summary> public bool Render() { // This starts both menu and in game post screen shader! BaseGame.UI.PostScreenMenuShader.Start(); // Render background and black bar BaseGame.UI.RenderMenuBackground(); BaseGame.UI.RenderBlackBar(352, 61); // Show Press Start to continue. if ((int)(BaseGame.TotalTime / 0.375f) % 3 != 0) BaseGame.UI.Logos.RenderOnScreen( BaseGame.CalcRectangleCenteredWithGivenHeight( 512, 352 + 61 / 2, 26, UIRenderer.PressStartGfxRect), UIRenderer.PressStartGfxRect); // Show logos BaseGame.UI.RenderLogos(); // Clicking or pressing start will go to the menu return Input.MouseLeftButtonJustPressed || Input.KeyboardSpaceJustPressed || Input.KeyboardEscapeJustPressed || Input.GamePadStartPressed; } // Render() The RenderMenuBackground method is a little bit more complex. It is used to show the menu background behind the splash screen, which shows the car driving through one of the tracks. The car is controlled by the computer and the camera just follows it. The code for that is not very complex:
// [From RenderMenuTrackBackground(), which is called by // RenderMenuBackground(), both located in the UIRenderer class] // [Some code to calculate carPos, carMatrix, etc.] // Put camera behind car RacingGame.Player.SetCameraPosition( carPos + carMatrix.Forward * 9 - carMatrix.Up * 2.3f); // For rendering rotate car to stay correctly on the road carMatrix = Matrix.CreateRotationX(MathHelper.Pi / 2.0f) * Matrix.CreateRotationZ(MathHelper.Pi) * carMatrix; RacingGame.Landscape.Render(); RacingGame.CarModel.RenderCar( randomCarNumber, randomCarColor, carMatrix); Thanks to the Render method of the Landscape class and the RenderCar method of the Model class you do not have to worry about rendering the landscape, track, or anything else here. The camera matrix makes sure you look at the correct position and the car advances through the track through the car matrix variable.
All other menu game screens also use the RenderMenuBackground method to render the game in the background, but it can be less visible in some game screens because you put darker textures in the front (for example, in the Credits screen it is harder to see the background anymore). It is just a background effect, however; you can see more of the game when you actually start playing it.
Main Menu
The Main Menu (see Figure 14-9) is a little bit more complex than most other menu screen classes, but even this class is just about 250 lines of code. Every other game screen can be started from here except the Splash screen, which is only shown initially after starting the application. The most important choices are starting the game and viewing the highscores (the first two buttons).
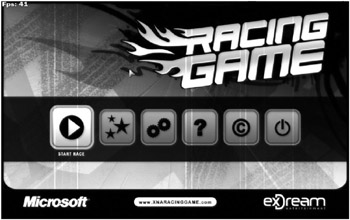
Figure 14-9
The coolest feature of this class is the menu button animation. Every button gets a float value between 0 and 1, where 0 is the smallest possible button size and 1 is the biggest button size. When you hover over a button with the mouse or select it with the gamepad or keyboard it gets bigger until it reaches 1.0. When you leave the button, it slowly gets smaller again.
The first button is initially set to 1. All other buttons are left at the smallest size (0).
/// <summary> /// Current button sizes for scaling up/down smooth effect. /// </summary> float[] currentButtonSizes = new float[NumberOfButtons] { 1, 0, 0, 0, 0, 0 }; Then in the Render method the button selection code and scaling of the buttons is handled. To make sure you do not hover over more than one button at the same time a helper variable is used for the mouse. If no mouse is used to select the menu buttons this variable will never be used.
// Little helper to keep track if mouse is actually over a button. // Required because buttons are selected even when not hovering over // them for GamePad support, but we still want the mouse only to // be applied when we are actually over the button. int mouseIsOverButton = -1; // [a little later in the code ...] for (int num = 0; num < NumberOfButtons; num++) { // Is this button currently selected? bool selected = num == selectedButton; // Increase size if selected, decrease otherwise currentButtonSizes[num] += (selected ? 1 : -1) * BaseGame.MoveFactorPerSecond * 2; if (currentButtonSizes[num] < 0) currentButtonSizes[num] = 0; if (currentButtonSizes[num] > 1) currentButtonSizes[num] = 1; // Use this size to build rect Rectangle thisRect = InterpolateRect(activeRect, inactiveRect, currentButtonSizes[num]); Rectangle renderRect = new Rectangle( xPos, yPos - (thisRect.Height - inactiveRect.Height) / 2, thisRect.Width, thisRect.Height); BaseGame.UI.Buttons.RenderOnScreen(renderRect, ButtonRects[num], // Make button gray if not selected selected ? Color.White : new Color(192, 192, 192, 192)); // Add border effect if selected if (selected) BaseGame.UI.Buttons.RenderOnScreen(renderRect, UIRenderer.MenuButtonSelectionGfxRect); // Also check if the user hovers with the mouse over this button if (Input.MouseInBox(renderRect)) mouseIsOverButton = num; // [etc.] } // for (num) if (mouseIsOverButton >= 0) selectedButton = mouseIsOverButton;
Game Screen
The GameScreen class (see Figure 14-10) is the most important game screen because it handles the whole game logic. No game variables are stored here however, and you do not handle anything exclusive here, but all the important parts (landscape, track, car, objects, HUD, and so on) are still rendered and called from here.
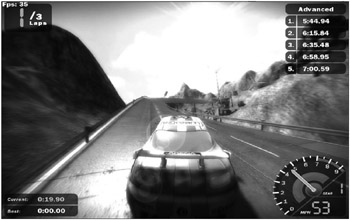
Figure 14-10
Most of the player variables are stored in the Player class and all the input and physics are handled in the base classes of the Player class (CarPhysics and ChaseCamera). The Player class also makes use of all the game variables. Most variables are displayed in the UI like the current game time on the in-game HUD and they are updated in the HandleGameLogic method of the Player class.
All the Render methods, even the in-game HUD, are located in the UIRenderer helper class for any UI rendering code and the rest is handled and rendered in the landscape and model classes; even the shadow mapping is mostly done there. All the rendering and game handling is called from here, so this class gives you a good overview of what happens in the game. If you write a game modification, start modifying code here. Comment out code here or in the called methods to quickly see what part of the game is affected by that change.
The first part of the Render method handles all the shadow mapping rendering, which is not very complex because most of it is handled in the landscape class. You just give the data to the shadow mapping class, which renders everything into the shadow map that can then be used directly after rendering the 3D objects to shadow the 3D scene.
/// <summary> /// Render game screen. Called each frame. /// </summary> public bool Render() { if (BaseGame.AllowShadowMapping) { // Generate shadows ShaderEffect.shadowMapping.GenerateShadows( delegate { RacingGame.Landscape.GenerateShadow(); RacingGame.CarModel.GenerateShadow( RacingGame.Player.CarRenderMatrix); }); // Render shadows ShaderEffect.shadowMapping.RenderShadows( delegate { RacingGame.Landscape.UseShadow(); RacingGame.CarModel.UseShadow( RacingGame.Player.CarRenderMatrix); }); } // if (BaseGame.AllowShadowMapping) Then the post-screen glow shader is started and all the 3D game content is rendered. This includes the sky cube map, landscape with the track and all 3D models, and finally the car.
// This starts both menu and in game post screen shader! BaseGame.UI.PostScreenGlowShader.Start(); // Render background sky and lensflare. BaseGame.UI.RenderGameBackground(); // Render landscape with track and all objects RacingGame.Landscape.Render(); // Render car with matrix we got from CarPhysics RacingGame.CarModel.RenderCar( RacingGame.currentCarNumber, RacingGame.CarColor, RacingGame.Player.CarRenderMatrix); // And flush all models to be rendered BaseGame.MeshRenderManager.Render(); After the MeshRenderManager has rendered all 3D models you can add the shadow mapping effect to the 3D scene. The order of the calls here is important because if the 3D models are not rendered before showing the shadows, the shadows will not have the correct effect on them or will not work at all.
// Show shadows we calculated above if (BaseGame.AllowShadowMapping) { ShaderEffect.shadowMapping.ShowShadows(); } // if (BaseGame.AllowShadowMapping) // Apply post screen shader here before doing the UI BaseGame.UI.PostScreenGlowShader.Show(); And finally the code for the UI in the game; if you want to get rid of it or change the HUD, here is the place for doing that.
// Play motor sound Sound.UpdateGearSound(RacingGame.Player.Speed, RacingGame.Player.Acceleration); // Show on screen UI for the game. BaseGame.UI.RenderGameUI( (int)RacingGame.Player.GameTimeMiliseconds, // Best time and current lap (int)RacingGame.Player.BestTimeMs, RacingGame.Player.CurrentLap+1, RacingGame.Player.Speed * CarPhysics.MeterPerSecToMph, // Gear logic with sound (could be improved ^^) 1+(int)(5*RacingGame.Player.Speed/CarPhysics.MaxSpeed), // Motormeter 0.5f*RacingGame.Player.Speed/CarPhysics.MaxSpeed + // This could be improved 0.5f*RacingGame.Player.Acceleration, RacingGame.Landscape.CurrentTrackName, Highscore.GetTop5Highscores()); if (Input.KeyboardEscapeJustPressed || Input.GamePadBackJustPressed) { // Stop motor sound Sound.StopGearSound(); // Play menu music again Sound.Play(Sound.Sounds.MenuMusic); // Return to menu return true; } // if (Input.KeyboardEscapeJustPressed) return false; } // Render()
Highscores
The Highscores screen (see Figure 14-11) is very similar to the highscores of Rocket Commander, but all the online highscores are missing because no network code or web services were implemented yet. Again, the reason for that is the lack of network support in XNA, but it would be possible to implement that just for the PC version.
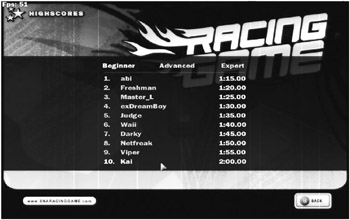
Figure 14-11
There are a couple of helper methods in the Highscore class that, for example, help you to determine the current rank in the game while the player is getting points for driving around the track, but most of these methods were already used in earlier games of this book.
The following code is used to render the top 10 highscore players on the screen. You will notice that the code is pretty simple thanks to the many helper methods in the UIRenderer class. If you just want to test the highscore game screen please use the unit test inside the class, which was used to position all the UI elements for this game screen in the same way it was done for most other game screens too. I also cheated a bit and used TestDriven.NET in Visual Studio 2005 and the new cool feature to re-run tests with a hotkey. This way I could practically code, press the hotkey, say “oh no,” press Escape, and fix the code until the class worked perfectly. In a matter of minutes most UI code was programmed this way.
// Go through all highscores for (int num = 0; num < NumOfHighscores; num++) { // Show player in white if mouse is over line or else use gray color Rectangle lineRect = new Rectangle( 0, yPos, BaseGame.Width, lineHeight); Color col = Input.MouseInBox(lineRect) ? Color.White : new Color(200, 200, 200); // Fill in text for this line BaseGame.UI.WriteText(xPos1, yPos, (1 + num) + ".", col); BaseGame.UI.WriteText(xPos2, yPos, highscores[selectedLevel, num].name, col); BaseGame.UI.WriteGameTime(xPos3, yPos, highscores[selectedLevel, num].timeMs, Color.Yellow); yPos += lineHeight; } // for (num) The other game screen classes that are left are Options, Help, and Credits. They are all pretty similar to the highscore class and not really exciting. Options has some nice UI features and allows you to enter text with the help of the Input class and to select one of multiple sliders and drag them around with either the mouse or a gamepad. Use the unit test in the Options class to learn more about the features in this class. Both the Help and the Credit classes just display a texture on the screen, very similar to the SplashScreen class you saw earlier.
Finally the exit button quits the game because there will be no other game screens left after the main menu is closed. All other game screens always return to the main menu (even the SplashScreen class).
EAN: 2147483647
Pages: 138