Final Unit Testing and Tweaking
You now have all classes together for the game, but you are not done quite yet. We talked a few times about the Player class, but you never saw it called. The reason for this is the fact that XNA separates the update and drawing code. If you look at the Update method of the RacingGame class, you can finally see the call to the Player Update method:
/// <summary> /// Update racing game /// </summary> protected override void Update(GameTime time) { // Update game engine base.Update(time); // Update player and game logic player.Update(); } // Update() If you take a look inside the Player class, you might wonder why it is so simple. The Update method does not do much here; it only handles some additional game logic. In the Rocket Commander game the Player class handled almost the whole game logic and input together with the SpaceCamera class. The game logic in the racing game seems to be much simpler thanks to the separation of all the game logic code into four different classes, which are all connected to each other (see Figure 14-12).
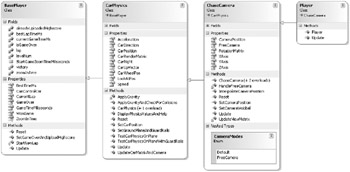
Figure 14-12
-
BasePlayer - This is the basic game logic class for the game; it holds all the important variables and helper properties to see if the game is over, how long you played, and if you won the game. The whole purpose of this class is to give the derived classes an easy way to access these data because you are not able to control the car anymore if the game is over or the game has not even started yet, because you are still zooming in. Though the BasePlayer class does provide almost everything you need externally (and internally) to know about the current game state, it does not handle much of it. The class will only update the timers; all the rest of the game logic is handled in the derived classes!
/// <summary> /// Update game logic, called every frame. In Rocket Commander we did /// all the game logic in one big method inside the player class, but it /// was hard to add new game logic and many small things were also in /// the GameAsteroidManager. For this game we split everything up into /// many more classes and every class handles only its own variables. /// For example this class just handles the game time and zoom in time, /// for the car speed and physics just go into the CarController class. /// </summary> public virtual void Update() { // Handle zoomInTime at the beginning of a game if (zoomInTime > 0) { // Handle start traffic light object (red, yellow, green!) RacingGame.Landscape.ReplaceStartLightObject( 2-(int)(zoomInTime/1000)); zoomInTime -= BaseGame.ElapsedTimeThisFrameInMs; if (zoomInTime < 0) zoomInTime = 0; } // if (zoomInTime) // Don't handle any more game logic if game is over or still zooming // in. if (CanControlCar == false) return; // Increase game time currentGameTimeMs += BaseGame.ElapsedTimeThisFrameInMs; } // Update() -
CarPhysics - This class was already discussed in the previous chapter. It is derived from the BasePlayer class and adds all the physics calculations to the car and the rest of the game. While the Update method updates the internal car values like the direction, position, up vector, the car speed and acceleration, most of the actual physics calculation is done in several helper methods like in the ApplyGravity, ApplyGravityAndCheckForCollisions, and SetGroundPlaneAndGuardRails methods. To get a car matrix for rendering the car and updating the basic look at position for the camera the UpdateCarMatrixAndCamera helper method is used.
For testing the physics in general you should use the two unit tests TestCarPhysicsOnPlane and TestCarPhysicsOnPlaneWithGuardRails in this class, especially if you want to change some of the many constants defined in this class like the car mass, maximum speed, maximum rotation, or acceleration values.
You can find more information about this class in Chapter 13.
-
ChaseCamera is similar to the SpaceCamera class of the Rocket Commander game or the SimpleCamera class of XNA Shooter. The class is not very complex and it does not have to be because it is derived from the CarPhysics class, which provides you with almost everything you need. It supports two camera modes: Default for the game and the menu and FreeCamera, which is mostly used for unit tests.
The view matrix of the BaseGame class is updated here every frame and if you need access to the camera position or the rotation matrix or a rotation axis, this is the place to look. You probably will not need this class very often because most the important game information like the current car position or game time can be accessed through the properties of the BasePlayer and the CarPhysics classes.
-
And finally there is the Player class, which is derived from the ChaseCamera class and finally combines all the features of the four classes. If you want to add additional game logic or rules, this is probably the easiest place to do that, but if you don’t change the Update methods of the base classes, you will not be able to change much of the behavior of the game. For example, to change the maximum car speed, which is handled directly in the CarPhysics class, it would be easier to change the game logic there, but if you want to add an abort condition or text message after reaching a certain check point or completing a lap, it is probably easier to add that code in the Player class.
Tweaking the Track
You now know how to change the global game logic rules, but most of the game play and levels is defined directly through the level data. As you already saw in Chapter 12 it is not easy to create the tracks and it doesn’t get any easier to import the 3D track data into the game because you need to do the following things (see also Figure 14-13):
-
You need 3D Studio Max to even open one of the tracks and change it. It will probably also work with other 3D modeling programs, but that hasn’t been tested yet. In any case as a game programmer you probably will not have these tools.
-
Next you have to use a Collada exporter in 3D Studio Max, which is not supported out of the box, and getting one for the latest 3D Studio Max version is not always a piece of cake. For example, at the time of this writing there is no working Collada exporter for 3D Studio Max 9; you would have to use 3D Studio Max 8 to export the tracks, which again is not compatible with any .max files saved in 3D Studio Max 9. You can see this is getting more complicated even just speaking about it.
-
Now you need to import the Collada track data into the game with the help of the unit tests in the TrackImporter class, which will tell you if anything goes wrong, but they don’t give you visual feedback.
-
Finally you will have to test the tracks yourself either by starting and playing the game or using one of the unit tests in the Track or TrackLine classes.
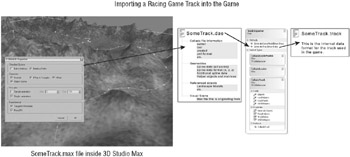
Figure 14-13
Well, this is not ideal and I will work on an in-game track editor in the future to resolve this issue. Please check the official website for updates of the game and better ways to edit tracks at http://www.xnaracinggame.com.
Currently you can also create tracks the way they are created for some of the unit tests in the TrackLine class by just defining a couple of 3D points. To “import” such a track you would just write down each of the points of this track in an array of 3D points and then use the array instead of an imported binary track. You can also create tunnels, road width helpers, and set landscape models, but beyond some unit tests this is not the way to go.
The TestRenderingTrack unit test shows how to initialize the TrackLine class with a custom array of vectors to create a track. If you just want to quickly play around with some track ideas you might have, I suggest using this unit test first.
/// <summary> /// Test rendering track /// </summary> public static void TestRenderingTrack() { TrackLine testTrack = new TrackLine( new Vector3[] { new Vector3(20, 0, 0), new Vector3(20, 10, 5), new Vector3(20, 20, 10), new Vector3(10, 25, 10), new Vector3(5, 30, 10), new Vector3(-5, 30, 10), new Vector3(-10, 25, 10), new Vector3(-20, 20, 10), new Vector3(-20, 10, 5), new Vector3(-20, 0, 0), new Vector3(-10, 0, 0), new Vector3(-5, 0, 0), new Vector3(7, 0, 3), new Vector3(10, 0, 10), new Vector3(7, 0, 17), new Vector3(0, 0, 20), new Vector3(-7, 0, 17), new Vector3(-10, -2, 10), new Vector3(-7, -4, 3), new Vector3(5, -6, 0), new Vector3(10, -6, 0), }); TestGame.Start( delegate { ShowGroundGrid(); ShowTrackLines(testTrack); ShowUpVectors(testTrack); }); } // TestRenderingTrack()
Shadow Mapping
The shadow mapping classes, which were discussed earlier in this chapter, are a prime candidate for tweaking. Not only are there many settings and parameters, but there are also several shaders involved, which have to be fine-tuned for both optimal performance and a good visual quality.
The main unit test that was used throughout the development of the shadow mapping techniques in the racing game is the TestShadowMapping method in the ShadowMapShader class (see Figure 14-14). If you press the Shift key (or A on the gamepad) you can see the shadow map and the two blur passes of the ShadowMapBlur shader. You can replace the car with any other 3D model if you would like to test the shadows of other 3D objects.
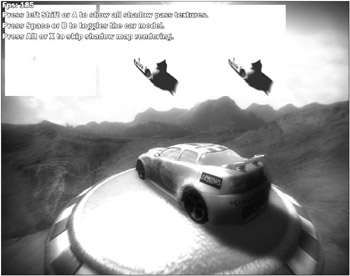
Figure 14-14
Earlier in this chapter you saw in the GameScreen class how to use the ShadowMapShader class. First of all you call GenerateShadows and RenderShadows on all objects you want to include in the shadow map generation process. Please note that both methods are rendering 3D data and you should only render what is necessary here. The data should be visible from the virtual shadow mapping light, and if the object is just receiving shadows like the plate in Figure 14-14, you don’t need to include it into the GenerateShadows method call. Just let the shadows be thrown onto it with the RenderShadows method!
if (Input.Keyboard.IsKeyUp(Keys.LeftAlt) && Input.GamePadXPressed == false) { // Generate shadows ShaderEffect.shadowMapping.GenerateShadows( delegate { RacingGame.CarModel.GenerateShadow(Matrix.CreateRotationZ(0.85f)); }); // Render shadows ShaderEffect.shadowMapping.RenderShadows( delegate { RacingGame.CarSelectionPlate.UseShadow(Matrix.CreateScale(1.5f)); RacingGame.CarModel.UseShadow(Matrix.CreateRotationZ(0.85f)); }); } // if After the shadow map has been generated you can start rendering the real 3D content. In this unit test it is basically the same code as the render delegate for RenderShadows method executes with the additional call to render the game background sky with help of the sky cube mapping shader. This way you can optimize in the actual game which object will be rendered, which ones will generate shadows, and which ones will receive shadows. If you just generate, render, and apply shadows on every single object in the scene your frame rate would go down terribly. Only about 10%–20% of the visible objects will be included in the shadow map generation in the game code, but for this unit test you just want to test out the shadow mapping on the car and the car selection plate models.
if (Input.Keyboard.IsKeyUp(Keys.LeftAlt) && Input.GamePadXPressed == false) { ShaderEffect.shadowMapping.ShowShadows(); } // if With the unit test up and running you can now tweak the shadow mapping code (after it has been written, of course). Most tweaking variables can be found directly in the ShadowMapShader class, but some of them like the shadow color for darkening shadowed areas are only defined in the ShadowMap.fx shader file and do not change once the shader is loaded.
To see the result of each shadow mapping pass press Shift on your keyboard or the A button on a connected gamepad. The most important render target is the first one, which shows the actual shadow map from the virtual shadow light position. It is displayed in teal because you use a render target surface format of R32F as discussed earlier in this chapter, which just contains the red color channel. All the other color channels are unused and will use the default values of 1.0. If the value in the shadow map is 1.0 (for the farthest possible value) you end up with a completely white color; if you get closer to 0.0 the resulting color will be teal. It is often hard to see the differences in the shadow map. To enhance the values you can multiply it with a fixed constant in the shader and zoom in by moving the virtual shadow light position closer to the look target.
The following variables and constants are the most important ones to tweak; there are a couple more things you can tweak by changing the vertex and pixel shaders in the ShadowMap.fx and PostScreenShadowBlur.fx shaders. Please note that due the limitations of pixel shader 1.1 most code for shader model 1.1 is pretty much fixed and will not be affected by most of the variables. If you still need support for shader model 1.1 and change some parameters, make sure the shader model 1.1 shader still works. It can by tested by forcing the shader model 1.1 techniques in the shader classes instead of using the techniques ending with 20, which are used for shader model 2.0.
-
virtualLightDistance and virtualVisibleRange are used to construct the virtual shadow mapping light and especially the lightViewMatrix, which is important for both the shadow map generating and when rendering the shadow map. The virtual light distance is the distance from the shadow mapping look-at position, which is always the current car position, or to be more precise, a position a little bit in front of the car to fit the actual viewing area of the player camera a little bit better. The virtual visible range describes the field of view of the shadow map matrix. It can be a lot different from the view matrix used in the game and it has nothing to do with the view matrix at all.
For example, in the XNA Shooter game a very distant virtual light position is used and a relatively small virtual visible range results in a small field of view for the shadow mapping matrix, almost orthogonal. This way the shadows are always oriented in the same way, but it gets a little bit harder to tweak a shadow map light with a distant light position. In the racing game you do not care so much about a closer virtual light distance because when driving around with your car you won’t notice the shadows in the distance so much, and the shadows on the car stay pretty much the same because the position of the car in the resulting shadow map is always the same.
-
nearPlane and farPlane are used to tweak the shadow map depth calculation a little bit. If all the shadow map values have a depth value of 20.0 to 30.0 it would not make sense to use the same near and far plane values as in the game (for example, 1.0 and 500) because the shadow map would then get only 2% of the depth buffer precision. For depth buffer values it won’t matter so much because you only run into problems if depth values overlap by overlapping geometry, which will not happen very often if the scene is well constructed.
For shadow mapping, on the other hand, you are only looking at depth values that do overlap because you need to test if each pixel in the scene is shadow mapped or not. By using a bad shadow mapping depth buffer precision the whole shadow mapping looks bad. This is also one of the main reasons there are so many other shadow algorithms available, especially stencil shadows, which is the main competitor of shadow mapping in 3D games. With stencil shadows a lot of these problems disappear, but they are often a lot harder to handle and they usually involve rendering a lot more geometry, which can slow down any game that already has a lot of polygons.
The racing game mainly uses the farPlane value, which is fairly low (30–50) and then the nearPlane is automatically generated in the shader code. Earlier versions used a nearPlane value, which was more than half of the farPlane value to improve the depth precision, but then any objects near the virtual light would be skipped from the shadow map generation process. For a better tweaked nearPlane value check out the XNA Shooter game that also uses better code for the virtual light distance and range values.
// Use farPlane/10 for the internal near plane, we don't have any // objects near the light, use this to get much better percision! float internalNearPlane = farPlane / 10; // Linear depth calculation instead of normal depth calculation. Out.depth = float2( (Out.pos.z - internalNearPlane), (farPlane - internalNearPlane)); -
texelWidth, texelHeight, and the texOffsetX and texOffsetY values are used to tell the shader about the texel sizes used for the shadow map. These values are calculated in the CalcShadowMapBiasMatrix helper method, which puts all these values into a helper matrix called texScaleBiasMatrix, which is then used by the shader to transform all shadow mapping position values to fit the shadow map better.
/// <summary> /// Calculate the texScaleBiasMatrix for converting proj screen /// coordinates in the -1..1 range to the shadow depth map /// texture coordinates. /// </summary> internal void CalcShadowMapBiasMatrix() { texelWidth = 1.0f / (float)shadowMapTexture.Width; texelHeight = 1.0f / (float)shadowMapTexture.Height; texOffsetX = 0.5f + (0.5f / (float)shadowMapTexture.Width); texOffsetY = 0.5f + (0.5f / (float)shadowMapTexture.Height); texScaleBiasMatrix = new Matrix( 0.5f * texExtraScale, 0.0f, 0.0f, 0.0f, 0.0f, -0.5f * texExtraScale, 0.0f, 0.0f, 0.0f, 0.0f, texExtraScale, 0.0f, texOffsetX, texOffsetY, 0.0f, 1.0f); } // CalcShadowMapBiasMatrix() -
The shadowColor constant in the shader is used to darken down any shadowed areas. Due to the blur effect used after the shadow map is rendered and thanks to the PCF3x3 (precision closer filtering on a 3×3 box) used in PS_UseShadowMap20 the shadow color is interpolated with the surrounding non-shadowed areas. Using completely black shadows (ShadowColor of 0, 0, 0, 0) is often the easiest solution because it fixes many shadow mapping artifacts, but it will not look good if it is bright daylight. In those cases shadowing does not darken everything down to black, there is still ambient color and occlusion lighting left in a realistic 3D scene.
// Color for shadowed areas, should be black too, but need // some alpha value (e.g. 0.5) for blending the color to black. float4 ShadowColor = { 0.25f, 0.26f, 0.27f, 1.0f }; -
depthBias and shadowMapDepthBias are probably the two shadow mapping parameters that were tweaked the most together with the actual shader code that uses them.
// Depth bias, controls how much we remove from the depth // to fix depth checking artifacts. For ps_1_1 this should // be a very high value (0.01f), for ps_2_0 it can be very low. float depthBias = 0.0025f; // Substract a very low value from shadow map depth to // move everything a little closer to the camera. // This is done when the shadow map is rendered before any // of the depth checking happens, should be a very small value. float shadowMapDepthBias = -0.0005f;The shadowMapDepthBias is added to the shadow map generation code to pull the depth values a little bit closer to the viewer.
// Pixel shader function float4 PS_GenerateShadowMap20(VB_GenerateShadowMap20 In) : COLOR { // Just set the interpolated depth value. float ret = (In.depth.x/In.depth.y) + shadowMapDepthBias; return ret; } // PS_GenerateShadowMap20(.)The depthBias value is a little bit more important because it is used in the shadow depth comparison code of the UseShadowMap20 technique. Without the depthBias most shadow mapping pixels that are not really shadowed, but are both used to generate and to receive shadows, have such similar values that they often pop in and out of the shadow map comparisons due to depth map precision errors (see Figure 14-15). Please note that the shadow map blur effect hides these artifacts, but the stronger they are, they more apparent they get and even with a good blur code applied to the shadow map result, it will look wrong in the game, especially when moving the camera around.
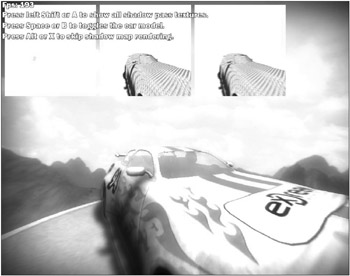
Figure 14-15
/ Advanced pixel shader for shadow depth calculations in ps 2.0. // However this shader looks blocky like PCF3x3 and should be smoothend // out by a good post screen blur filter. This advanced shader does a // good job faking the penumbra and can look very good when adjusted // carefully. float4 PS_UseShadowMap20(VB_UseShadowMap20 In) : COLOR { float depth = (In.depth.x/In.depth.y) - depthBias; float2 shadowTex = (In.shadowTexCoord.xy / In.shadowTexCoord.w) shadowMapTexelSize / 2.0f; float resultDepth = 0; for (int i=0; i<10; i++) resultDepth += depth > tex2D(ShadowMapSampler20, shadowTex+FilterTaps[i]*shadowMapTexelSize) ? 1.0f/10.0f : 0.0f; // Multiply the result by the shadowDistanceFadeoutTexture, which // fades shadows in and out at the max. shadow distances resultDepth *= tex2D(shadowDistanceFadeoutTextureSampler, shadowTex).r; // We can skip this if its too far away anway (else very far away // landscape parts will be darkenend) if (depth > 1) return 0; else // And apply shadow color return lerp(1, ShadowColor, resultDepth); } // PS_UseShadowMap20(VB_UseShadowMap20 In) There are probably a lot more things we could discuss about the shadow mapping techniques used in the game and possible improvements like using better code to construct the virtual light matrices and tweaking certain parameters even better. You did see some of the most important shader code for the shadow mapping, but there are a lot more tricks in the shader code. Additionally there are so many shadow mapping techniques and tricks that can be used today, it would probably fill up another book.
Two of the most exciting shadow map techniques today are the perspective shadow mapping light matrix generation techniques (there are many different variations of it; I wrote some perspective shadow mapping code a year ago and played around with it for some time, but it is really hard to tweak and fine-tune, especially if your game allows many different perspectives). The other exciting technique is variance shadow mapping, which uses two shadow maps instead of one (or two channels) and allows storing much higher precision values this way. I did not have much time to play around with variance shadow mapping and it is a fairly new technique, but early tests showed that you can gain a lot of speed and save memory bandwidth due to much smaller shadow mapping sizes (512×512 looks as good as a 2048×2048 traditional shadow map) and it fixes quite a lot of the shadow mapping problems and artifacts. But again, there are always problems with shadow mapping; some programmers like the famous John Carmack from id Software dislike it so much, they’d rather implement the more complicated stencil shadows and fight with their issues instead of using shadow mapping.
Final Testing on Windows
Well, with all that great code lying around some game testing can now be done. Before you start the game and drive around the track trying to beat the highscores, you should make sure that you have checked out most of the unit tests of the game engine (see Figure 14-16).
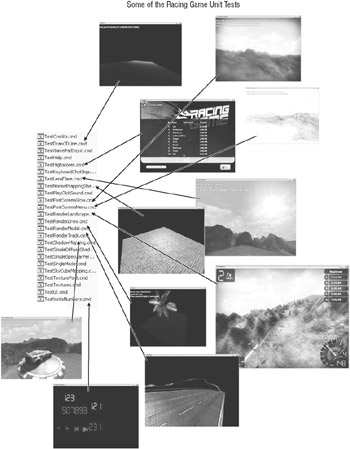
Figure 14-16
If you use the unit tests before even testing out the game you don’t have to test any issues with shadow mapping, the physics, the menu, and so on directly in the game. You are going to solve all issues with unit tests instead until they work fine. Then the game will magically run very nicely in the end without you ever testing the game itself; all you did was test smaller unit tests.
Often there are improvements that can be made to the game or you might want to tweak something directly in the game code. You will find yourself tweaking the game code and fixing bugs in the final testing phase of the game, but you should make sure that you don’t spend more time always starting the game and testing the issues. For example, if you encounter a bug in some physics calculation or you want to tweak some of the shadow mapping values, you should either use an existing unit test or write a new unit test for the specific issue if it is easier than constantly restarting the game with all its content and submenus. It often just takes a couple of clicks and waiting for the loading and screen transitions, but even that can slow you down.
One common trick I always use at the final stage of any game development project is to change the game screen initialization code. This way I end up directly in the game instead of the menu where I might have to set some options first, then select a level and start a custom game. There is no point in doing that over and over again if all you want to test is some issue inside the game itself.
// Create main menu at our main entry point gameScreens.Push(new MainMenu()); // But start with splash screen, if user clicks or presses Start, // we are back in the main menu. gameScreens.Push(new SplashScreen()); #if DEBUG //tst: Directly start the game and load a certain level, this code is // only used in the debug mode. Remove it when you are done with // testing! If you press Esc you will also quit the game and not // just end up in the menu again. gameScreens.Clear(); gameScreens.Push(new GameScreen()); #endif Because all unit tests should only work in the debug mode and you are not even adding the NUnitFramework.dll assembly in the release mode, you should make sure the game runs fine in the release mode too. Sometimes you also get a little better performance in the release mode, but since most of the performance critical code is probably going to happen inside the XNA Framework, your code will not care if it is run in debug or release mode if it is optimized good enough anyway.
Figure 14-17 shows the racing game in action. There are still things to tweak, but the game runs good and has a good frame rate even in the highest resolution possible on the Xbox 360 (1080p, which is 1920×1050). The final fine-tuning, level design, and game testing took an extra week of work, but that was a lot of fun. It is always good to let the game be played by some people you know, maybe even ones that are not really fans of your game genre. Also make sure the game can be installed easily. No one wants to compile the game himself and find out which assemblies are used the hard way through exceptions. Your installer should contain the compiled game and it should check which frameworks are not installed on a target machine and preferably install them itself. Your game probably needs just the .NET Framework 2.0 (about 30 MB), the latest DirectX version (about 50 MB), and the XNA Framework Redistributables (just 2 MB). On the Xbox 360 there is currently no deployment method available other than compiling the source code and deploying it with XNA Game Studio Express. For the installer used for this game I chose NSIS (Nullsoft Installer Script), which allowed me to build the installer in a way that downloads and installs all these frameworks automatically if the user does not have them installed. After that the game can be started and you can play a while and have fun while trying to get the best highscores.
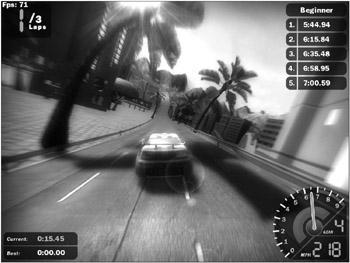
Figure 14-17
Final Testing on the Xbox 360
You obviously want your game to run on the Xbox 360 as well and the Racing Game was mainly developed especially for the Xbox 360 platform, because it makes sense to have a racing game on a console, especially if you have a wheel controller like I do.
As I mentioned so many times before all the unit tests you write should be tested on both Windows and the Xbox 360 platform, but you will probably forget that from time to time and then at the end of the project when the final test on the Xbox 360 is due you find out that the shadow mapping is not working the same way as on the PC, for example. Well, time to pull out those unit tests (see Figure 14-16) again and test them on the Xbox 360, one by one, until you find a problem.
Because the racing game was the first project I ever did for the Xbox 360 I made quite a few mistakes that I found out about the first time I was able to run it on the Xbox 360 (the first beta of XNA in August did not support the Xbox 360 platform yet, so I was only able to test XNA on the PC for a while). The two major issues were the screen layout in the game and the menu, which did not fit well on all certain TV monitor configurations on the Xbox 360 (we already talked about that earlier in this book) and certain issues with render targets on the Xbox 360, which behave quite differently from the PC.
One of the hardest parts was to get the shadow mapping right on the Xbox 360. There were several issues with resolving the render targets and I used some tricks that are neither allowed nor possible on the Xbox 360, like using several render targets at the same time and reusing the back buffer information after rendering some render targets.
Here is some text from a blog entry from my blog at http://abi.exdream.com early in November 2006 when I talked about this issue while I was visiting the XNA Team in the USA:
| Important | Today I worked a lot with the Xbox 360 side of XNA. In the earlier builds I had a lot of problems with testing my starter kit on the Xbox 360, but most of these issues are resolved now. About 99% works the same on the Windows and Xbox 360 platforms, but if you hit that 1% it does still get you angry and pushing your head into the wall. For example a couple of the more advanced shadow mapping shaders work fine on the windows platform, but all kinds of crazy things happen on the Xbox 360, the game crashes, you see black bars all over the screen or the output is just not right. If you are like me and have not worked with the Xbox 360 before, I can tell you that it is not easy getting used to the way the console uses render targets. You have to resolve them with a little helper method in XNA (or in the Xbox 360 SDK) to get the contents copied over to your texture. This is not required on windows. But even if you take care of that the shaders might behave a little different. For example most of my post screen shaders use the background buffer to mix results and sometimes mix them together several times. This works fine on the windows platform and behaves the same way as it does in DirectX. But after some discussion with Tom Miller, Matt and Mitch Walker from the XNA Team and debugging a little, it was clear that the background buffer can have garbage data after rendering into render targets. This was very bad for one of the shaders because it requires 2 separate images over several passes and then blends them together at the last pass. I used the back buffer to hold one of them and a render target for the other, but that had to be changed in order to run correctly on the Xbox 360. Good thing this was just one shader, in my bigger game engine I have over 100 shaders and it would not be fun to rethink all of the post screen shaders ^^ |
Figure 14-18 shows the repositioning code required to make the game look ok on TV monitors attached to the Xbox 360. Because you cannot know what kind of monitor is attached and how much is visible you can end up displaying more or less of the screen borders, but the values used here look good on all systems I’ve tested the game on.
The safe region (90% visible) is shown as the red border, but even if you see 100% of the screen, the game looks still fine. If your TV set is worse and goes below the 90% visibility you will still see all the important information, but some texts might be cut off.
The following code is used to push the UI elements more into the center than for the PC version, which shows all HUD elements near the screen border:
// More distance to the screen borders on the Xbox 360 to fit better // into the safe region. Calculate all rectangles for each platform, // then they will be used the same way on both platforms. #if XBOX360 // Draw all boxes and background stuff Rectangle lapsRect = BaseGame.CalcRectangle1600( 60, 46, LapsGfxRect.Width, LapsGfxRect.Height); ingame.RenderOnScreen(lapsRect, LapsGfxRect, baseUIColor); Rectangle timesRect = BaseGame.CalcRectangle1600( 60, 46, CurrentAndBestGfxRect.Width, CurrentAndBestGfxRect.Height); timesRect.Y = BaseGame.Height-timesRect.Bottom; ingame.RenderOnScreen(timesRect, CurrentAndBestGfxRect, baseUIColor); // [etc.] 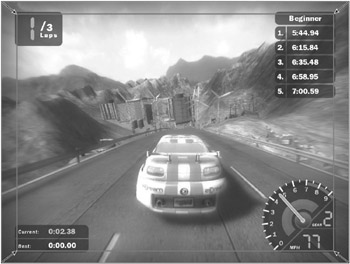
Figure 14-18
EAN: 2147483647
Pages: 138